Water Leaks onto Headliner #99-T-35A - (Dec 18, 2002)
Water Leaks onto Headliner (Inspect and/or Repair Sunroof Module Drain Hoses,
Open End of Front Drain Hose Grommets, and/or Reseal Various Locations on Sunroof
Module) Due to changes under MODELS AFFECTED and PROCEDURE, this bulletin is being
revised and supersedes bulletins 99-T- 35 and 98- T- 48, which should both be discarded.1996 -- 2001 Saturn S-Series Sedans and 1997 -- 2001 Saturn S-Series
Coupes with sunroof option (RPO CF5)
Condition
Water leaks onto headliner, causing possible water stain on headliner.
Cause
- Sunroof front and/or rear drain hose connections loose at sunroof module.
- Front drain hose pinched by roof panel attachment bolts and/or rear drain
hose kinked due to assembly of the grommet to the hose on vehicles built before and
including VIN WZ246268.
- Grommets at lower end of sunroof module front drain hoses may be obstructed
by debris and/or be too restrictive on vehicles built before and including VIN XZ301802.
- Void(s) in body seam sealer used at various locations on sunroof module.
Correction
Follow the procedures in this bulletin to diagnose and repair water leak(s)
as required.
Procedures
General Diagnostic Information -- All Models
Important
Before removing any vehicle components, thoroughly water test vehicle to determine
if leak is originating at any of the follow areas:
- Front windshield
- Rear glass
- Door openings
Important
If customer reports vehicle is parked on an incline when water leak occurs,
all water leak diagnosis should include raising end of vehicle that is "up" when customer
parks on an incline. Raise one end of vehicle to simulate incline under which water
leak occurs.
- Refer to "Windows/Waterleak Customer Diagnosis Form," in the General Information
section of the Body/Repair service manual (1996-1999) or Windnoise/Waterleaks/Apperance
section of the Body/Electrical Volume I service manual (2000-2001) and fill
out the Customer Comment Worksheet.
- Remove headliner.
- On 1996 -- 1999 model year vehicles, refer to "Headliner --
Coupe" or Headliner -- Sedan" remove procedure in the Vehicle Interior Systems
section of the appropriate model year S-Series Body/Electrical Volume II Service Manual.
- On 2000 -- 2001 model year vehicles, refer to "headliner --
Coupe" or Headliner -- Sedan" removal procedure in the Interior Trim section
of the appropriate model year S-Series Body/Electrical Volume II Service Manual.
- Water test vehicle in the water leak location described by the customer.
(Refer to "Waterleaks in the General Information section of the appropriate model
year Body/Repair service manual [1996-1999] or Windnoise/Waterleaks/Apperance
section of Body/Electrical Vol. I service manual [2000-2001].
- If water leak occurs in front
area of sunroof
module, refer to "Sunroof Drain Hose Clamps," "Sunroof Housing Front Drain Hoses,"
Sunroof Module Front Drain Hose Grommets," and Reseal Front of Sunroof Module" in
this bulletin.
- If water leak occurs in rear
area of sunroof
module, refer to "Sunroof Drain Hose Clamps," "Sunroof Housing Rear Drain Hoses,"
and Reseal Rear of Sunroof Module" in this bulletin.
- If water leak occurs in any area(s) other that the headliner, refer to
"Diagnosis and Repair" under Water Leaks in the General Information section of the
appropriate model year Body/Repair service manual.
- Once water leak had been repaired, install headliner.
- On 1996 -- 1999 model year vehicle, refer to "Headliner -- Coupe"
or "Headliner -- Sedan" installation procedure in the Vehicle Interior Systems
section of the appropriate model year Body/Repair service manual.
- On 2000 -- 2001 model year vehicles, refer to "Headliner --
Coupe" or Headliner -- Sedan" installation procedure in the Interior Trim section
of the appropriate model year S-Series Body/Electrical Volume II Service Manual.
Sunroof Module Drain Hose Clamps -- All Models
A water leak at sunroof module drain hose locations where they attach to sunroof
module can be identified by watching around edges of sunroof module from inside vehicle
while water test stand is running. Allow ample time when water testing for water leak
to occur.
- If water leaks between the hose and sunroof module drain, refer to the
following procedure.
- If water is not leaking between hose and sunroof module drain, refer to
the other procedure in this bulletin.
- Inspect for clamps on all drain hoses of sunroof module.
- If sunroof module drain hose clamps are present, tighten clamps and retest
for water leak.
- If sunroof module drain hose clamps are not present, continue to next
step.
- Remove all drain hoses from sunroof module.
- Fed sunroof module drain hose clamps (P/N 01626260) onto hoses.
- Push hoses back onto sunroof module so that they fully seat.
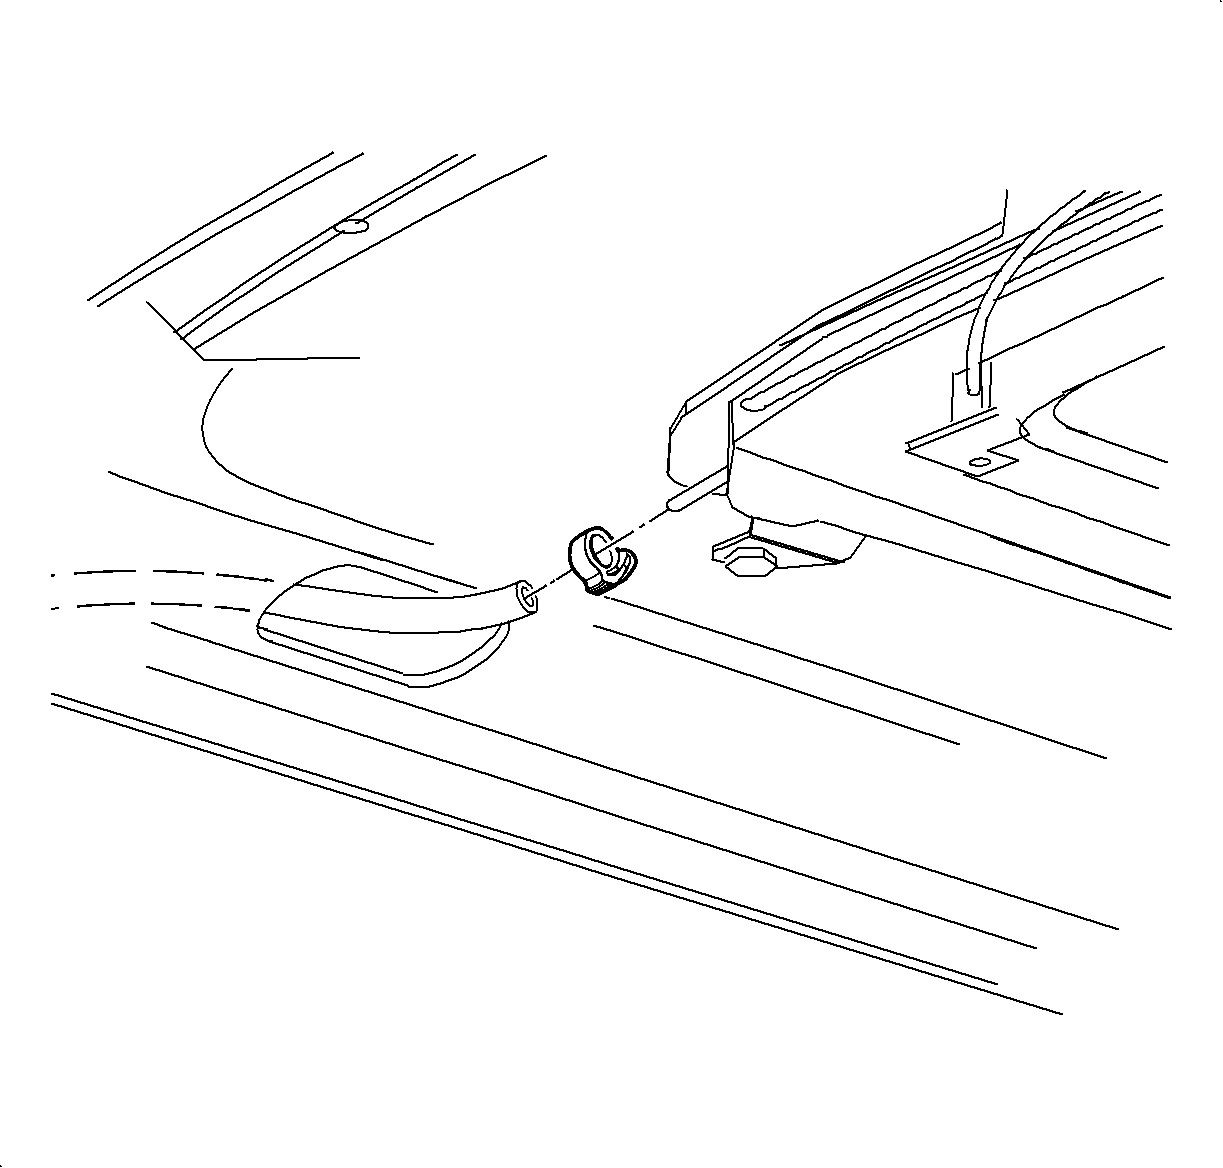

- Tighten clamps. Left front shown. Others similar.
- Water test vehicle in sunroof module area.
Sunroof Module Front Drain Hoses -- All Models
Most likely cause of an obstruction may be the front sunroof housing drain hose(s)
pinched by the cockpit attachment bolts during assembly.
- Open sunroof glass to the full open position.
- Using a standard measuring cup, pour two cups of water directly into the
sunroof housing front drain hole. The water should be able to be poured into the sunroof
housing front drain hole in under 60 -- 80 seconds without water collecting along
the sunroof using drain channel and spilling over into the vehicle. Repeat this procedure
for the other sunroof housing front drain hole.
- If waters pours through each sunroof housing front drain hole in under
60 -- 80 seconds, refer to the other procedures in this bulletin.
- If water does not pour through each sunroof housing drain hole in under
60 -- 80 seconds, proceed to the next step.
- Using a standard air gun, limited to 207kPa (30 psi), blow into the sunroof
housing front drain hole(s) with the obstruction and attempt to clear the obstruction.
- Water test again, using a standard measuring cup, pour two cups of water
directly into the sunroof housing front drain hole that was obstructed. The water
should be able to be poured into the sunroof housing front drain hole in under 60
-- 80 seconds without water collecting along the sunroof housing drain channel
and spilling over into the vehicle. Repeat this procedure for the other sunroof housing
front drain hole if it was also obstructed.
- If water pours through the sunroof housing front drain hole(s) in under
60 -- 80 seconds, obstruction has been removed.
- If water still does not pour through each sunroof housing front drain
hole in under 60 -- 80 seconds, proceed to the next step.
- Replace sunroof housing front drain hose(s) with new sunroof housing front
drain hose(s) and new sunroof housing drain hose clamp(s).
- On 1996 -- 1999 model year vehicles, refer to "Front Drain Hose Grommet"
in the Vehicle Interior Systems section of the appropriate model year Body/Repair
Service Manual.
- For 2000 -- 2001 model year vehicles, refer to "Front Drain Hose
Grommet" om the Sunroof section of the appropriate model year S-Series Body/Electrical
Volume II Service Manual.
- Water test vehicle in sunroof module area.
Sunroof Module Front Drain Hose Grommets -- All Models
The grommets at bottom ends of sunroof module front drain hoses
can be obstructed by debris, or they may be too restrictive to allow water to pass
freely through them. To open up ends of sunroof module front drain hose grommets,
use the following procedure.
- Remove hinge pillar garnish/sill molding.
- Starting at the rear of molding, pull firmly at clip locations.
- Use a large flat blade screwdriver to reach top clip location and release
clip.
- Partially remove insulators in hinge pillar to expose lower end of sunroof
module front drain hose grommet.
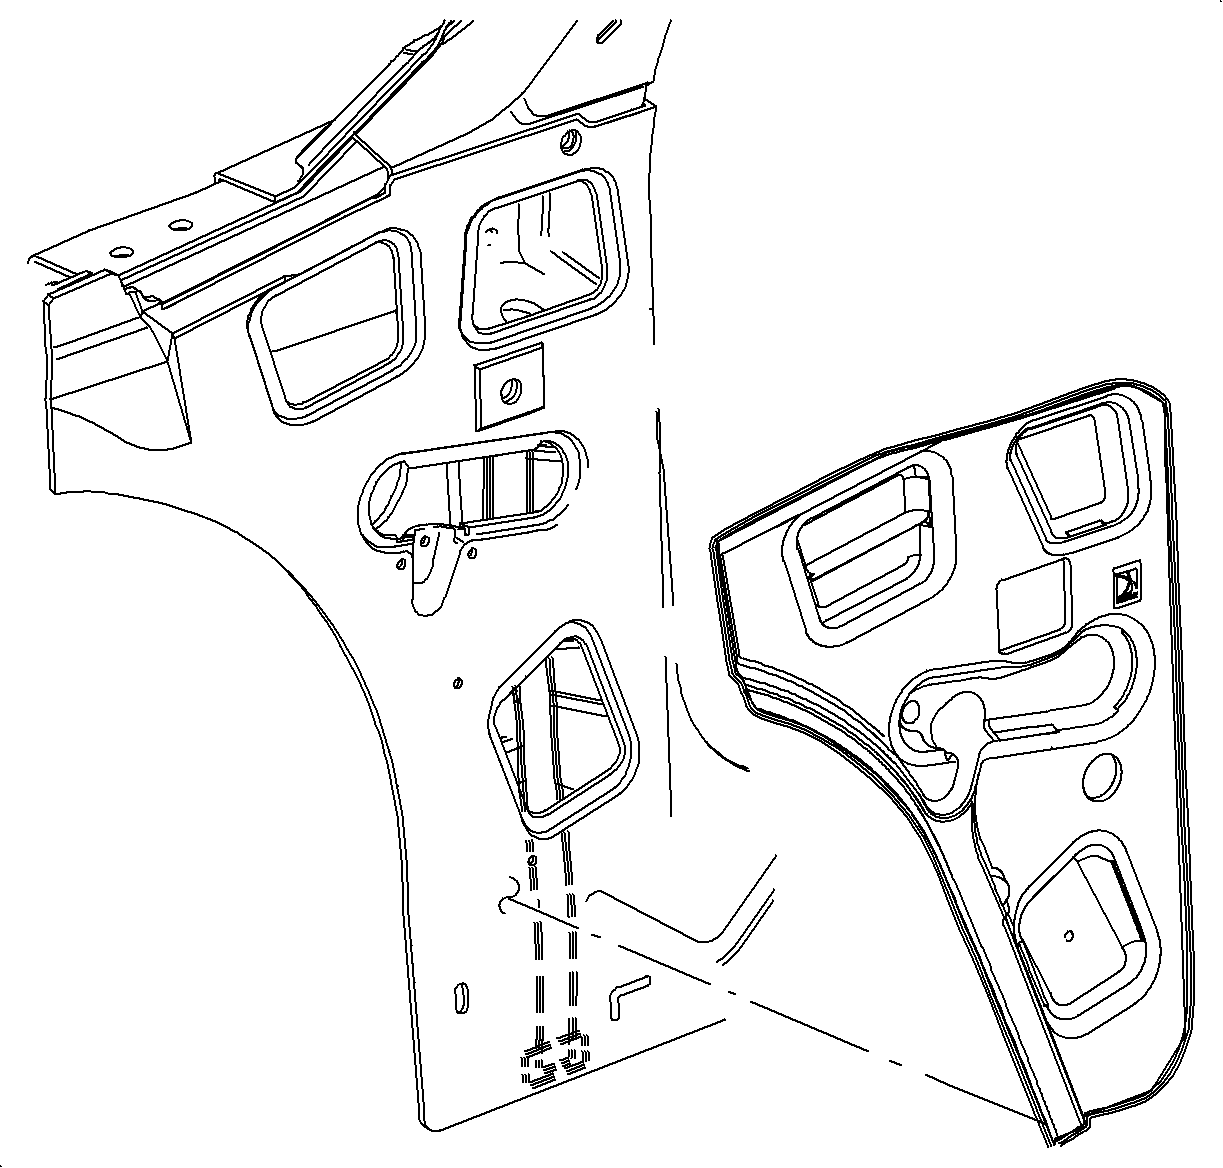

- Pull lower end of sunroof module drain hose with
grommet attached through lower access hole in hinge pillar.
- Pull grommet off end of sunroof module drain hose. Do not pull on the
drain hose. Right side shown. Left side similar.
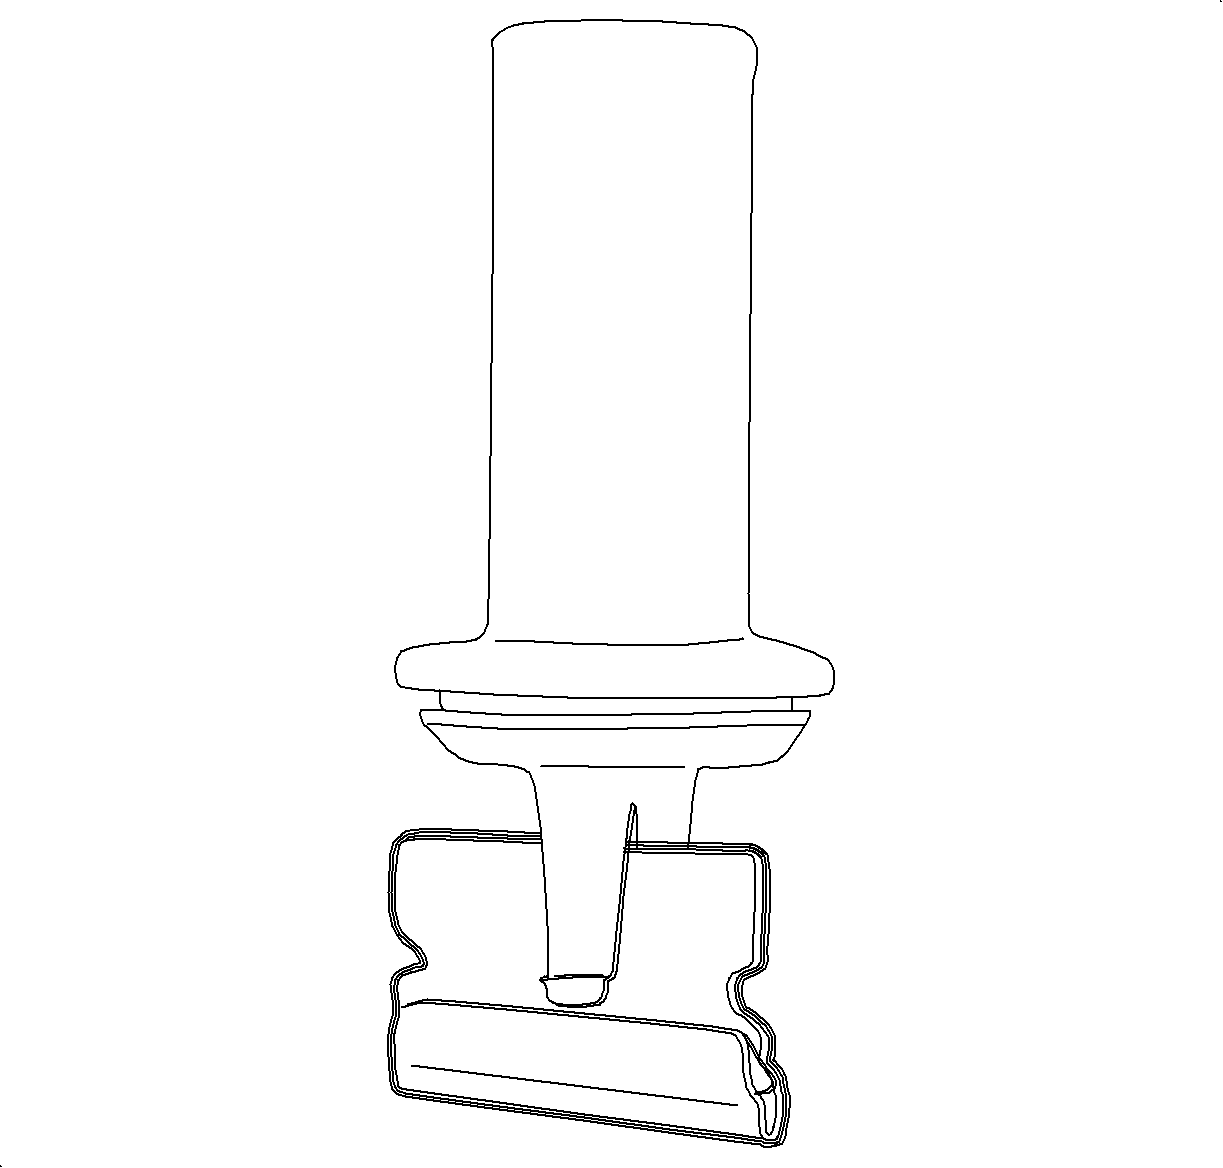

- Once grommet is removed, extend side slits on
end of grommet all the way through the bottom as show is illustration. Do not remove
any material from grommet.
- Install grommet to end of drain hose, seat grommet and drain hose in rocker
panel through hole in hinge pillar.
- Install hinge pillar garnish/sill molding.
- Start at the top clip and work towards the rear of the vehicle.
- Install garnish molding by snapping molding and clips into clip locations.
- Water test vehicle in sunroof module area.
Reseal Front of Sunroof Module -- All Models
Important
Forcing butyl sealer through the drive cable tube holes in the module will restrict
the water drainage system of the sunroof module.
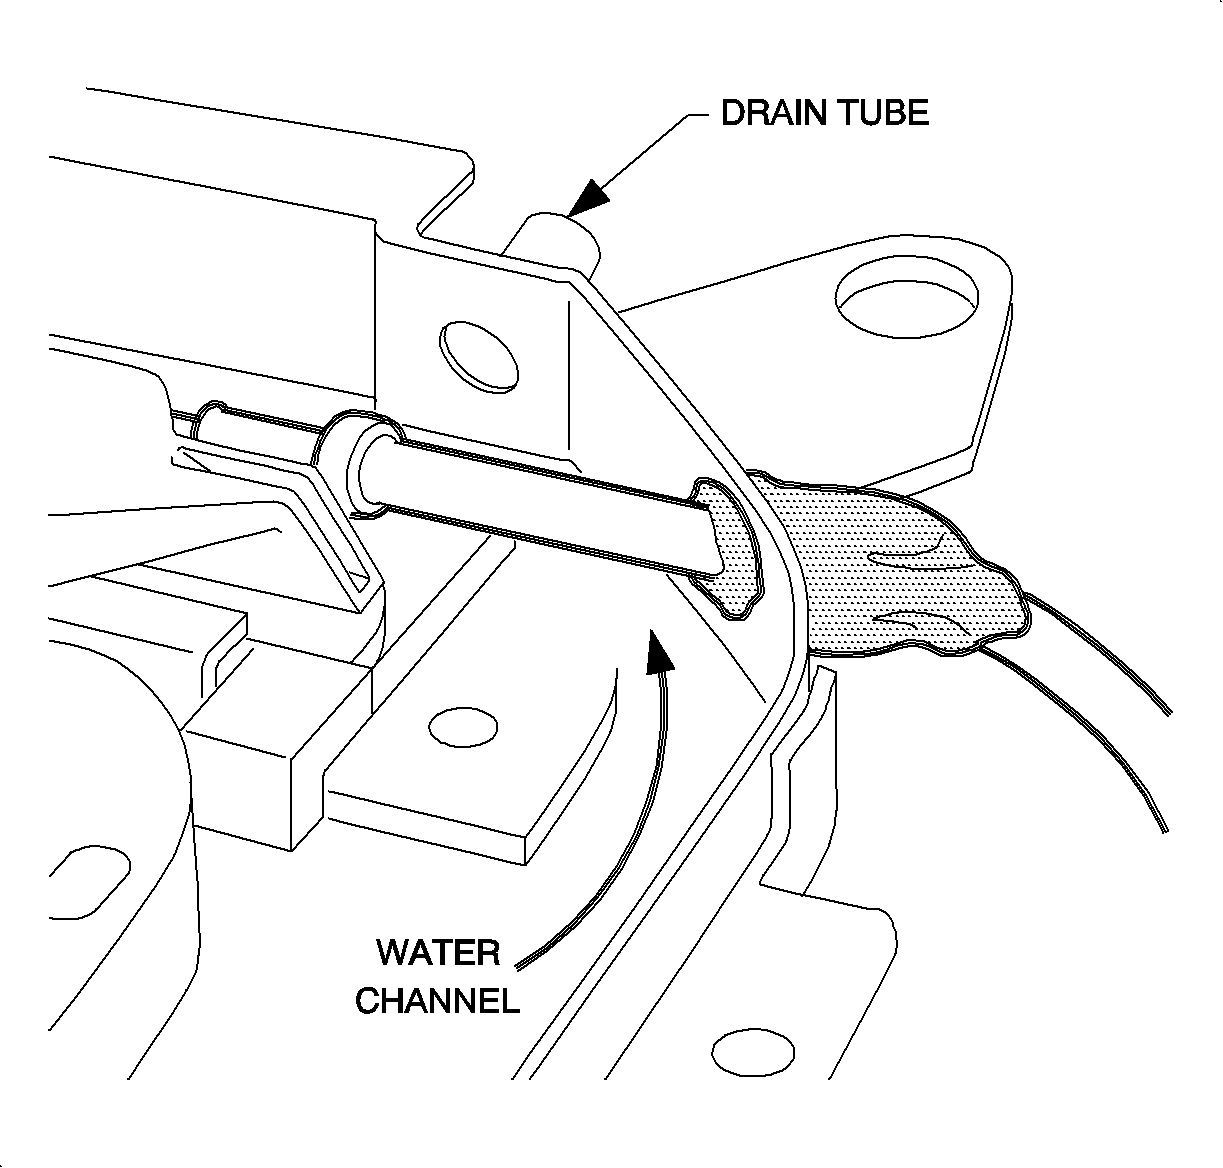

- Inspect butyl sealer placed around copper drive
cable tubes as they exit the front of the module for water leaks. If the eater leak
occurs from this area, apply Kent Industries Seal n' Caulk (P/N 10310), or equivalent,
as needed until the leak is corrected.
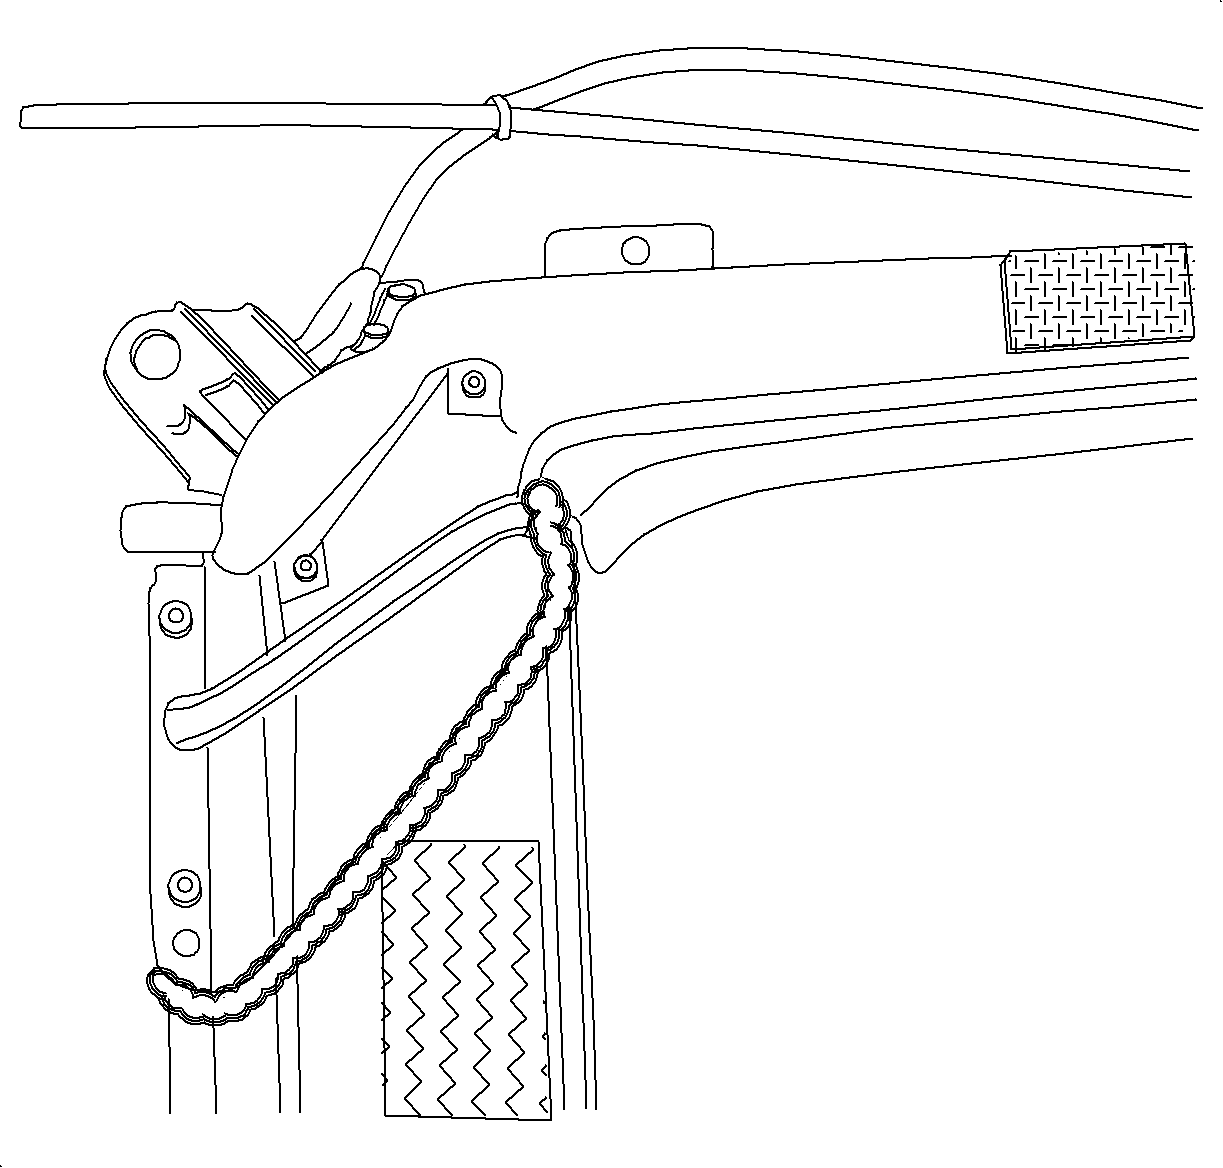

- Inspect for leakage where the sides of the sunroof
module are joined to the front of the module. Inspect for cracked module. If no cracks
are present, apply a bead of Kent Industries HIGH TECH Seam Sealer (P/N 10070), or
equivalent, as shown in the illustration. If cracks are present, replace module.
- Water test vehicle in sunroof module area.
Rear Sunroof Module Drain Hoses -- Sedan
- Remove roof rear panel assemblies (rear roof appliques) from the left
and right side of vehicle.
- On 1996 -- 1999 model year vehicle, refer to "Panel -- Roof
Rear Outer -- Sedan" in the Roof Rocker Panels and attaching Components section
of the appropriate model year S-Series Body/Electrical Volume I Service Manual.
- On 2000 -- 2001 model year vehicles, refer to "Panel -- Roof
Rear Outer -- Sedan" in the Roof and Rockers section of the appropriate model
year S-Series Body/Electrical Volume I Service Manual.
- Remove the quarter outer panel hole plugs on the left and right side of
the vehicle. (Quarter outer panel hole plugs are located under the rear of the roof
rear panel assembly.)
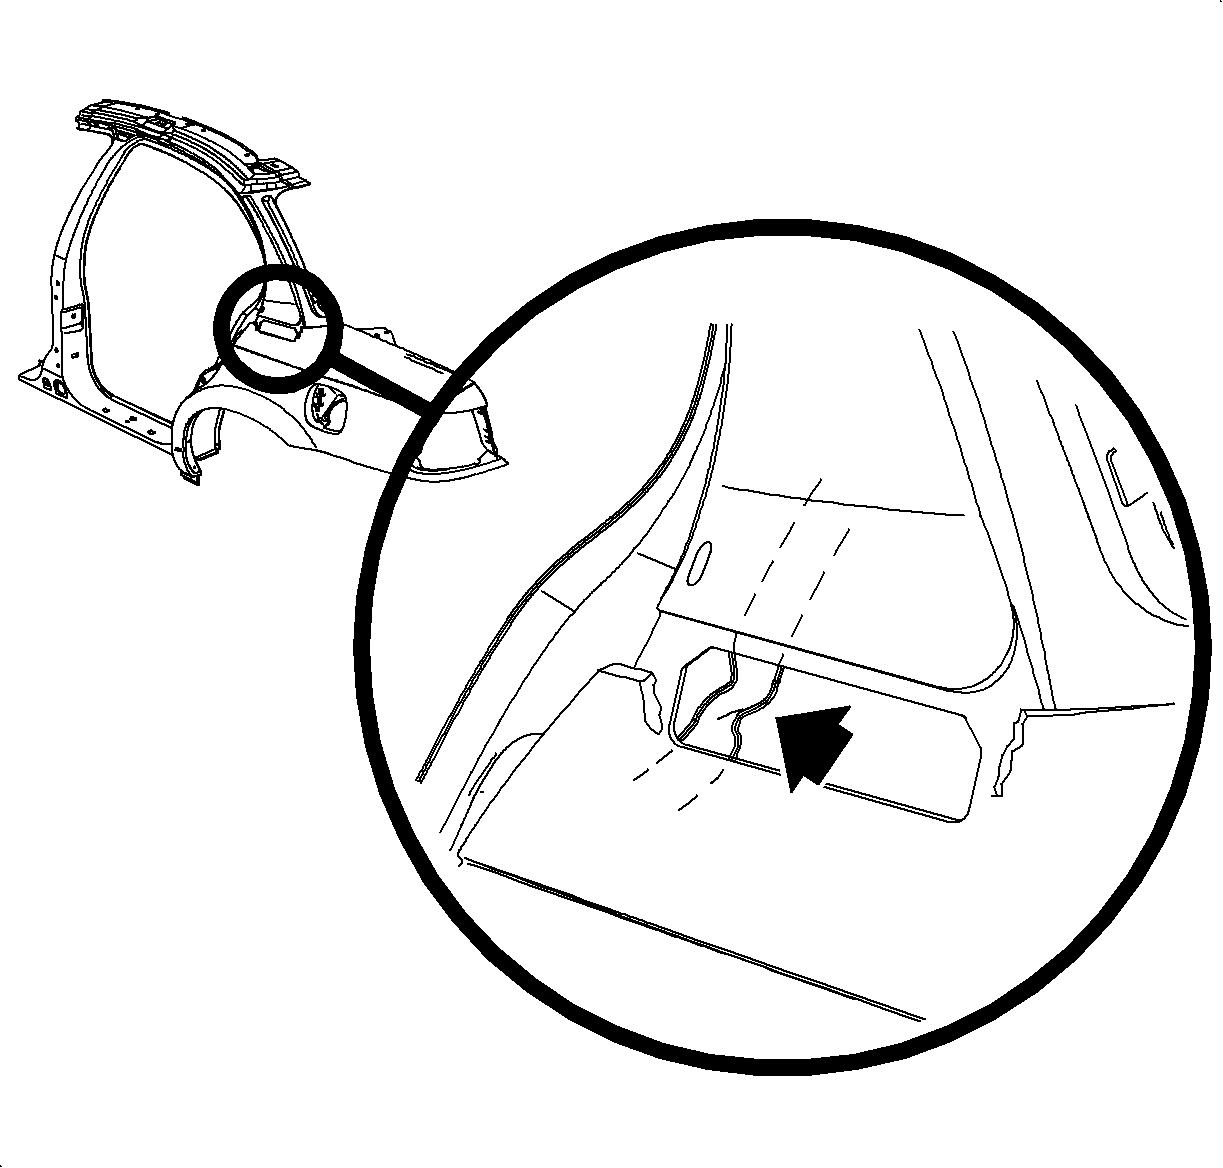

- Inspect both sunroof housing rear drain hoses
through the quarter outer panel holes to determine if they are kinked. (The sunroof
housing rear drain hose(s) may have been kinked by the installation of the sunroof
housing rear drain hose grommet, which is located below body plug.)
- If either of the sunroof housing rear drain hoses are kinked, remove the
kinked sunroof housing rear drain hose(s) and replace with a new sunroof housing rear
drain hose(s) and sunroof housing drain hose clamp(s).
On 1996 -- 1999 model year vehicles, refer to "Rear Drain Hose Grommet
-- Sedan" in the Vehicle Interior Systems section of the appropriate model year
Body/Repair Service Manual.
On 2000 -- 2001 model year vehicles, refer to "Rear Drain Hose/Grommet
-- Sedan" in the Sunroof section of the appropriate model year S-Series Body/Electrical
Volume II Service Manual
- If neither of the sunroof housing rear drain hoses are kinked, remove
each sunroof housing rear drain hose from the sunroof housing and proceed to the next
step.
- Using a standard air gun, limited to 207 kPa (30 psi), blow into the sunroof
housing rear drain hole(s) with the obstruction and attempt to clear the obstruction.
- If air flows freely through both sunroof housing rear drain hoses, there
is no obstruction. Reattach sunroof housing rear drain hoses and refer to "Sunroof
Module Sealer" in this bulletin.
- If at first air does not flow freely through either of the sunroof housing
rear drain hoses, then starts to flow freely, obstruction has been removed. Reattach
sunroof housing rear drain hoses.
- If air does not flow freely through either of the sunroof housing rear
drain hoses and obstruction cannot be removed, replace sunroof housing rear drain
hose(s) with new sunroof housing rear drain hose(s)
On 1996 -- 1999 vehicles, refer to "Rear Drain Hose Grommet -- Sedan"
in the Vehicle Interior Systems section of the appropriate model year Body/Repair
Service Manual.
On 2000 -- 2001 vehicles, refer to "Rear Drain Hose/Grommet -- Sedan"
in the Sunroof section of the appropriate model year S-Series Body/Electrical Volume
II Service Manual.
- Water test vehicle in sunroof module area.
Rear Sunroof Module Drain Hoses -- Coupe
- Raise the front of the vehicle so all water flows to the rear of the sunroof
housing .
- Water test the vehicle with the sunroof closed.
On the 1996 - 1999 model year vehicles, refer to "Waterleaks" in the General
Information section of the appropriate mode year Body/Repair Service Manual.
On 2000 -- 2001 model year vehicles, refer to "Waterleaks" in the Windnoise/Waterleaks/Appearance
section of the appropriate model year S-Series Body/Electrical Volume I Service Manual.
- If water runs over the rear portion of the sunroof module during the water
test, remove the sunroof housing rear drain hoses from the vehicle and proceed to
step 3.
- If water does not run over the rear portion of the sunroof housing during
the water test, refer to the other procedures in this bulletin.
- Using a standard air gun, limited to 207kPa (30 psi), blow into the sunroof
housing rear drain hoses to dislodged any possible obstructions.
- Reattach sunroof housing rear drain hoses to sunroof housing and water
test the vehicle again.
- If water runs over the rear portion of the sunroof module during the water
test, proceed to step 5.
- If water does not run over the rear portion of the sunroof housing during
the water test, the obstruction has been removed.
- Replace the sunroof housing rear drain hoses with new sunroof housing
rear drain hoses and sunroof housing drain hose clamp(s).
On 1996 -- 1999 model year vehicle, refer to "Rear Drain Hose Grommet --
Coupe" in the Vehicle Interior Systems section of the appropriate model year Body/Repair
Service Manual.
On 2000 -- 2001 model year vehicle, refer to "Rear Drain Hose/Grommet --
Coupe" in the Sunroof section of the appropriate model year S-Series Body/Electrical
Volume II Service Manual.
- Water test vehicle in sunroof module area.
Reseal Rear of Sunroof Module -- All Models
A water leak from the rear of the sunroof module may result from a void in body
sealer between sunroof module side rail and end piece that drain hose attaches to.
Before attempting this repair, be certain water leak is not present due to missing
hose clamps on sunroof module drain hoses.
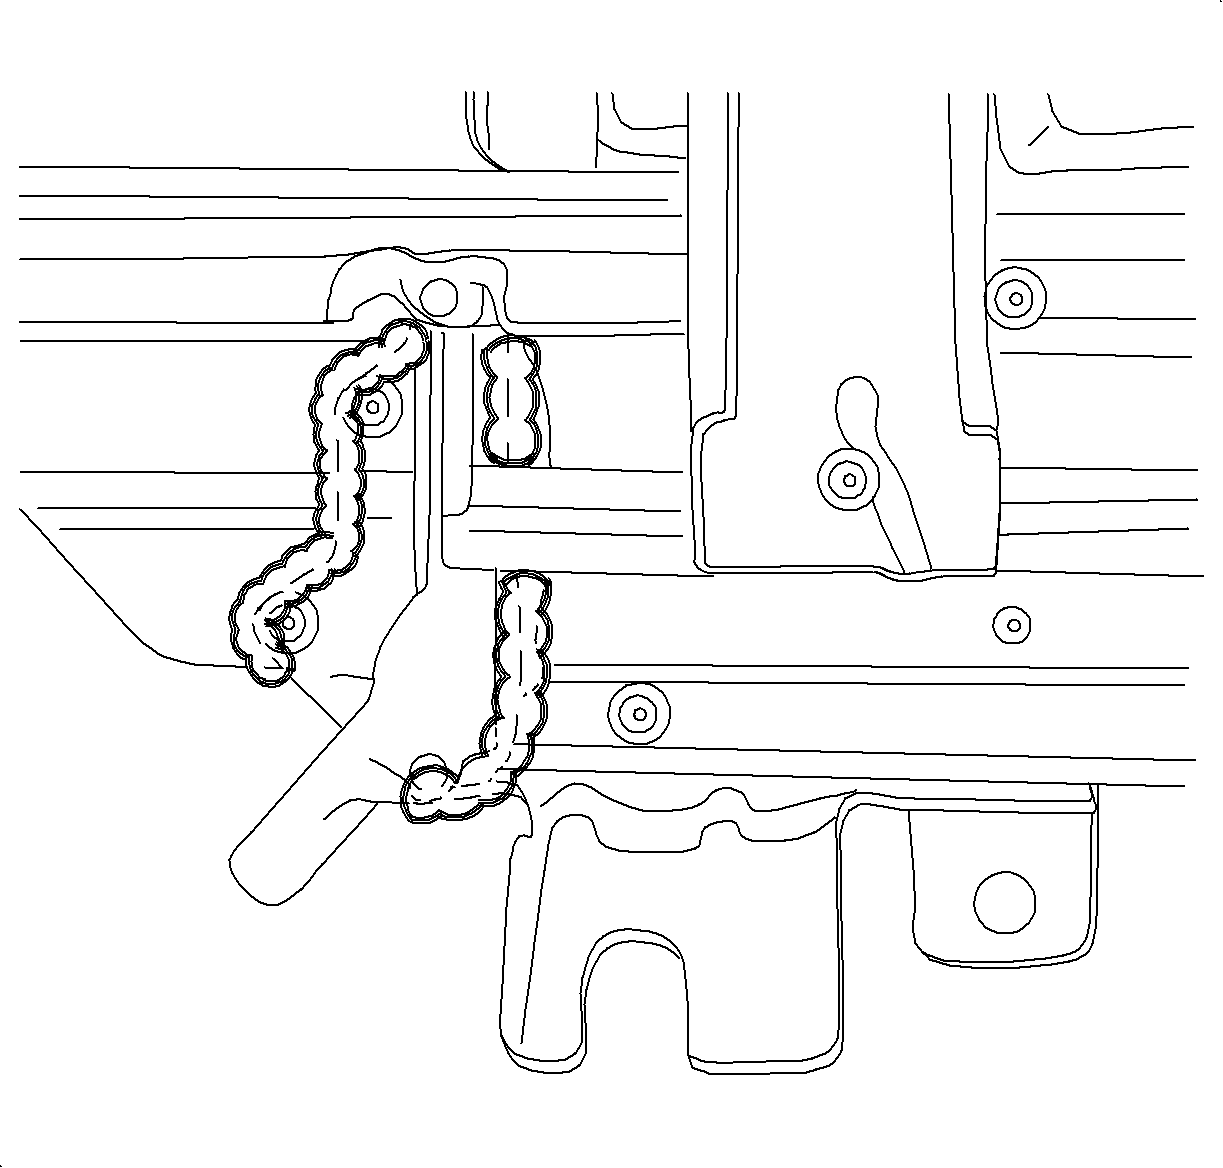

- Remove sunroof module from vehicle.
- From the top side, seal end piece in areas shown in illustration using
Kent Industries HIGH TECH Seam Sealer (P/N 10070), or equivalent.
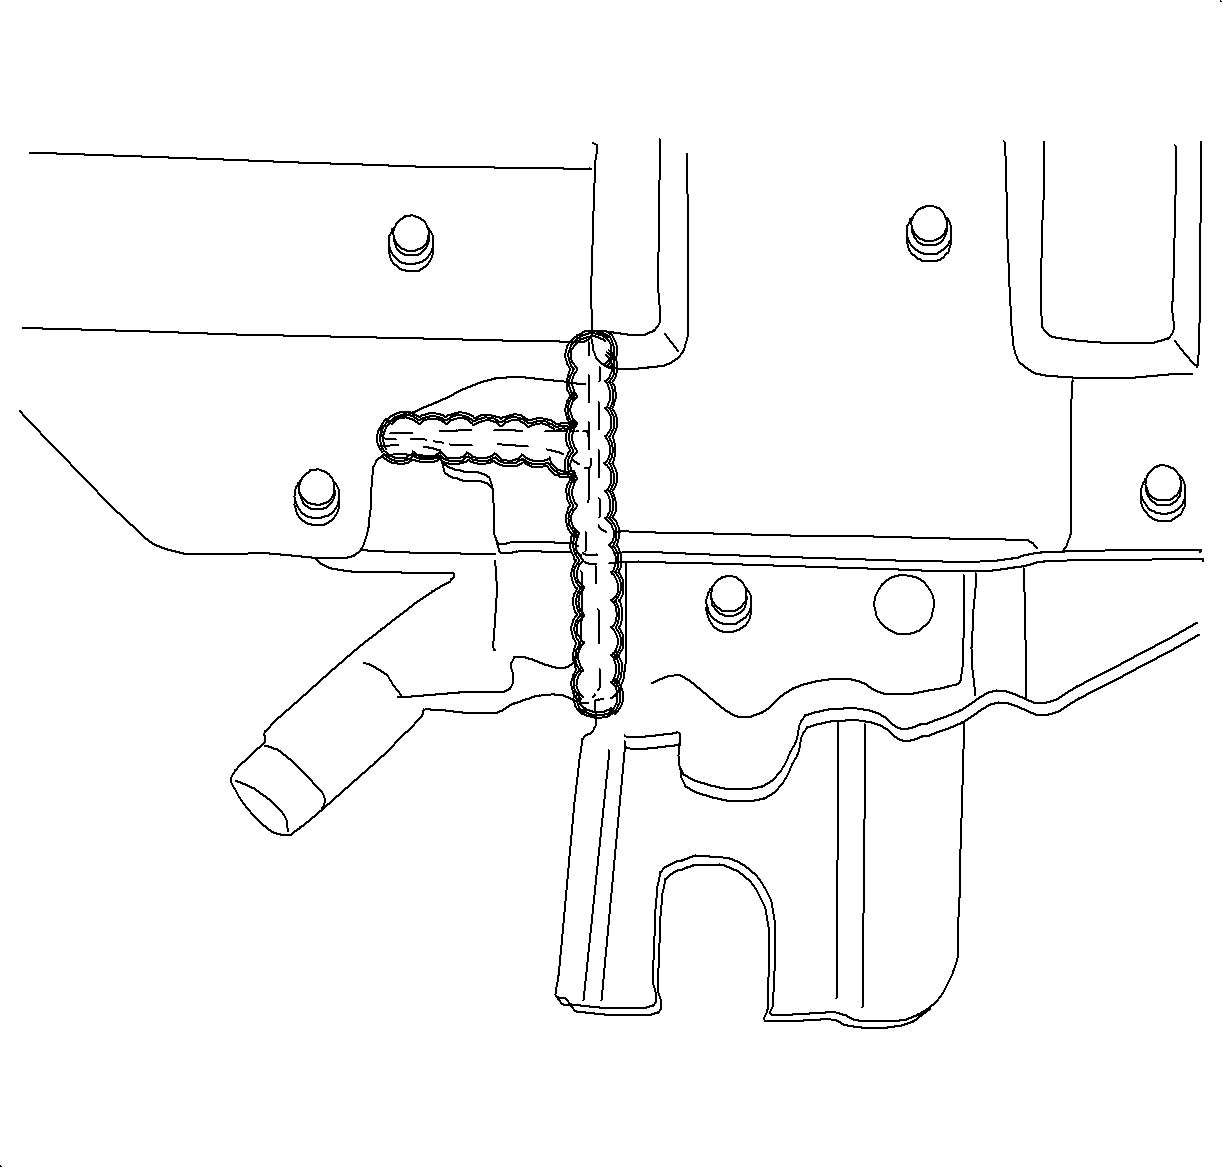

- From bottom side, seal end piece in areas shown
in the illustration using Kent Industries HIGH TECH Seam Sealer (P/N 10070), or equivalent.
- Install sunroof module in vehicle.
- Water test vehicle in sunroof module area.
Parts Requirements
0162620
| Clamp - Sun Rf Hsg Frt Drn Hose
|
21302069
| Hose - Sun Rf Hsg Frt Drn (1996 Sedan)
|
21302069
| Hose - Sun Rf Hsg Frt Drn (1997-2000 Coupe and Sedan)
|
21302069
| Hose - Sun Rf Hsg Frt Drn (2001 Coupe)
|
21302099
| Hose - Sun Rf Hsg Rr Drn (1996-2000 Sedan)
|
21302508
| Hose - Sun Rf Hsg Rr Drn (1997-2001 Coupe)
|
--
|
10070
| Kent Industries HIGH TECH Seam Sealer * (Or Equivalent)
|
10310
| Kent Industries Seal n' Caulk Black * (Or Equivalent)
|
--
|
* Kent Product Telemarketing
| 1-800-654-6333 USA
1-800-663-2800
|
CLAIM INFORMATION
To receive credit for this repair during the warranty coverage period, submit
a claim through the Saturn Dealer System as Follows
Case Type
| Description
| Labor Operation Code
| Time
|
VW
| Water Test and Determine Leak
| Z4031
| --
|
INC: Time to Install Hose Clamps on Front and Rear Drain Hoses Sedan
| --
| 1.3hrs
1.5hrs
|
ADD
| To Replace One Front Drain Hose
| --
| 0.2hrs
|
To Replace Both Front Drain Hoses
| --
| 0.3hrs
|
To Modify Ends of Both Front Drain Hose Grommets
| --
| 0.5hrs
|
To Seal Front of Sunroof Module
| --
| 0.1hrs
|
To Seal Rear of Sunroof Module
| --
| 0.5hrs
|
To Replace One Rear Drain Hose-Coupe
| --
| 0.2hrs
|
To Replace Both Rear Drain Hoses-Coupe
| --
| 0.3hrs
|
To Replace One Rear Drain Hose-Sedan
| --
| 0.6hrs
|
To Replace Both Rear Drain Hoses-Sedan
| --
| 1.4hrs
|
Important
Claims for the specified sealing material will be reimbursed in the following
amounts:
Seal Rear of Sunroof Module-Seam Sealer-Retailer Cost of $2.00 x 30% = $2.60
Seal Front of Sunroof Module-Seam Sealer-Retailer Cost of $2.00 x 30% =$2.60
Seal N' Caulk-Retailer Cost of $0.21 x 30%=$0.27
It will be necessary to sell sealer and caulk to the CSO as material, using
net item code "M." Claims exceeding the above amounts will be returned to the Retailer
with reason 143 - material amount greater than maximum allowed.
GM bulletins are intended for use by professional technicians,
NOT a "do-it-yourselfer". They are written to inform these
technicians of conditions that may occur on some vehicles, or to
provide information that could assist in the proper service of a
vehicle. Properly trained technicians have the equipment,
tools, safety instructions, and know-how to do a job properly and
safely. If a condition is described, DO NOT assume that the
bulletin applies to your vehicle, or that your vehicle will have
that condition. See your GM dealer for information on whether
your vehicle may benefit from the information.
|

|
WE SUPPORT VOLUNTARY TECHNICIAN CERTIFICATION
|
© Copyright General Motors Corporation.
All Rights Reserved.


