Service Information Regarding Sunroof Service Procedures and Serviceable Sunroof Components #01-T-43 - (Dec 20, 2002)
Service Information Regarding Sunroof Service Procedures and Serviceable
Sunroof Components1996-2001 Saturn S-Series sedans equipped with power sunroofs (RPO CF5)
1997-2001 Saturn S-Series coupes equipped with power sunroofs (RPO CF5)
PURPOSE
The purpose of this bulletin is to:
- Provide sunroof diagnostics with VIN breakpoints
- Summarize the sunroof components that can be serviced by following the
service procedures in this bulletin and in the S-Series service manual.
- Provide new "Sunroof Drive Cable Guide Channel Inspection" and "Sunroof
Actuator Mounting Bracket Replacement" procedures.
SUNROOF DIAGNOSTIC INFORMATION
Sunroof Actuator (Motor) DiagnosticThis section of the bulletin is intended to aid in sunroof actuator (motor)
diagnostics. This information is in addition to the service information available
in the S-Series service manual.
MODELS AFFECTED
| SYMPTOM
| POSSIBLE CAUSE
| PROCEDURE
|
- 1999 Saturn S-Series vehicles built after VIN XZ326078.
- 2000 and 2001 Saturn S-Series vehicles built before VIN 1Z319420.*
| Sunroof opens and closes but skips/hesitates when going from full open to close.
| Actuator bull gear is stripped
| Close sunroof and replace sunroof actuator. (Refer to the "Sunroof Actuator
(Motor)" procedure in the appropriate S-Series service manual.
|
Sunroof only goes to vent position and makes ratcheting/clicking noise.
|
Sunroof goes to full closed and makes ratcheting/clicking noise.
|
Sunroof goes to full open and makes ratcheting/clicking noise.
|
*2001 Saturn S-Series vehicles built after and including VIN 1Z319420 are equipped
with new design sunroof actuator drive gears and are not affected by these conditions.
Sunroof Actuator Mounting Bracket DiagnosticsThis section of the bulletin is intended to aid in sunroof actuator mounting
bracket diagnostics. Refer to the service predictors in this bulletin for sunroof
actuator mounting bracket diagnostics and replacement.
MODELS AFFECTED
| SYMPTOM
| POSSIBLE CAUSE
| PROCEDURE
|
- 1996-2002 Saturn S-Series sedans.
- 1997-2002 Saturn S-Series coupes.
| Sunroof glass panel is out of time on one side and will not close correctly
resulting in a ratcheting noise
| Sunroof actuator mounting bracket warped, causing actuator gear to catch only
one cable.
| Replace bracket and cable inset only. (Refer to "Sunroof Actuator Mounting Bracket
Replacement" procedure in this bulletin).
|
Sunroof will not open to full vent height
| Sunroof actuator mounting bracket warped, causing mistiming of actuator vent
setting.
| Replace bracket and cable insert inside bracket. Re-time actuator to module
before installing. (Refer to "Sunroof Actuator Mounting Bracket Replacement" procedure
in this bulletin and "Sunroof Actuator [Motor] to Module Timing" procedure in the
appropriate S-Series service manual.)
|
Sunroof Module DiagnosticsThis section of the bulletin is intended to aid in sunroof module diagnostics.
This information is in addition to the service information available in the appropriate
S-Series service manual.
MODELS AFFECTED
| SYMPTOM
| POSSIBLE CAUSE
| PROCEDURE
|
- 1996-2001 Saturn S-Series sedans built before VIN 1Z246729.
- 1997-2000 Saturn S-Series coupes built before VIN1Z246729.
| Sunroof goes to vent, but only one side will go to full close position.
| Broken sunroof drive cable guide channel.
| Replace sunroof assembly (except glass and sunshade). (Refer to "Sunroof Module
Assembly" procedure in the appropriate S-Series service manual.
|
Sunroof goes to full open and fully forward to vent position, but only one side
goes to full close.
|
SERVICEABLE SUNROOF COMPONENTS
This section of the bulletin is intended to summarize the sunroof components
that can be serviced by following the service procedures in this bulletin and in the
S-Series service manual. Based on recent sunroof warranty information, it has been
found that sunroof modules/sunshades have been replaced when they could have been
serviced with a component.
The following sunroof components are serviceable:
Important
Sunroof glass seal is no longer serviceable
- sunroof glass
- sunroof sunshade
Important
Do not replace sunshade due to broken slide blocks. Replace slide blocks using
sunshade kit.
- sunroof sunshade slide blocks
- sunroof actuator (motor)
- sunroof cable locator blocks
- sunroof drive cables
- sunroof actuator mounting bracket
SUNROOF DRIVE CABLE GUIDE CHANNEL INSPECTION
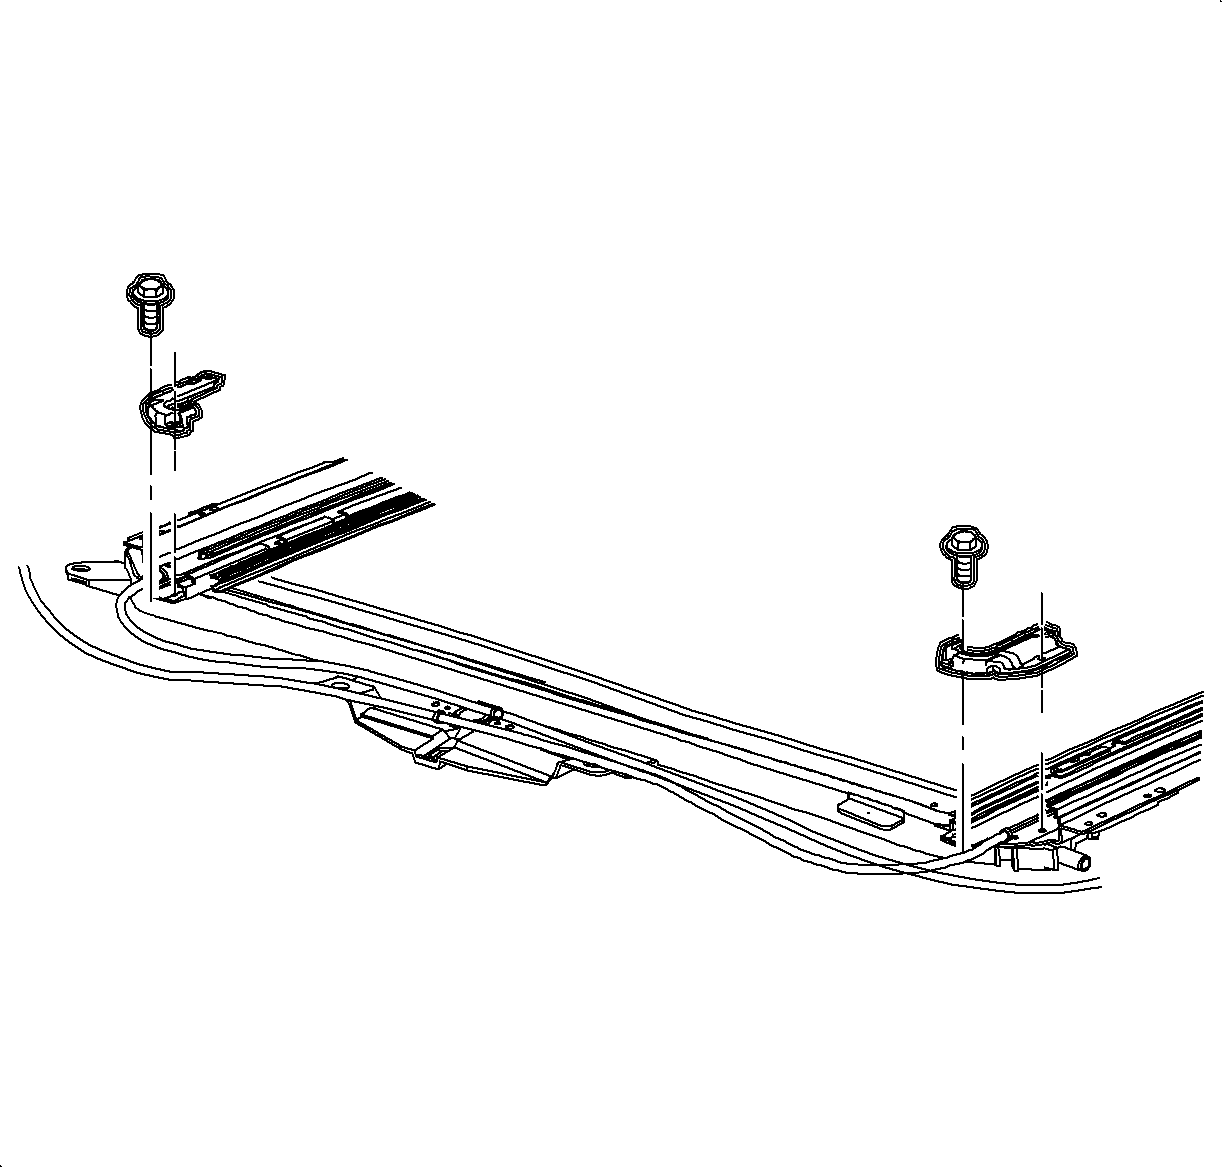

- Remove cable locator blocks.
- Open sunroof.
- Remove locator block fastening screws.
- Remove locator block using needle nose pliers.
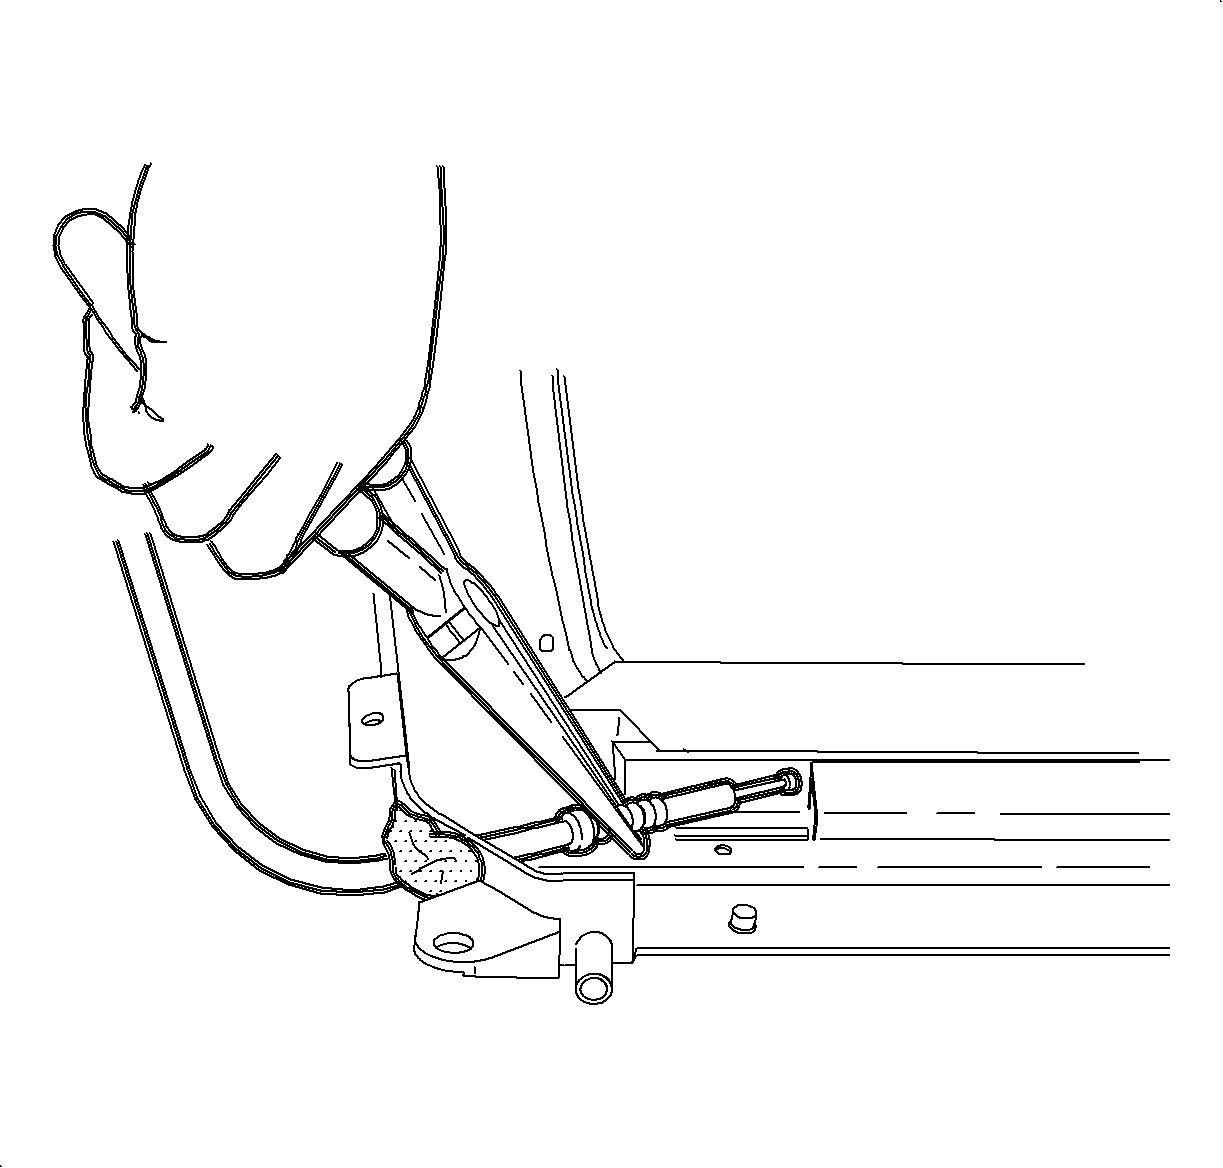

Important
If guide channel is fractured/broken, the cable end will most likely be separated
from the separated from the guide channel.
- Lift sunroof drive cable from guide channel.
- Inspect guide channel for damage.
- If guide channel is broken or fractured, replace sunroof. Refer to the
appropriate S-Series service manual for procedure.
- If guide channel is not broken or fractured, proceed to step 4 and replace
cable locator blocks. Then, refer to the Sunroof Module Diagnostics" chart in this
bulletin for additional diagnostics.


- Apply Permatex® medium strength threadlocker
(or equivalent) to locator block fastening screws. Make sure to cover the last few
threads.
- Install locator blocks.
- Install locator block fastening screws.
TightenTighten the locator block fastening screws to 2 N·m (17.5 lb ft)
SUNROOF ACTUATOR MOUNTING BRACKET REPLACEMENT
- Remove sunroof from vehicle. (Refer to "Sunroof Module Assembly Removal"
procedure in the appropriate S-Series service manual).
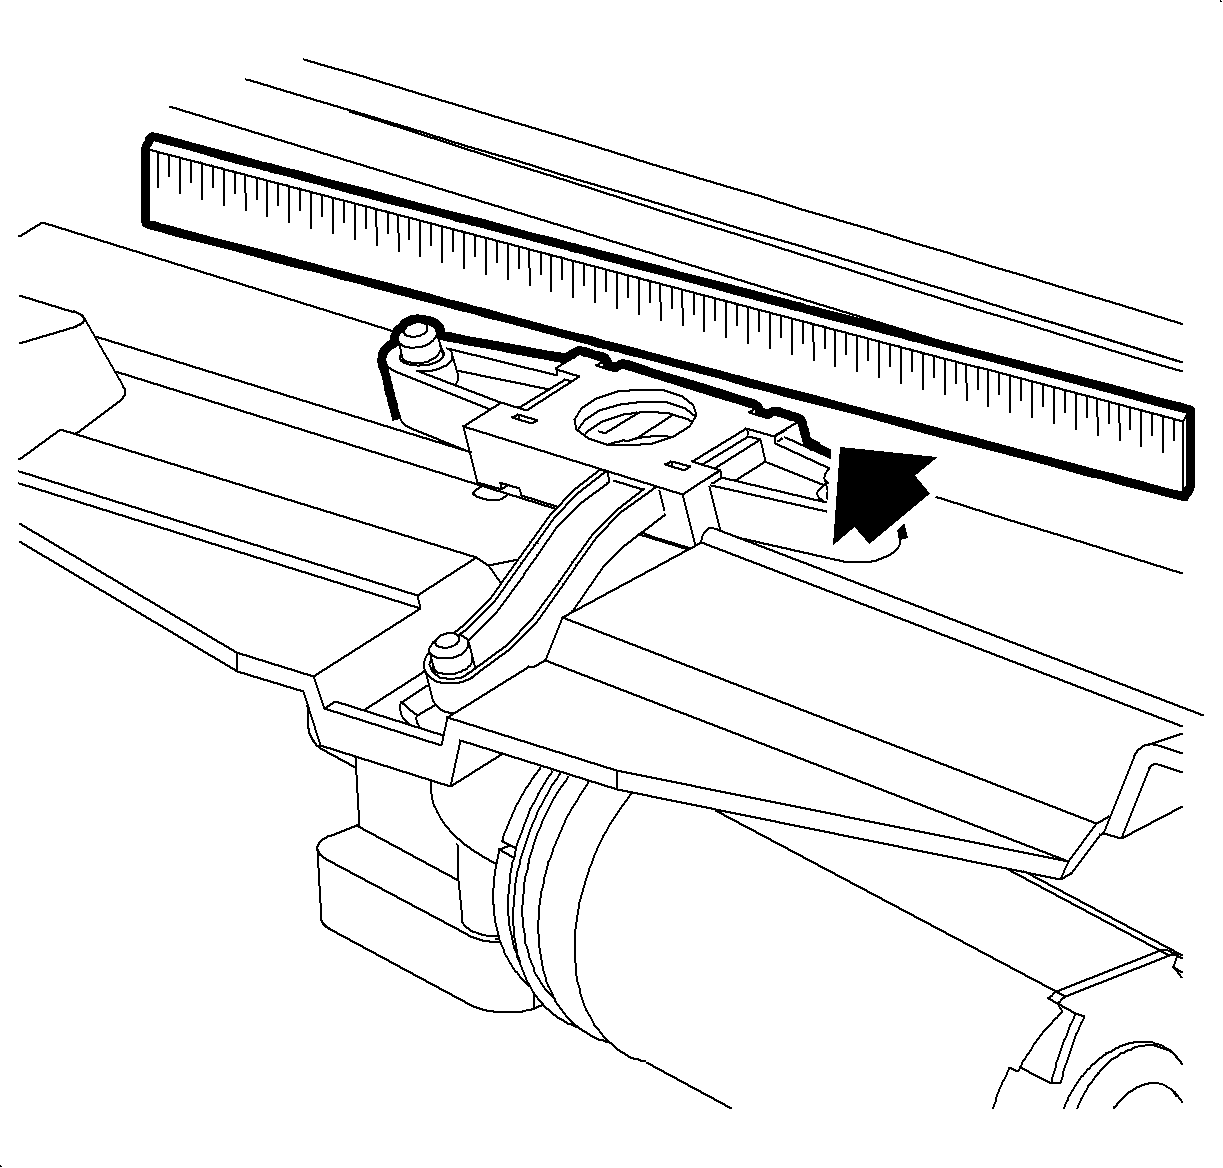

- Place a straight edge across sunroof actuator
mounting bracket as shown in illustration and inspect bracket for warpage.
- If actuator mounting bracket is warped, proceed to step 3.
- If actuator mounting bracket is not warped, refer to "Sunroof Actuator
Mounting Bracket Diagnostics" chart in this bulletin for additional diagnostics.
Important
Prior to removing sunroof/sunroof actuator, make sure sunroof glass is in full
closed position. this will result in proper actuator to module timing provided actuator
is not operated after it is removed.
- Remove sunroof actuator. (Refer to "Sunroof Actuator [Motor] Removal" procedure
in the appropriate S-Series service manual).
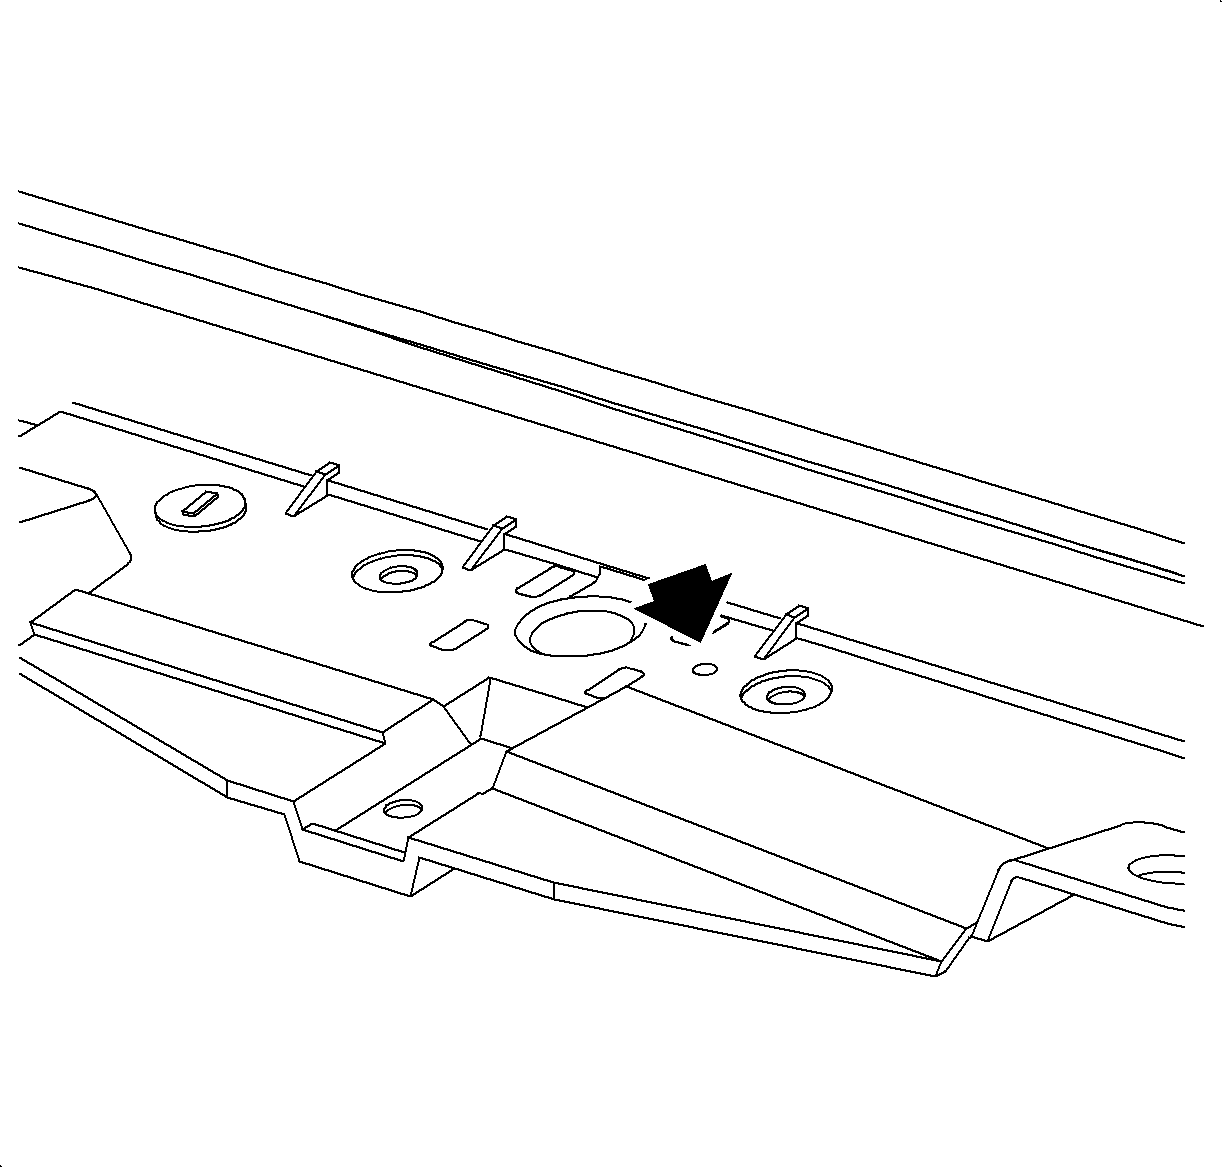

- Using a 3 mm (.012 in.) drill bit, remove rivet
that holds sunroof actuator mounting bracket to module front beam.
- Obtain tube assembly/actuator mounting bracket kit (P/N 21059928).
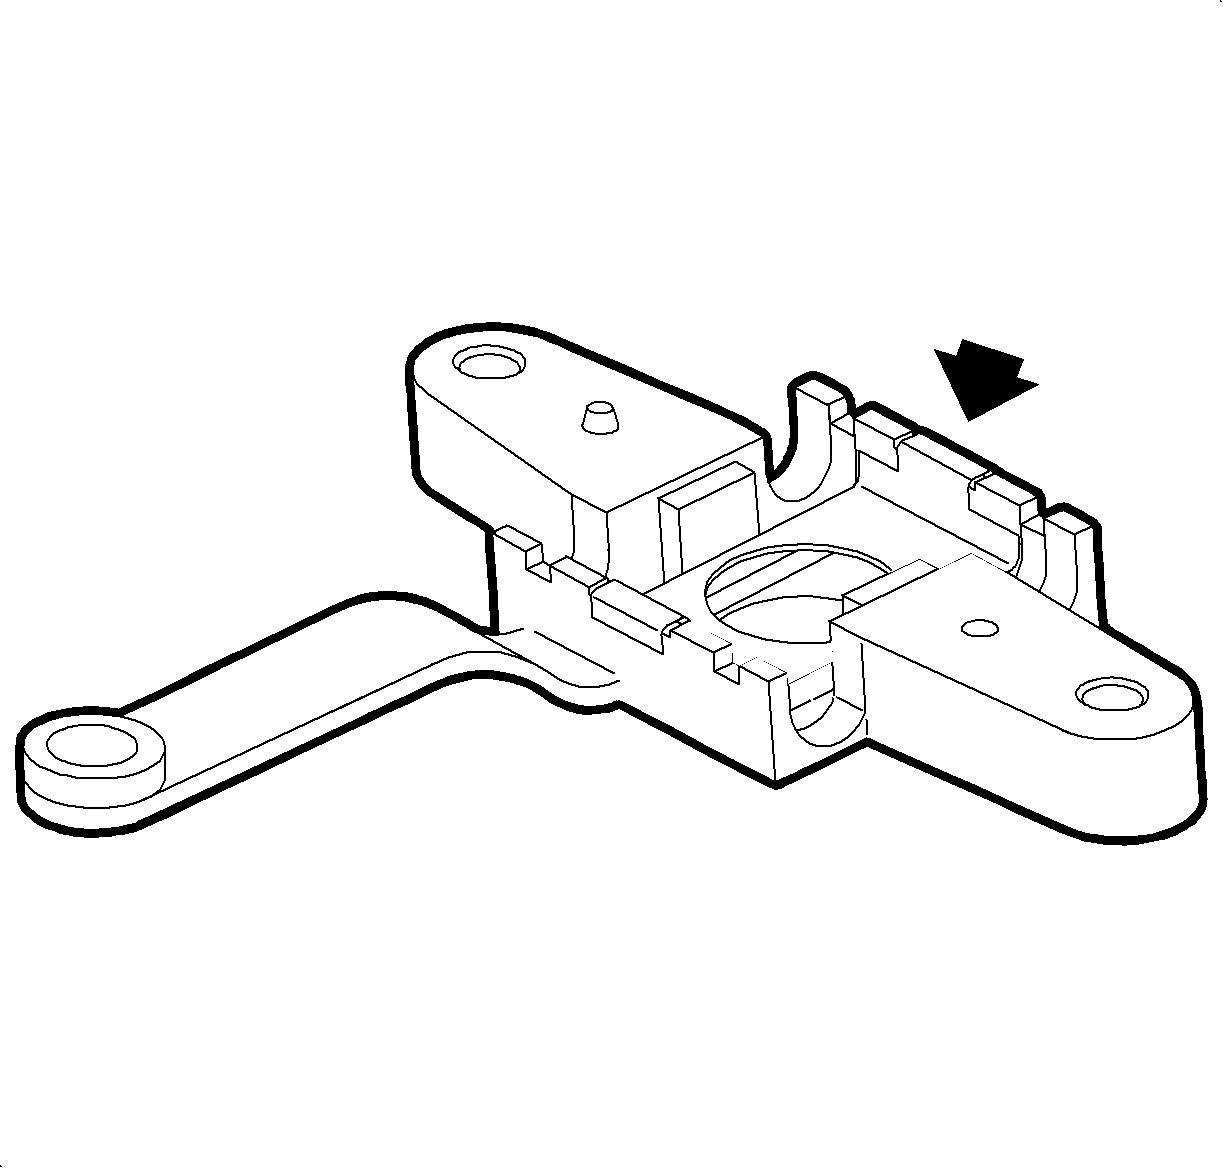

Important
Make sure sunroof actuator mounting bracket stays tight against drive tube
during rivet installation.
- Place a new actuator mounting bracket over drive tubes, making sure insert (included
with tube assembly/actuator mounting bracket kit [P/N 21059928] is mounted on bracket
in correct position, and secure with replacement 3 mm 12.3 mm rivet.
- Install sunroof actuator. (Refer to "Sunroof Actuator [Motor] Installation"
procedure in the appropriate S-Series service manual).
- Operate sunroof to insure repair has resolved customer complaint.
- If repair has resolved complaint, proceed to step 9.
- If repair has not resolved customer complaint, refer "Sunroof Actuator
Mounting Bracket Diagnostics" chart in this bulletin for additional diagnostics.
- Install sunroof. (Refer to "Sunroof Module Assembly Installations" procedure
in the appropriate S-series service manual.)
Parts Requirements:
21306076
| ACTUATOR ASM - SUN RF
|
21506011
| CABLE KIT - SUN RF ACTR (DRIVE CABLE)
|
21059418
| GUIDE - SUN RF ACTR CBL (RIGHT) (CABLE LOCATOR BLOCK)
|
21059419
| GUIDE - SUN RF ACTR CBL (LEFT) (CABLE LOCATOR BLOCK)
|
21059913
| MODULE ASM - SUN RF (1996-2000 SEDANS)
|
21059914
| MODULE ASM - SUN RF (1997-2000 COUPES)
|
21306074
| MODULE ASM - SUN RF (2000-SEDANS)
|
21306075
| MODULE ASM - SUN RF (2001 COUPES)
|
21059928
| REINFORCEMENT ASM - SUN RF OPG (ACTUATOR MOUNTING BRACKET)
|
21303329
| SUNSHADE KIT - SUN RF (INCLUDES SLIDE BLOCKS)
|
2130624
| WINDOW - SUN RF
|
CLAIM INFORMATION:
To receive credit for this repair during the warranty period, submit a claim
through the Saturn Dealer System for B2780 (Housing Assembly, Sunroof (Module) -
Replace) or B2752 (Cap, Track Cover, Right - Replace) or B2753 (Cap, Track Cover,
Left - Replace) or N3360 (Motor, Sunroof - Replace). If another procedure
is performed, refer to the appropriate Electronic Labor Time Guide for the correct
Labor Operation Code and Time.
Important
An Add Time has been added to N3360 for replacement of the motor (actuator)
mounting bracket.
GM bulletins are intended for use by professional technicians,
NOT a "do-it-yourselfer". They are written to inform these
technicians of conditions that may occur on some vehicles, or to
provide information that could assist in the proper service of a
vehicle. Properly trained technicians have the equipment,
tools, safety instructions, and know-how to do a job properly and
safely. If a condition is described, DO NOT assume that the
bulletin applies to your vehicle, or that your vehicle will have
that condition. See your GM dealer for information on whether
your vehicle may benefit from the information.
|

|
WE SUPPORT VOLUNTARY TECHNICIAN CERTIFICATION
|
© Copyright General Motors Corporation.
All Rights Reserved.


