Frontal Supplemental Inflatable Restraint (SIR) Switch Kits #98-T-28 - (Jan 2, 2003)
Frontal Supplemental Inflatable Restraints (SIR) Switch Kits -- Parts
and Service Procedures -- Due to new regulation, this bulletin supersedes 97-T-33
which should be discarded. Retailers Should On Longer Use the Information Contained
In 97-T-33. Instead, Use the Information Included With This Bulletin.1992-1998 Saturn vehicles
Purpose:
Never consider installing an airbag on off switch unless the following conditions
are met:
- The customer presents a letter from the National Highway Traffic Safety
Administration (NHTSA) Authorizing the Installation of the Air Bag ON-OFF Switch.
Important
Make sure to get a photocopy of the customer's letter from the NHTSA and retain
the photocopy in the CSO VIN jacket, stapled to the CSO Hardcopy.
- The retailer gives the customer a copy of the Notice to GM/Saturn Owners
About Air Bag ON-OFF Switches. Refer to Retail Support Team Bulletin 97-SC-07.
- The customer still wants the Air Bag ON-OFF Switch installed.
This bulletin provides service information for the installation and removal
of air bag ON-OFF switches to turn OFF and ON frontal supplemental inflatable restraints
(SIR) (Air bags), along with switch and system diagnosis.
The National Highway Traffic Safety Administration (NHTSA) has given approval
and direction for deactivating Frontal Supplemental Inflatable Restraints (SIR) systems
in special situations. Within this approval, the method to deactivate the Frontal
(SIR) modules (air bags) includes a switch(es) to turn the air bag(s) OFF and ON,
and display to indicate SIR system deactivation status.
The air bag ON-OFF switch installation kit contains the necessary components
(air bag ON-OFF switch, brackets, attaching hardware, display light, applique sheet
for switch and light, tie straps and instruction sheets) for system operation. Each
kit also contains an Owner's Handbook insert describing system operation for review
by the owner.
The cost of the air bag ON-OFF switch kit and labor to install the switch kits
are the responsibility of the customer. Suggested labor times for kit installation
are included at the end of this bulletin.
Important
In rare instances, the installation of an air bag ON-OFF switch(es) may turn
ON the vehicles AIR BAG warning light. This condition may exist due to the additional
resistance of the switch harness when added to the SIR system. For further assistance,
call the Saturn Technical Assistance Center at 1-800-828-2112, prompt
1.
The standard SIR System diagnosis can be made by disconnecting the air bag ON-OFF
switch from the SIR wiring harness and following the directions for SIR system diagnosis
found in the appropriate year SIR Service Manual.
A description of each of the installation kits major components is as follows:
Air Bag ON-OFF Switches:
Each air bag ON-OFF switch kit contains material for one air bag (driver or
passenger). The air bag ON-OFF switches are key operated. When the air bag ON-OFF
switch is in the OFF position, the air bag will remain OFF until the air bag ON-OFF
switch is turned to the ON position. Turning the air bag ON-OFF switch to the ON position
will allow the air bag to function.
Caution
To prevent personal injury, air bag ON-OFF switches must not be placed on any
instrument panel surface directly in front of the driver's or passenger's leg or knee
area.
The recommended location for air bag ON-OF switches on Saturn vehicles is in
the instrument panel (glovebox) compartment assembly.
Display Light:
Each air bag ON-OFF switch requires a display light to indicate the ON or OFF
status of the air bag. Each display light includes a harness to be connected to the
air bag ON-OFF switch.
Caution
To prevent personal injury, air bag display lights must not be placed on any
instrument panel surface directly in front of the driver's or passenger's leg or knee
area.
The recommended location fro the display lights is at the center of the roof
headliner (refer to the location illustration in this bulletin and the instruction
sheet).
Wiring Connections:
The air bag ON-OFF switch will be connected in series with the yellow 2-way
air bag connector. The air bag ON-OFF switch also requires ignition circuit, body
ground, and display light connections.
Diagnostics for the switch and display light are included with this bulletin.
Refer to the appropriate model year SIR service manual for SIR system diagnosis.
Parts Information
Order the appropriate installation kit(s) (driver's, passenger's or both) from
SSPO. Parts information containing the air bag ON OFF switch kit part numbers is located
at the end of this bulletin.
Warranty Information:
Air bag, ON-OFF switch kits and installation are NOT considered a warranty repair.
Parts and labor charges are the responsibility of the customer.
Service Precautions:
Caution
Switches and telltale lights must not be mounted on any instrument panel surface
directly in front of the driver or passenger seating areas. Instrument panel surfaces
that may come in contact with knees or head must be kept free of switches and telltale
lights.
Caution
As a system Pre-check, perform the following to verify the system operation.
Staying well away from both air bags, turn the ignition switch to the run position.
Verify that the air bag warning lamp flashes 7 times and then stays OFF. If the air
bag warning lamp does not operate as described, perform the SIR Diagnostic System
Check found in the SIR Service Manual.
The inflatable restraint sensing and diagnostic module or the diagnostic energy
reserve module (Depending on the model year of the vehicle) Maintains a reserve energy
supply. When the vehicle power is insufficient to cause deployment of the air bags,
the reserve energy supply provides the deployment power. Deployment power is available
for as long as 10 minutes after disconnecting the vehicle power by any of the
following methods.
- You turn OFF the ignition switch.
- You remove the fuse that provides power to the inflatable restraint sensing
and diagnostic module or diagnostic energy reserve module.
- You disconnect the vehicle battery from the vehicle electrical system.
Service Procedure for Installation of Air Bag ON-OFF Switches


- Disconnect the negative battery cable.
- Turn the steering wheel so that the vehicle's wheels are pointing straight
ahead.
- Turn the ignition switch to the LOCK position and remove the key.
- Remove the AIR BAG fuse from the I/P junction block (IPLB).
Important
With the AIR BAG fuse removed and the ignition switch ON, the AIR BAG warning
lamp will be ON. This is normal operation and does not indicate an SIR system malfunction.
- Remove the connector position assurance (CPA) device and disconnect the yellow
2-way connector located near the base of the steering column.
- For 1995 Sedans and 1995-1996 Coupes, remove
the upper trim panel extensions by carefully lifting up at the clip locations, starting
at the rear above the end cap.

- For all model years:
- Remove the upper trim panel screw caps by carefully prying with a small
flat-head screwdriver.
- Remove the upper trim panel screws.
Important
Be careful not to damage the VIN plate when removing the upper trim panel.
Be careful, when removing the upper trim panel, not to damage the upper trim
panel seal.
- Lift the upper trim panel at the clip locations on the rear edge to disengage
the clips.
- Disengage the forward edge of the upper trim panel by lifting upward at
each outer corner, then pull rearward.
- Remove the upper trim panel.
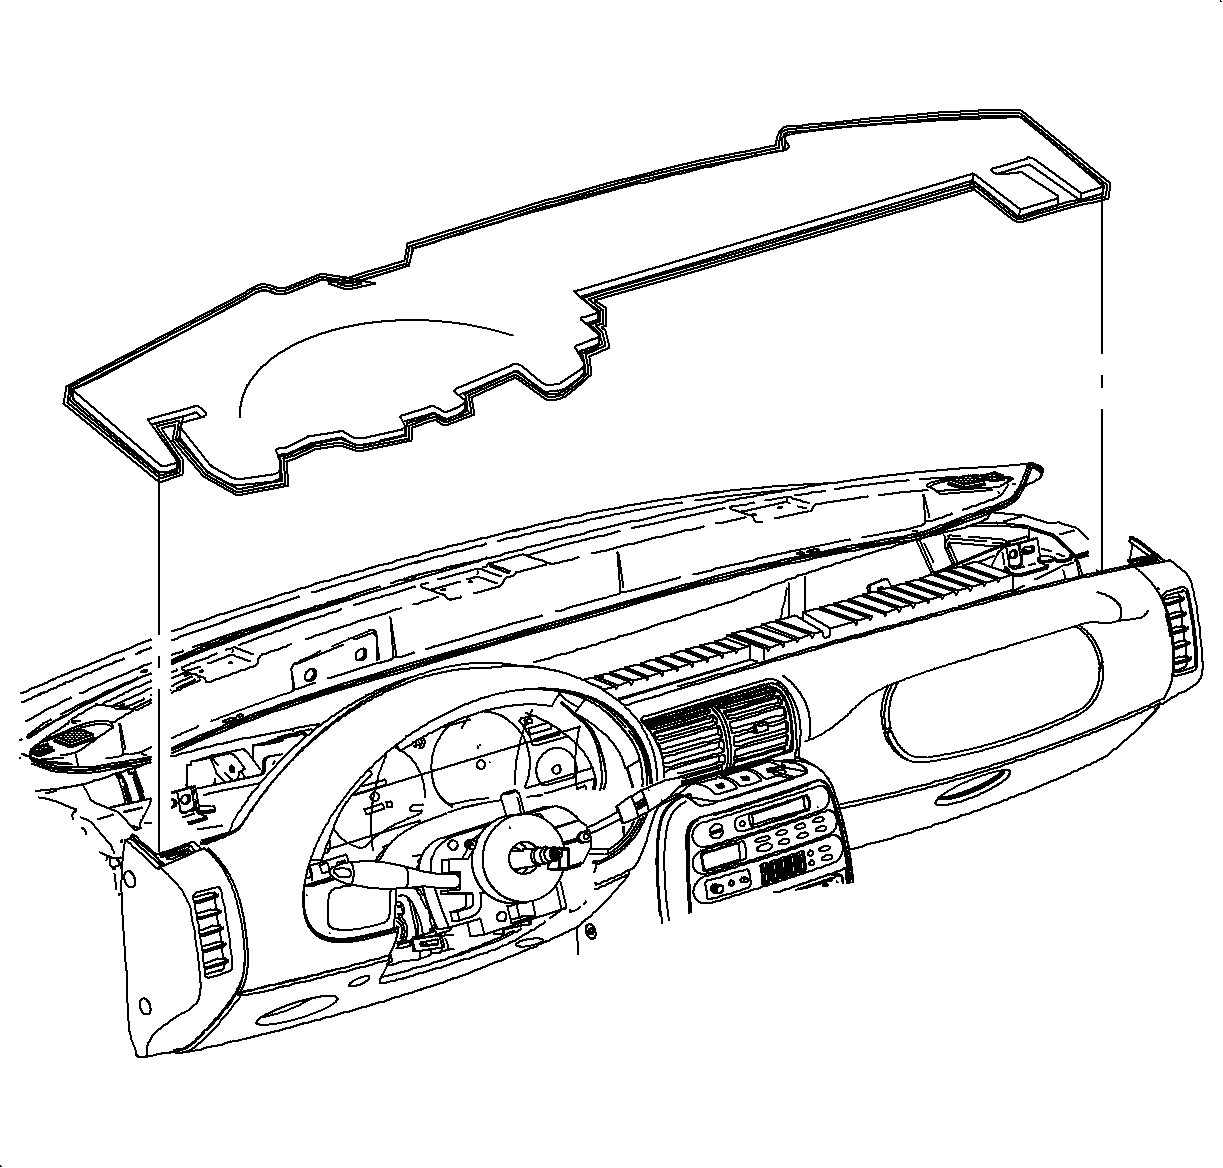
- Remove the upper trim panel insulator (if equipped).
- Remove the connector position assurance (CPA)
device and disconnect the yellow 2-way connector located on the pigtail from the passenger
inflator module (if equipped).
- Remove the right and left IPJB access panels
from the console.
- Remove the right side A-pillar garnish molding.
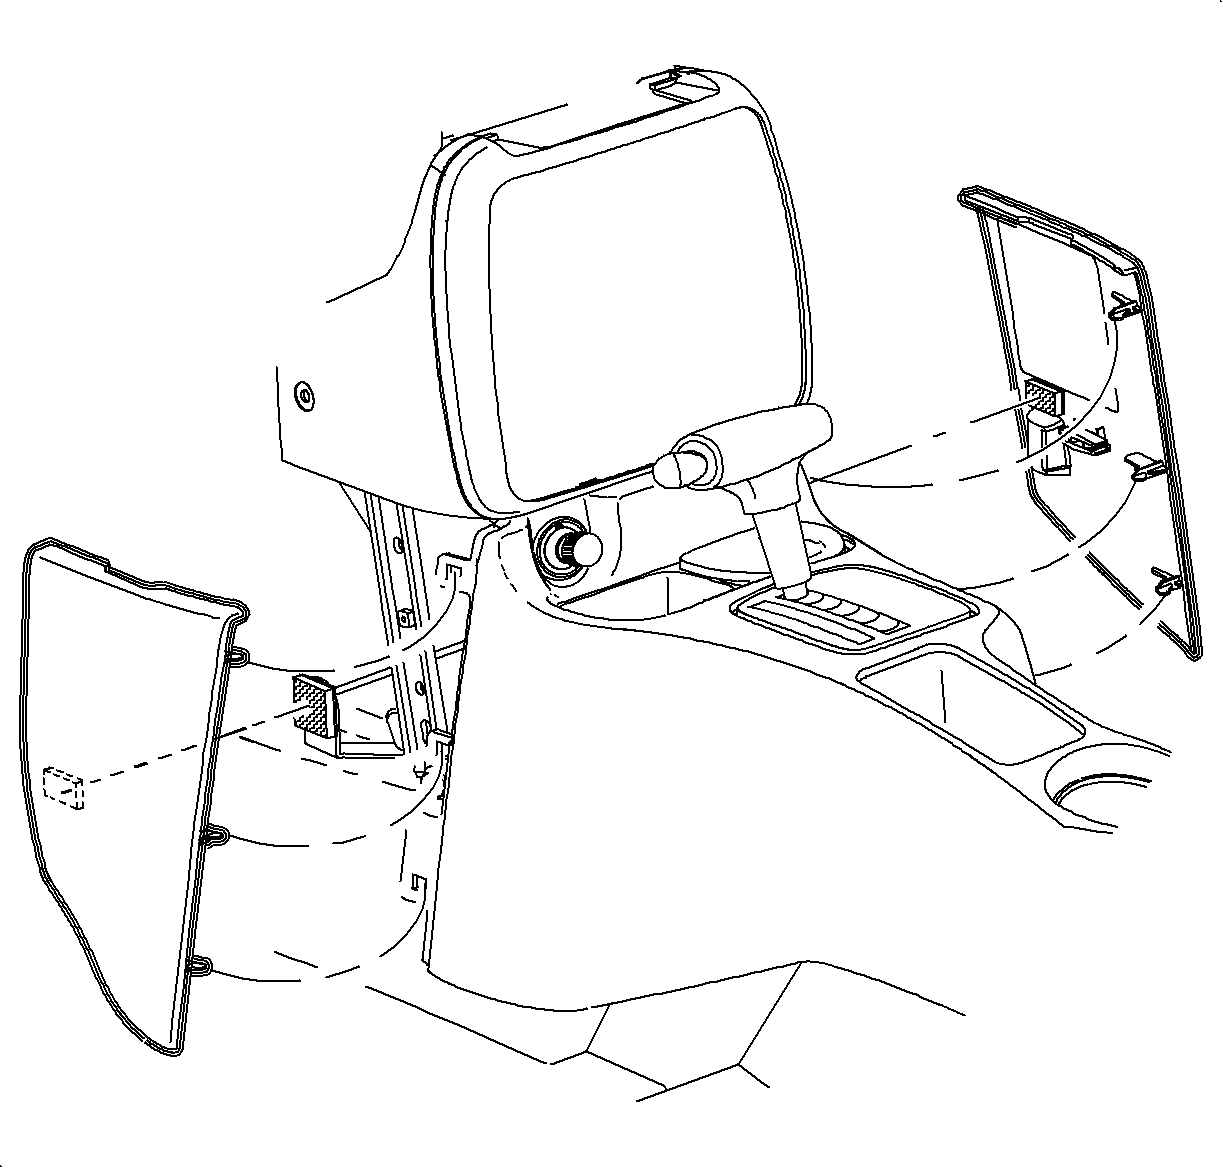
- Remove the I/P compartment assembly.
Caution
To prevent personal injury, air bag ON-OFF switches must not be placed on any
instrument panel surface directly in front of the driver's or passenger's leg or knee
area.
Important
On 1992-1994 model year vehicles, place the template on the inside of
the I/P compartment.
- For 1992-1994 model year vehicles:
- Place the template, provided with the kit on
the inside of the I/P compartment.
- Locate and drill two 5 mm (13/16 in) holes in the compartment
upper front surface for air bag ON-OFF switch mount location.
- Locate and drill one 32 mm (1 ¼in) hole in the I/P
compartment upper rear surface fro the air bag ON-OFF switch wiring.
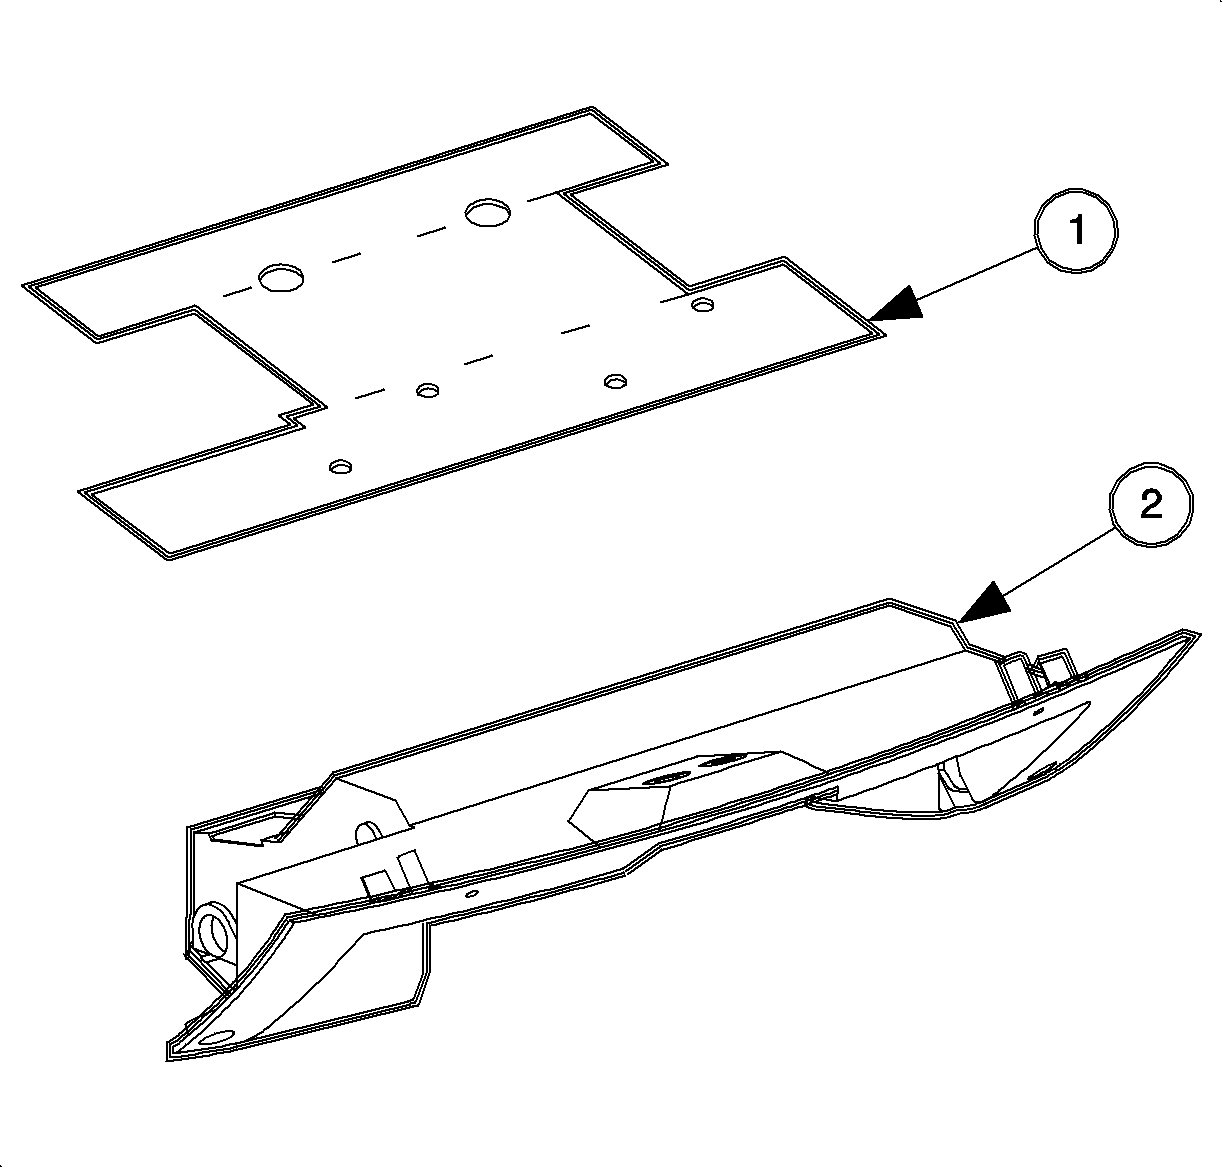
(1)-Template (2)-I/P compartment
Important
On 1995-1998 model year vehicles, place I/P compartment facing down, position
the template on the top surface of the I/P compartment, and mark the location of all
air bag ON-OFF switch mounting and wire routing holes.
- For 1995-1998 model year vehicles:
- Place the I/P compartment face down and position the template provided
with the kit on the top surface of the I/P compartment.
(1) Template (2) I/P compartment
Important
If only one air bag ON-OFF switch is to be installed, install the air bag ON-OFF
switch on the left side of the I/P compartment to allow easy access for the driver
of the vehicle.
- If installing only one air bag ON-OFF switch:
- Locate and drill one 32 mm (1¼ in) hole in the I/P
compartment upper rear surface for the sir bag ON-OFF switch wiring.
- Locate and drill two 5 mm (13/16 in) holes in the I/P compartment
upper rear surface for air bag ON-OFF switch mounting.
- If installing both air bag ON-OFF switches:
- Locate and drill two 32 mm (1¼ in) hole in the I/P
compartment upper rear surface for the wiring of air bag ON-OFF switches.
- Locate and drill four 5 mm (13/16 in) holes in the I/P compartment
upper rear surface for mounting of air bag ON-OFF switches.
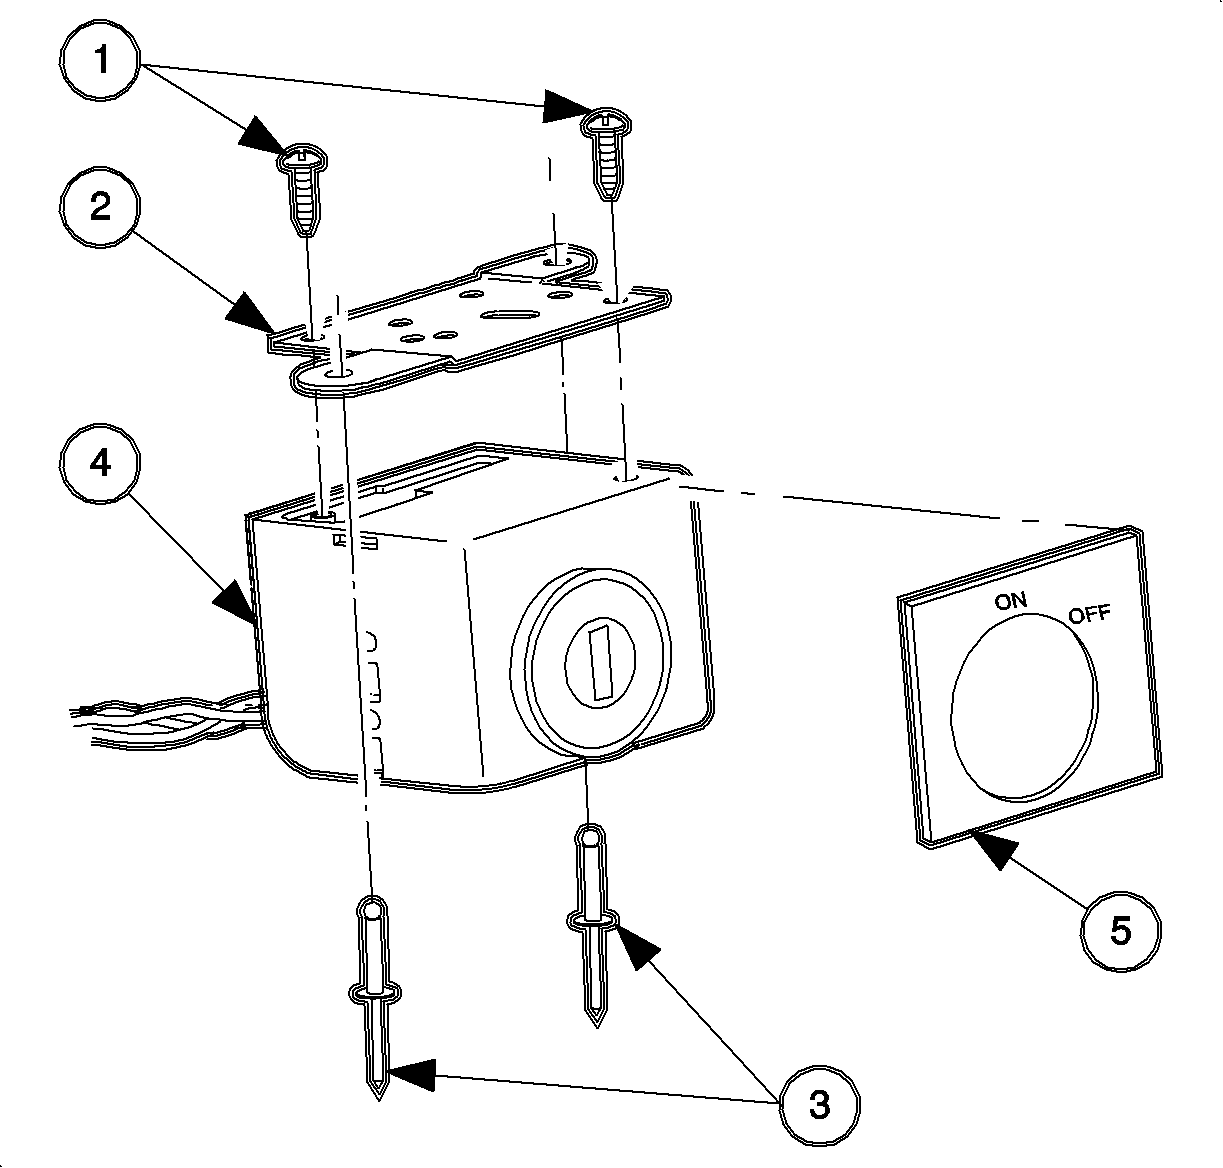
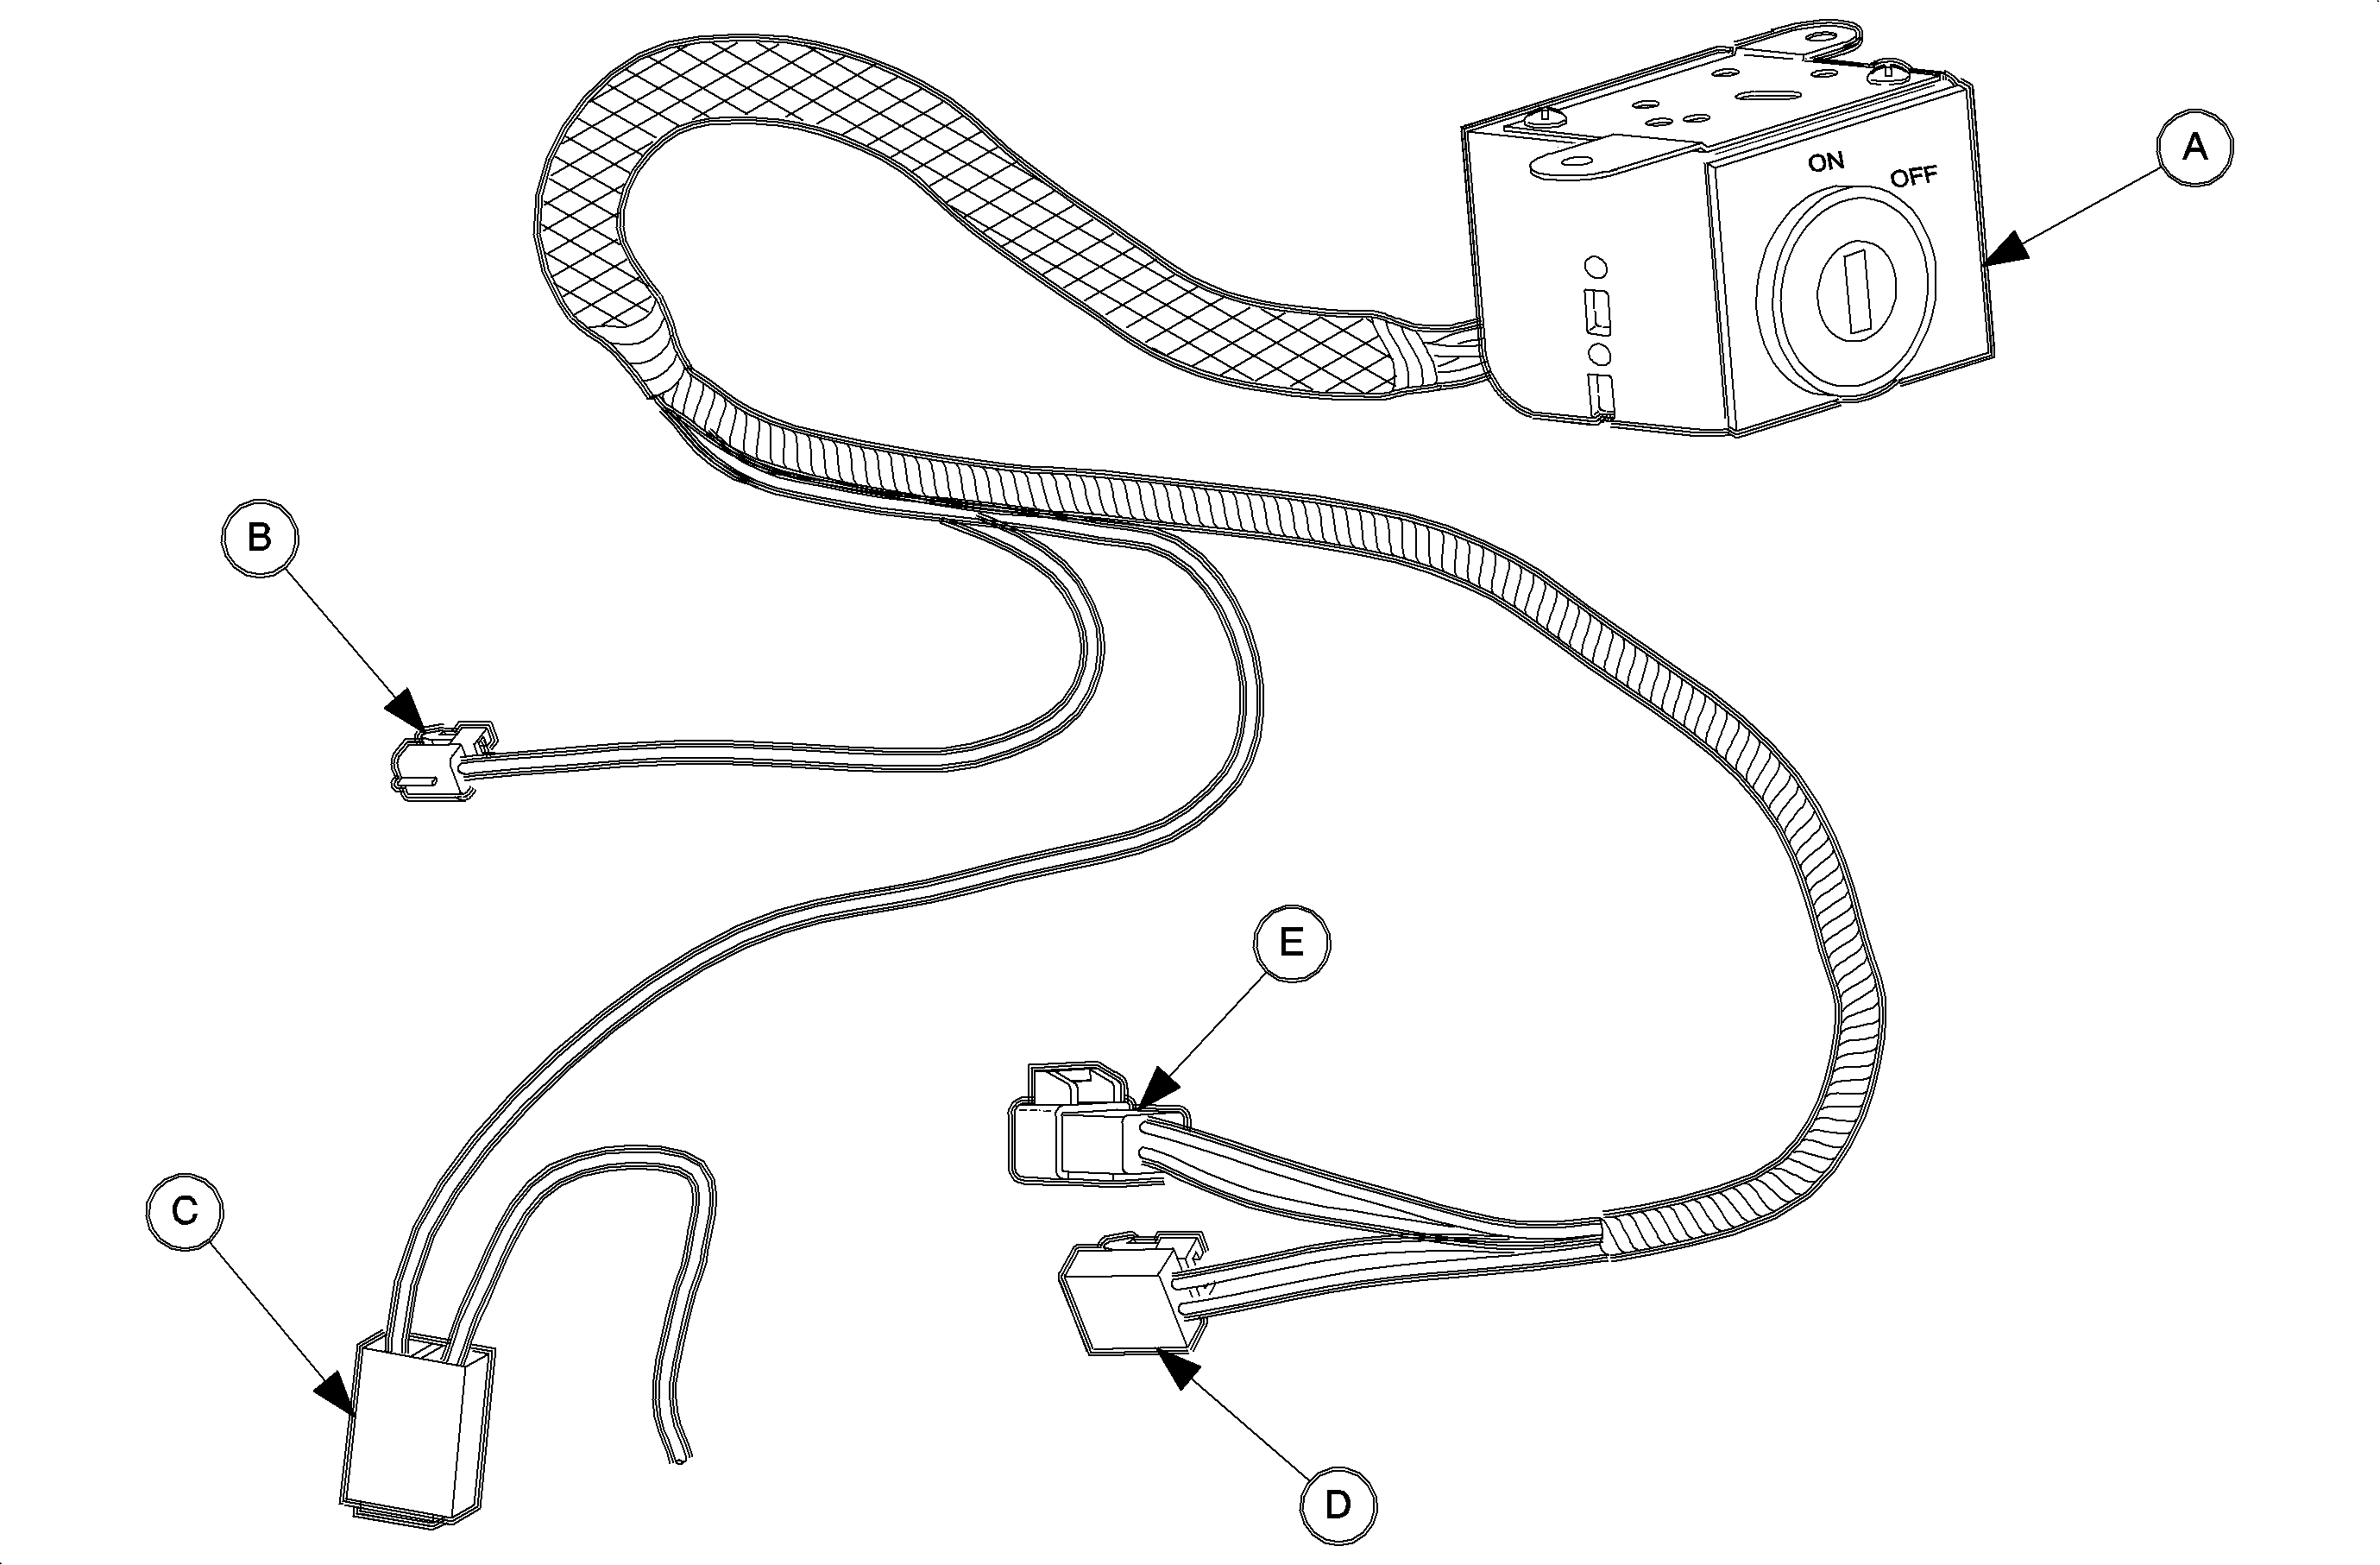
- Assemble the air bag ON-OFF switch (or switches)
to the mounting brackets using 2 Phillips head screws fro each air bag ON-OFF switch.
(1) Bracket screws (2) Switch bracket (3) Switch mounting rivets (4) Disable
switch (5) Applique
- Apply the appropriate applique to the air bag ON-OFF switch.
- If installing only one air bag ON-OFF switch:
- Route the air bag ON-OFF switch wiring harness through the hole in the
glove box.
- Secure the air bag ON-OFF switch to glove box with 2 pop rivets provided.
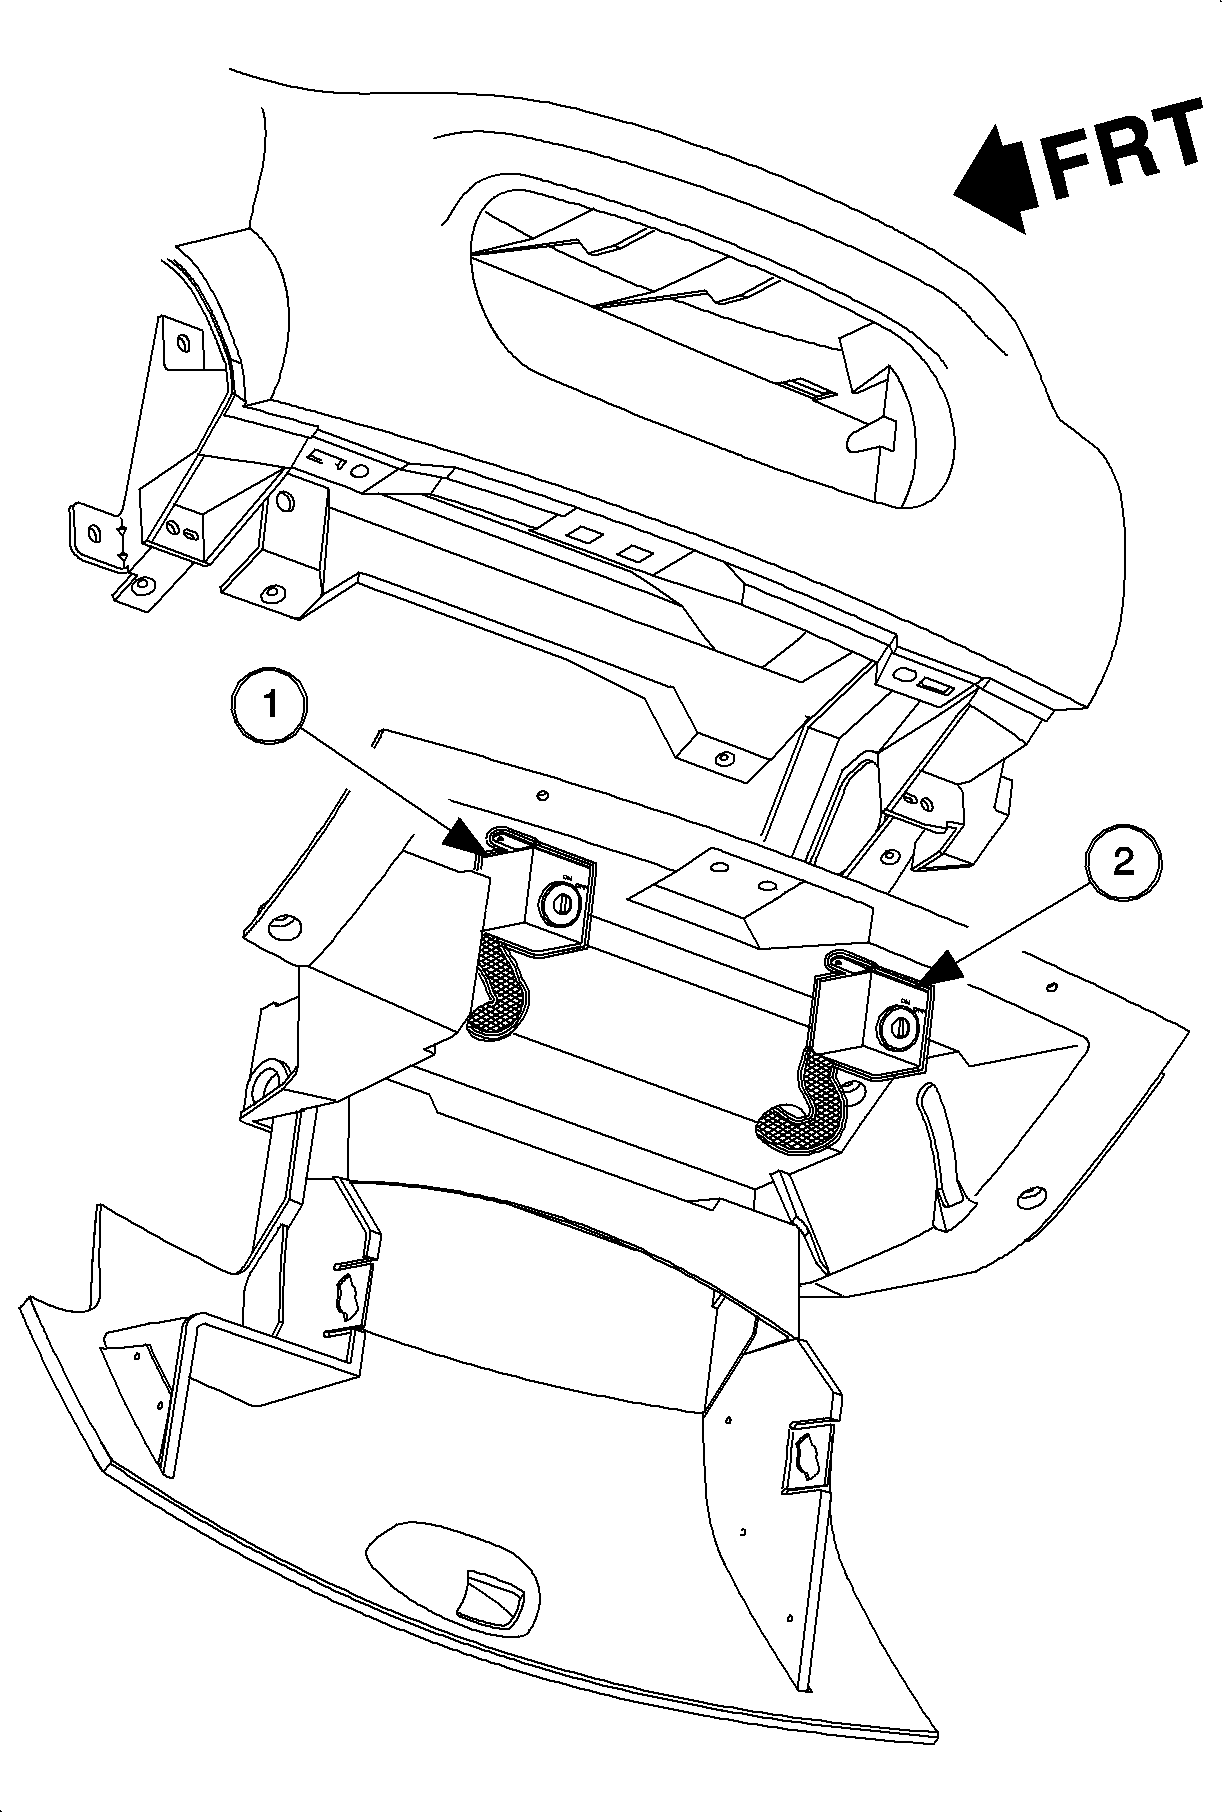
(1) Driver or Passenger Air Bag ON-OFF Switch.
- If installing both air bag ON-OFF switches:
- Route the driver air bag ON-OFF switch (1) wiring harness through the
hole in the left side of the glove box, and secure the air bag ON-OFF switch to the
glove box with 2 pop rivets provided.
- Route the passenger air bag ON-OFF switch (2) wiring harness through the
hole in the right side of the glove box, and secure the air bag ON-OFF switch with
2 pop rivets provided.
(1) Driver Air Bag ON-OFF Switch
(2) Passenger Air Bag ON-OFF Switch
Caution
To prevent personal injury, air bag display lights must not be placed on any
instrument panel surfaces directly in front of the driver's or passenger's leg or
knee area.
Important
There is one air bag OFF display assembly for each air bag ON-OFF switch installed
in the vehicle.
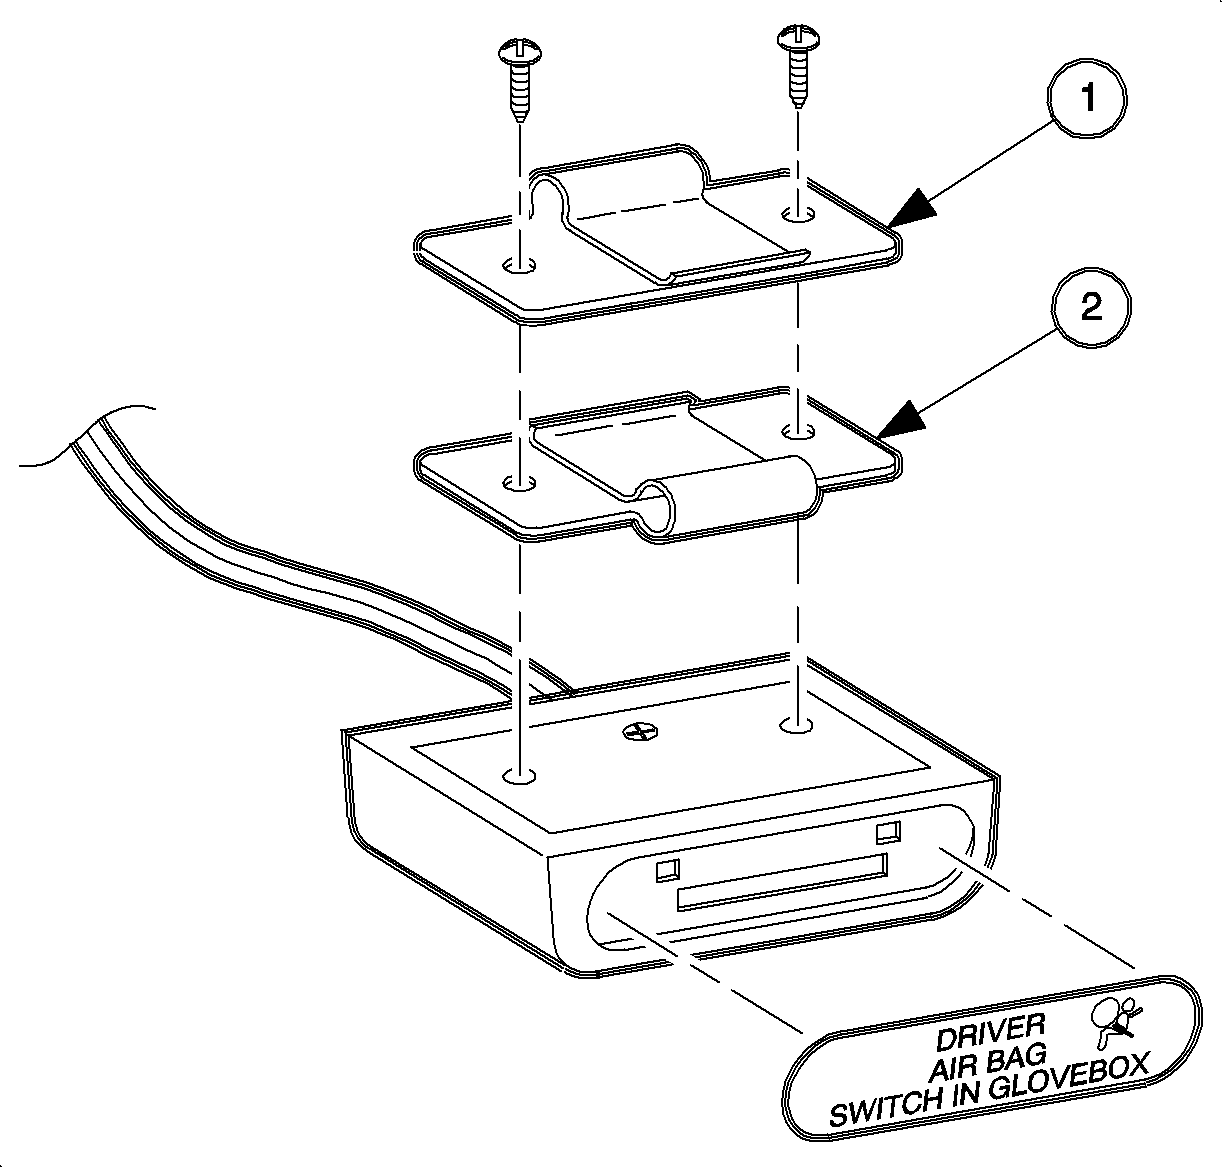
- With 2 screws provided in the kit, assemble the display assembly clip to air
bag OFF display assembly.
- On vehicles without a sunroof, the opening in the display assembly clip
(1) faces toward the front (face) of the air bag OFF display assembly.
- On vehicles with a sunroof, the opening in the display assembly clip (2)
faces the rear of the air bag OFF display assembly.
- Apply the appropriate applique to the air bag OFF display assembly.
- If two air bag ON-OFF switches are being installed, repeat steps 18 and
19 for the second air bag OFF display assembly.
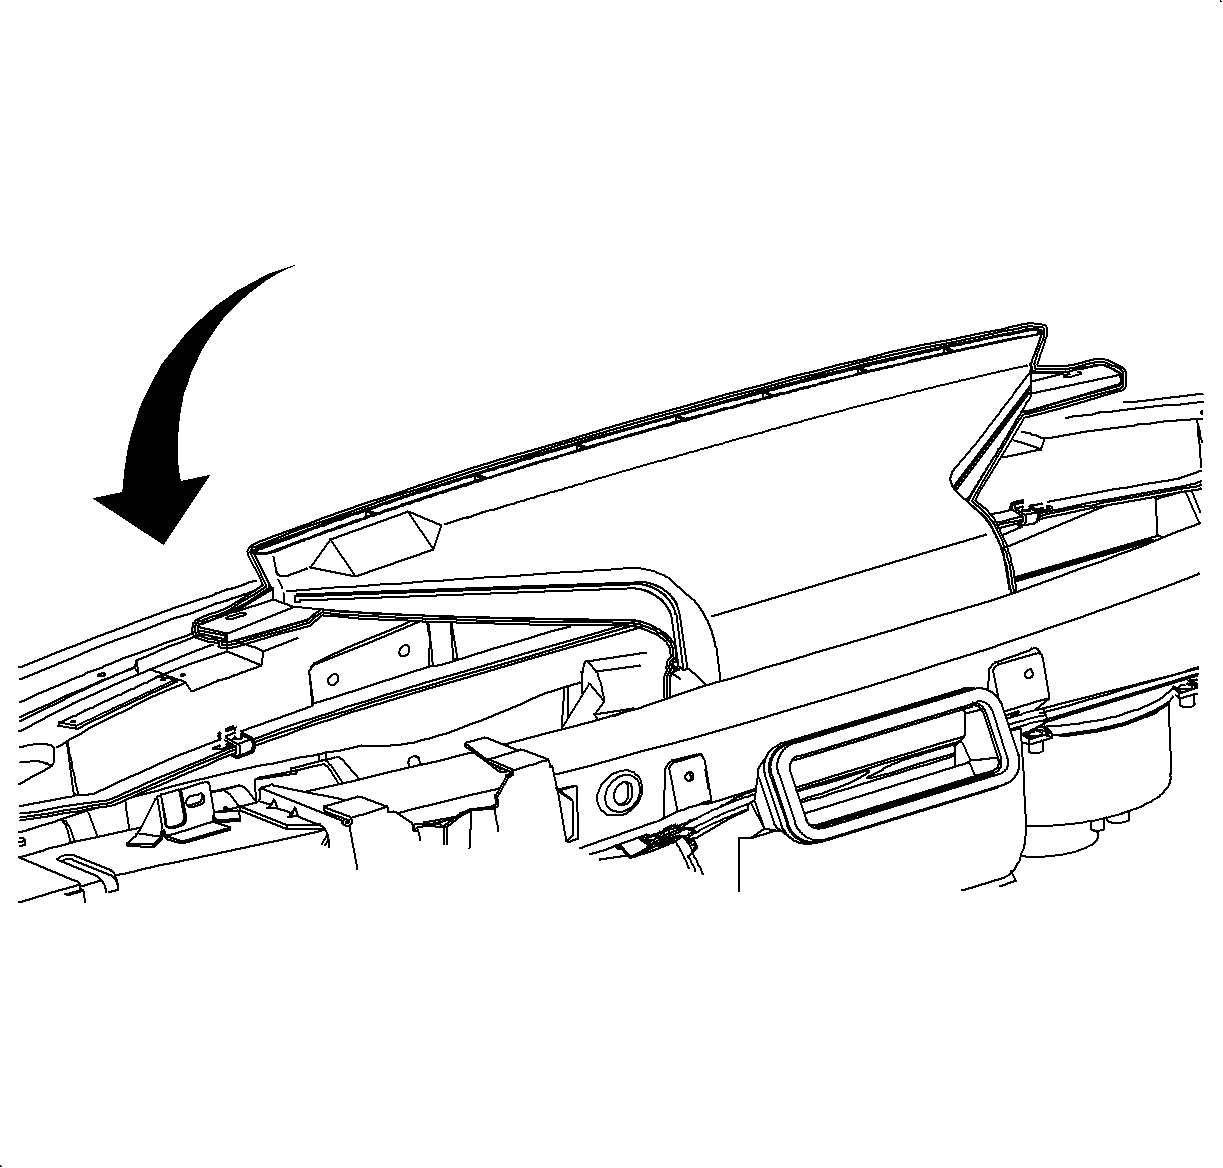
- On vehicles without a sunroof, attach the air
bag OFF display assembly to the headliner as shown in the illustration.

- On vehicles with a sunroof:
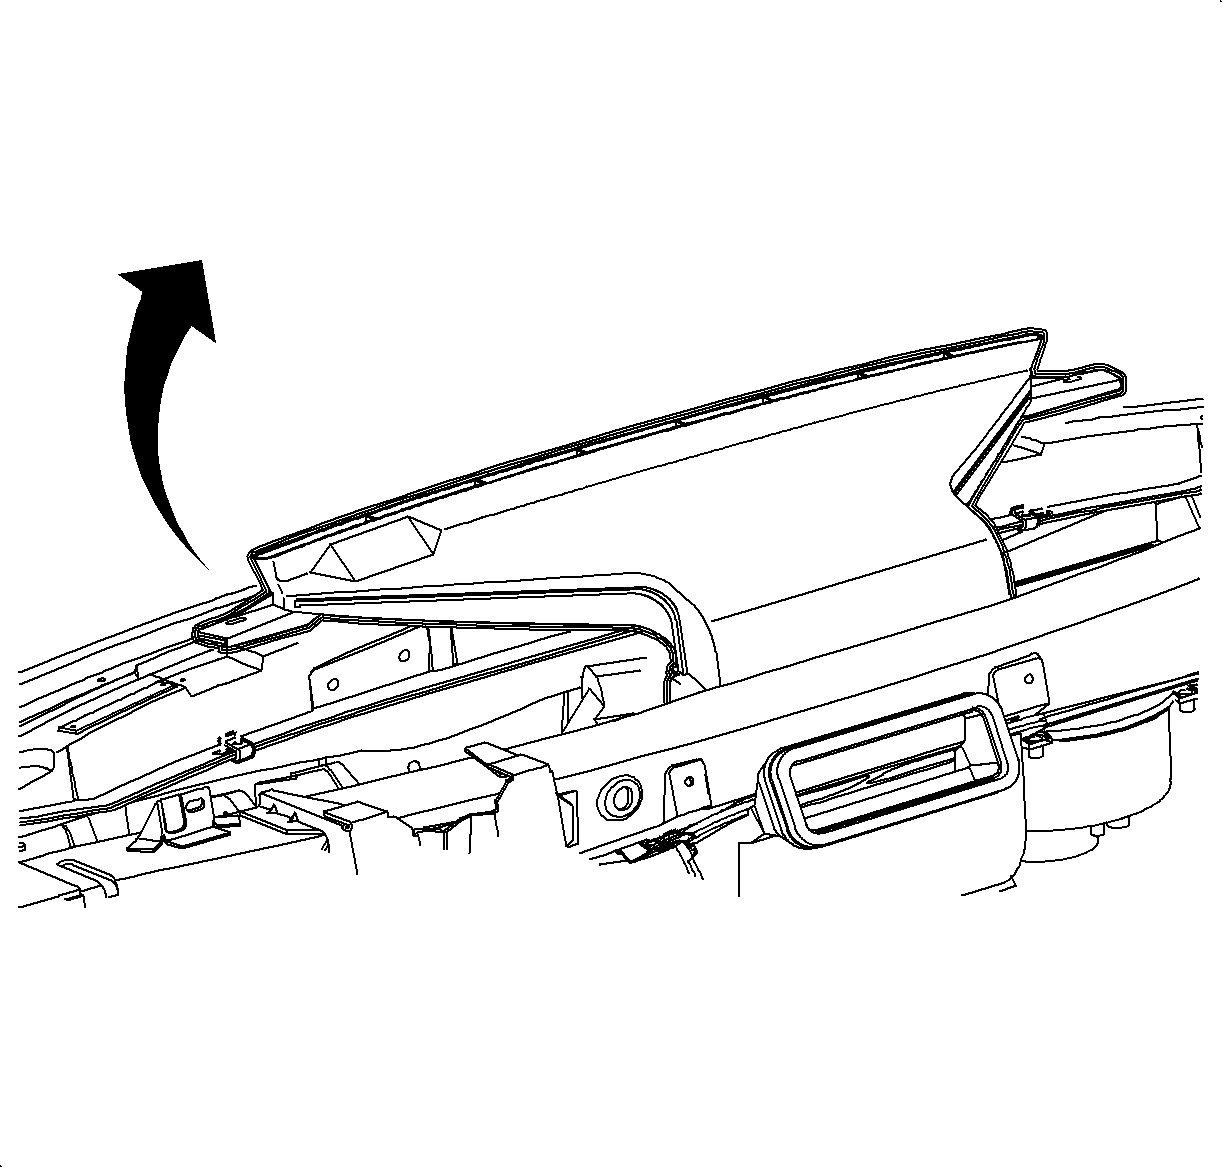
- Route the wiring from the air bag OFF display
assembly (or assemblies) across the front of the headliner and tuck between the headliner
and roof panel. Continue routing down the right A-pillar to the I/P compartment opening.
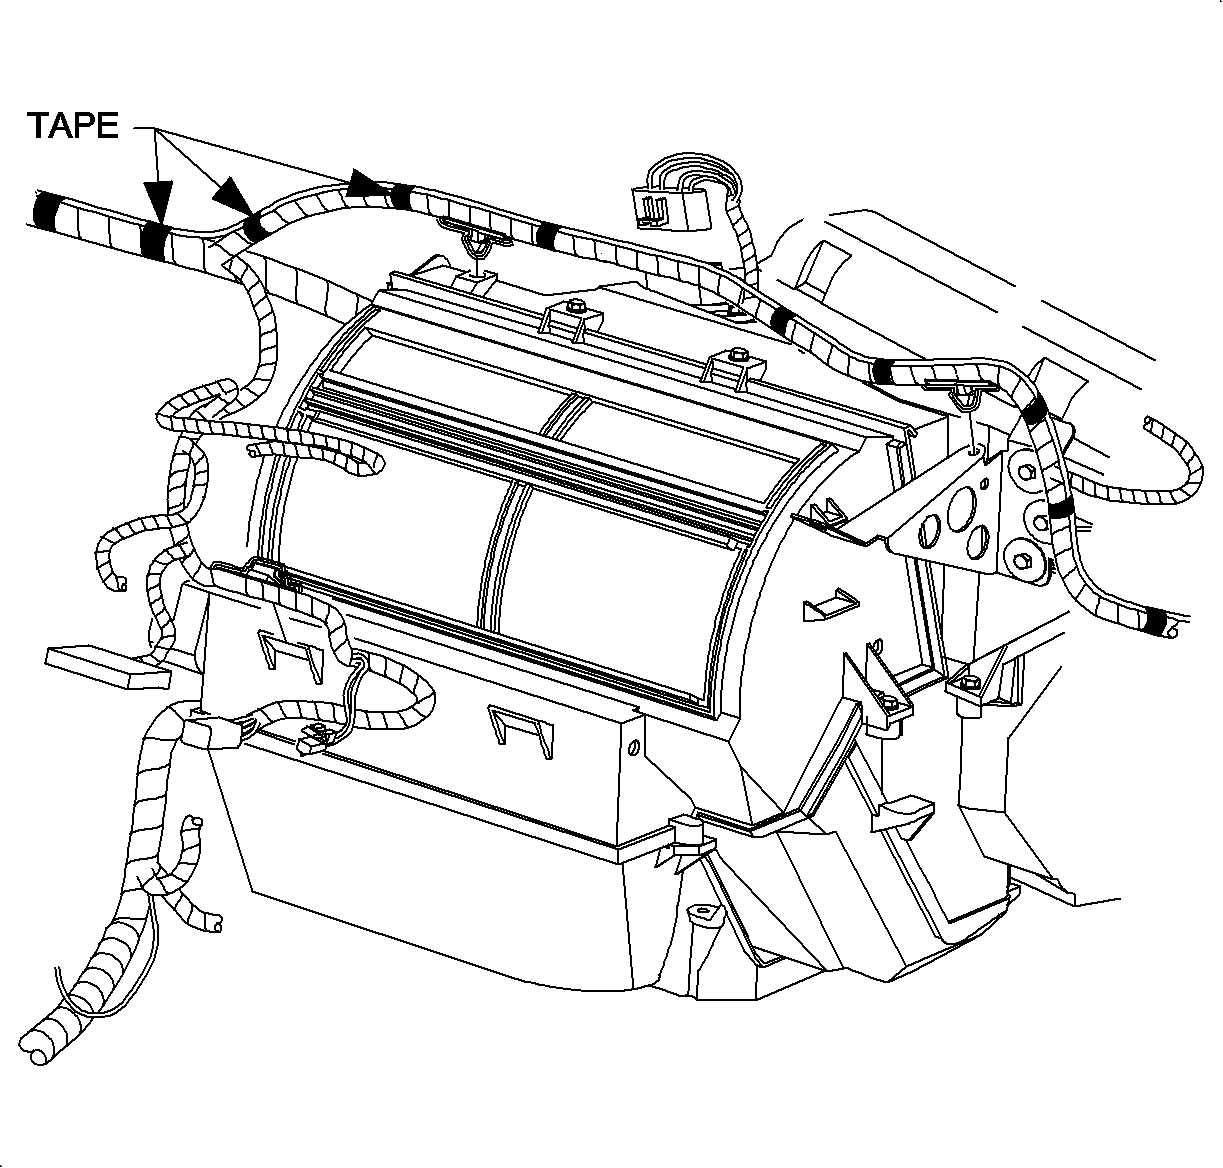
To prevent rattling, tape the harness to the A-pillar.
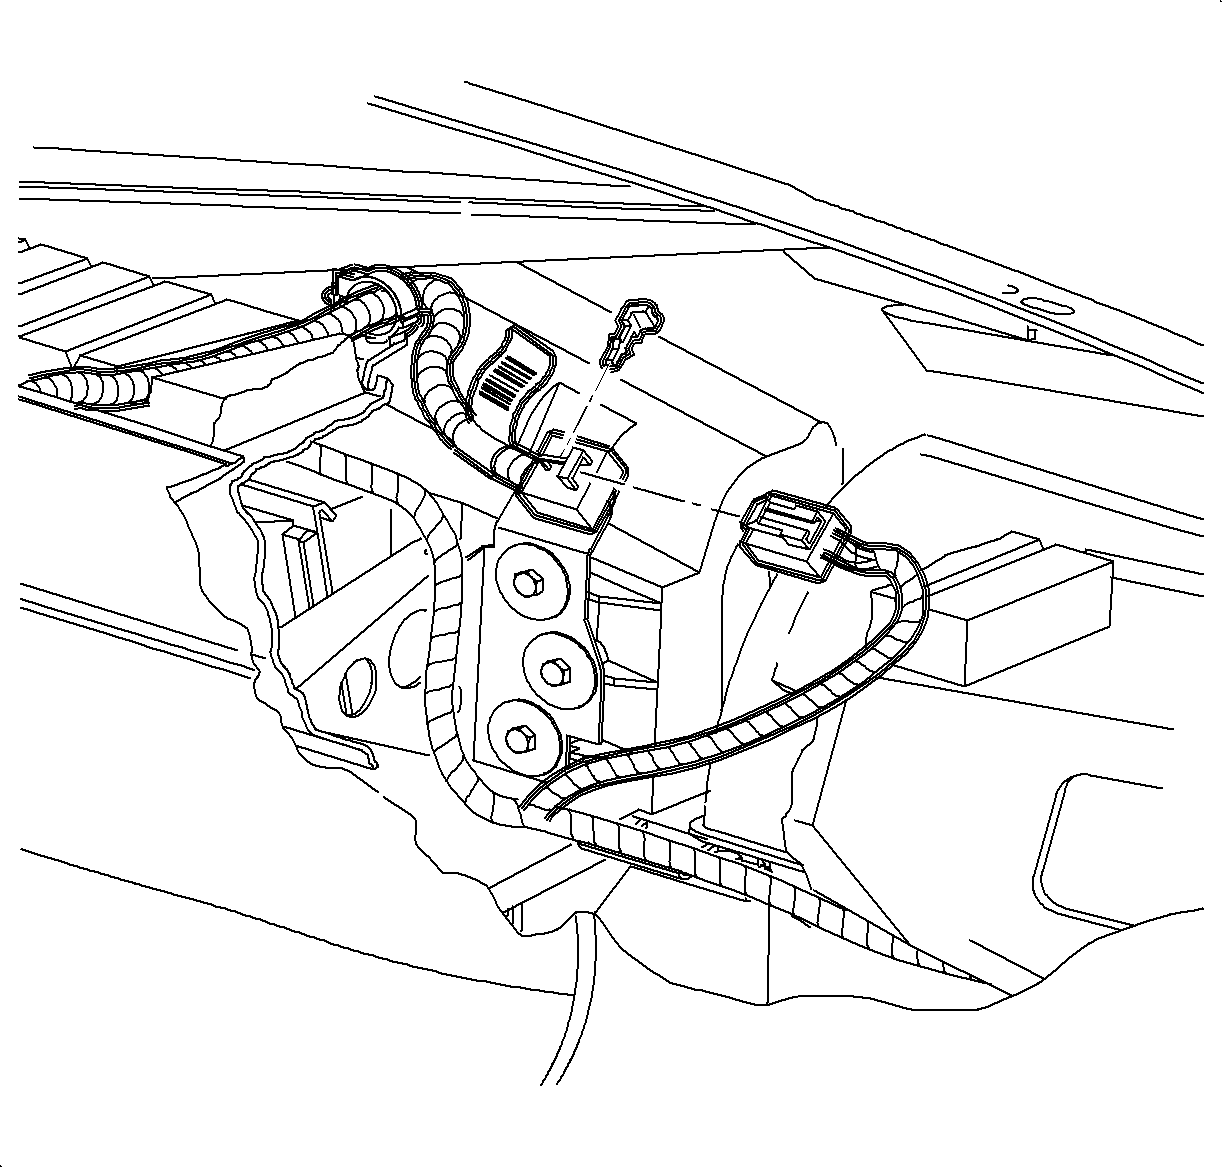
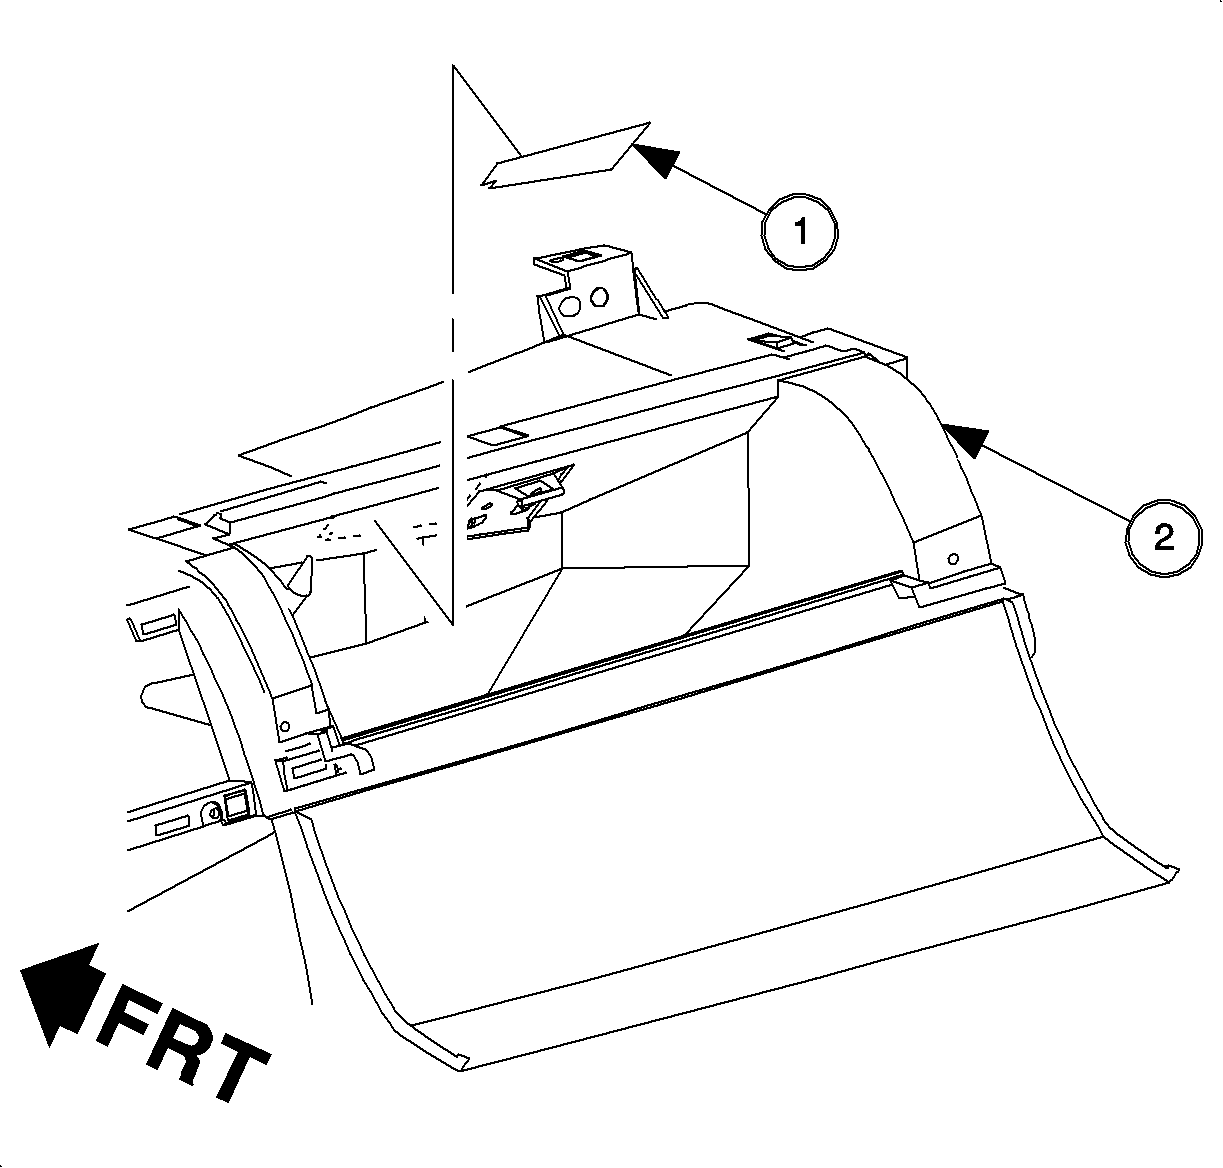
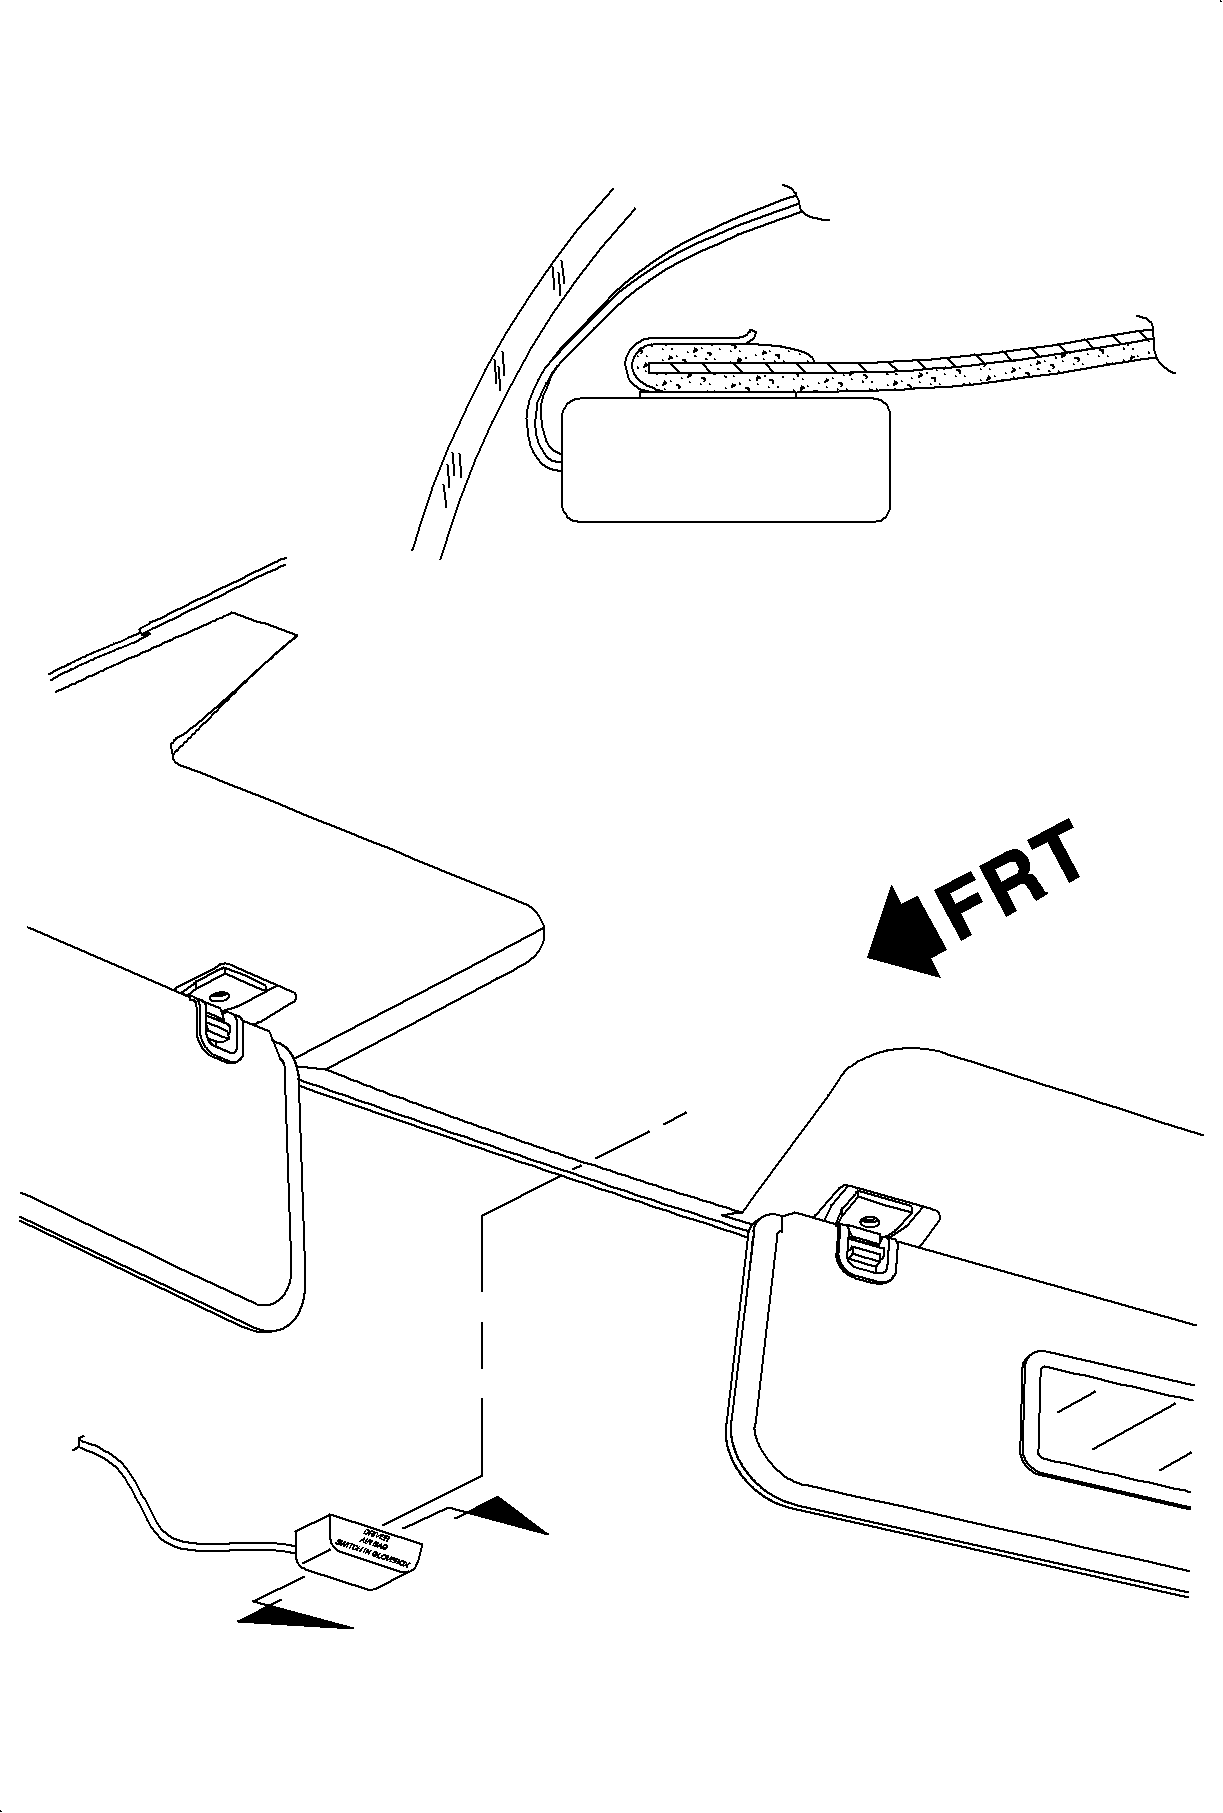
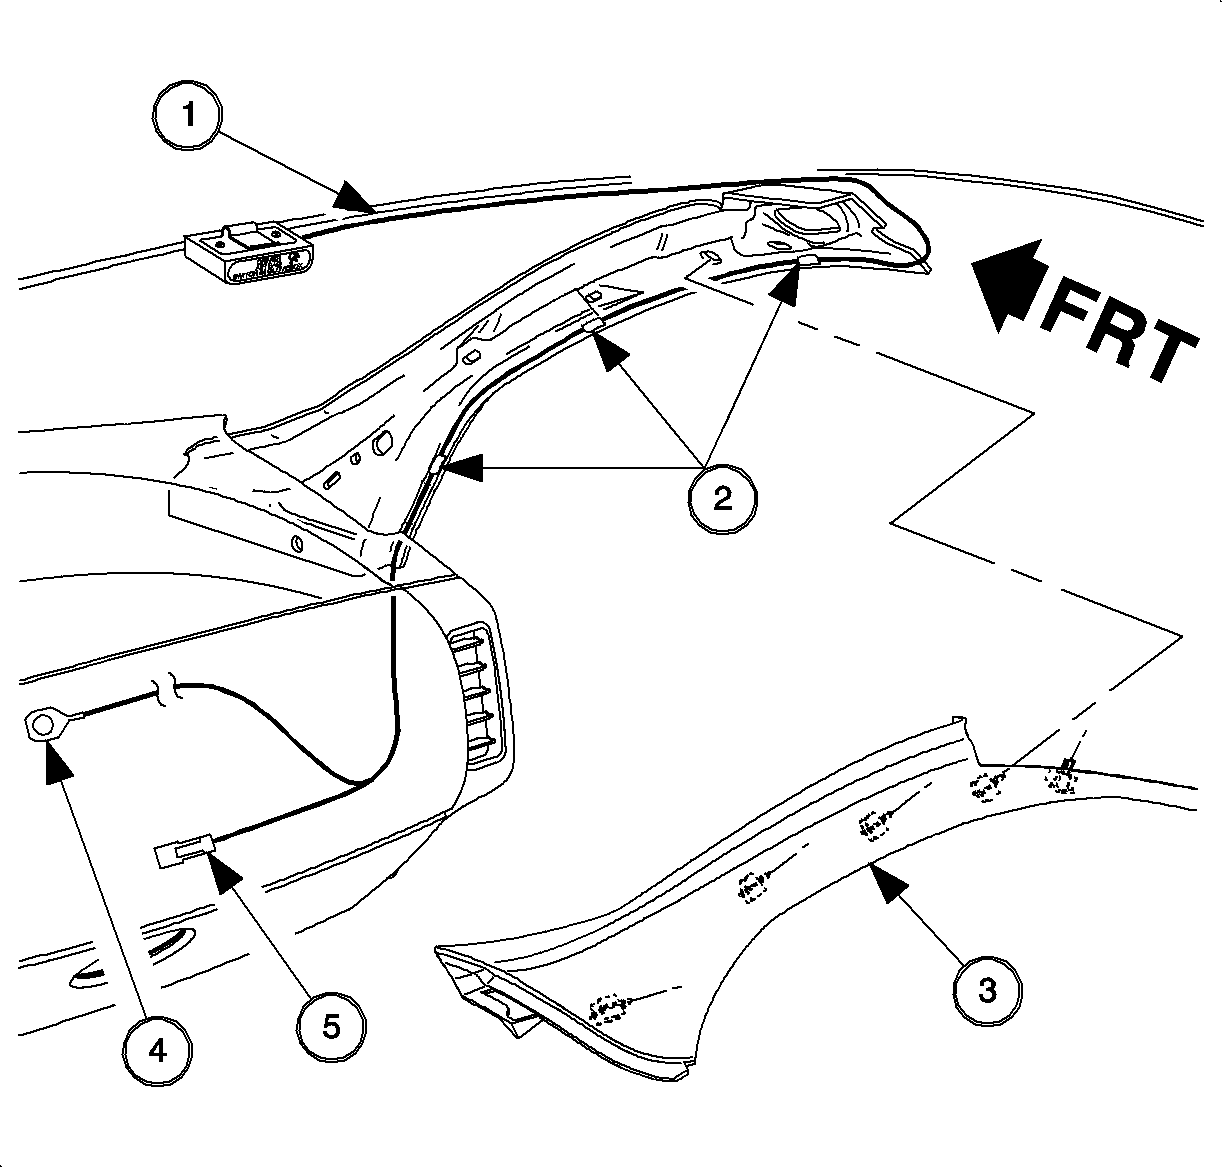
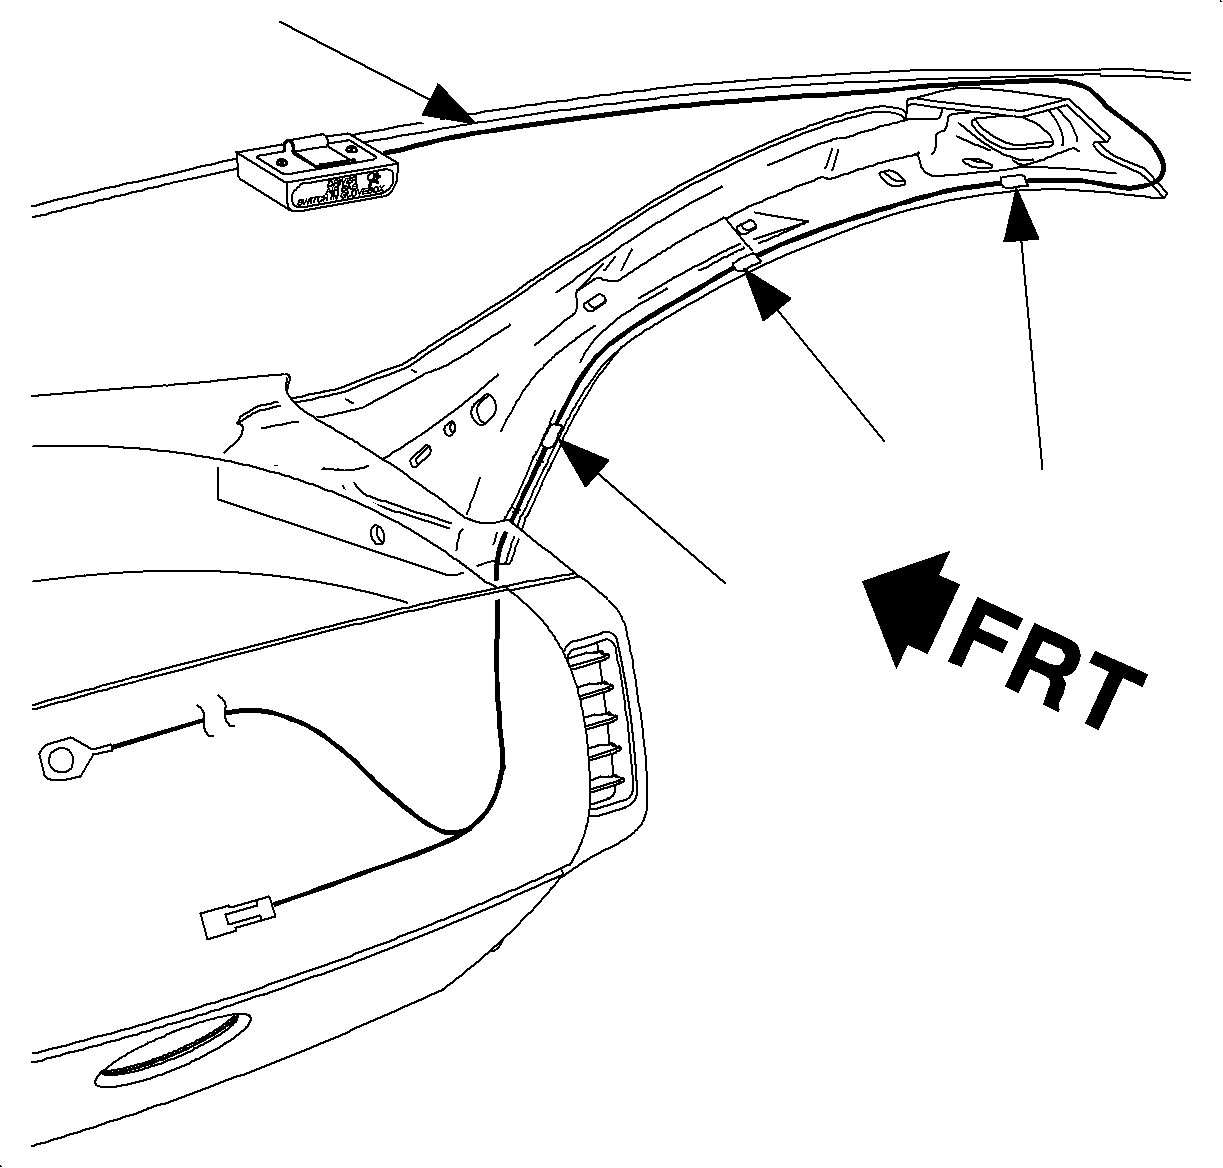
(1) Air Bag OFF Display Assembly (2) Tape (3 Right Side A-pillar Garnish Molding
(4) Ground Terminal (5) Air Bag OFF Display Assembly, In-Line Connector
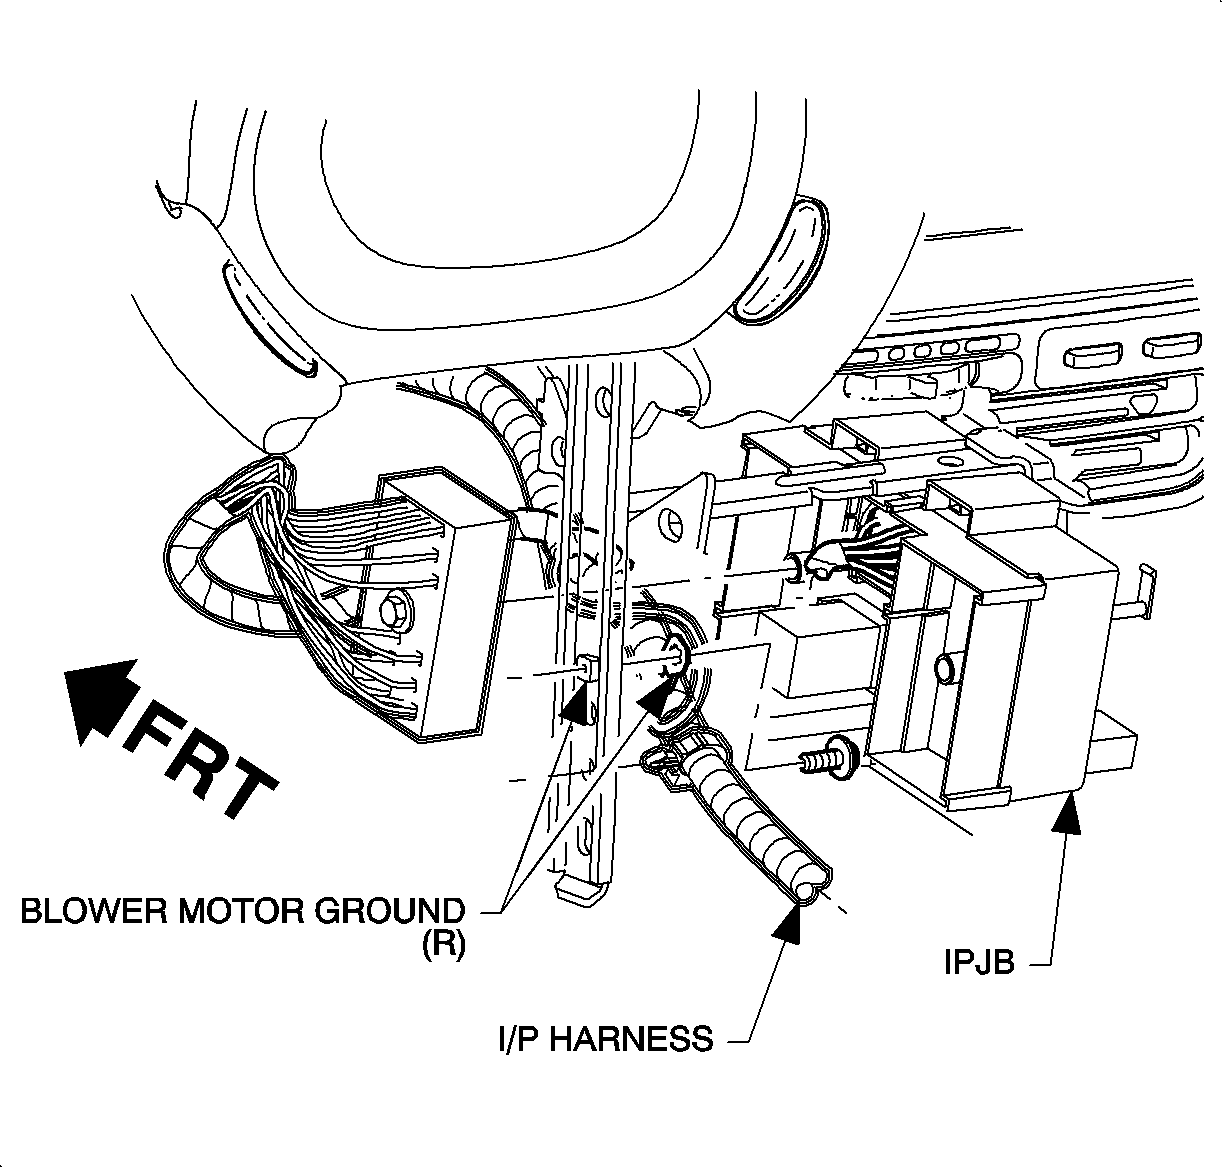
- Install the right side A-pillar garnish molding.
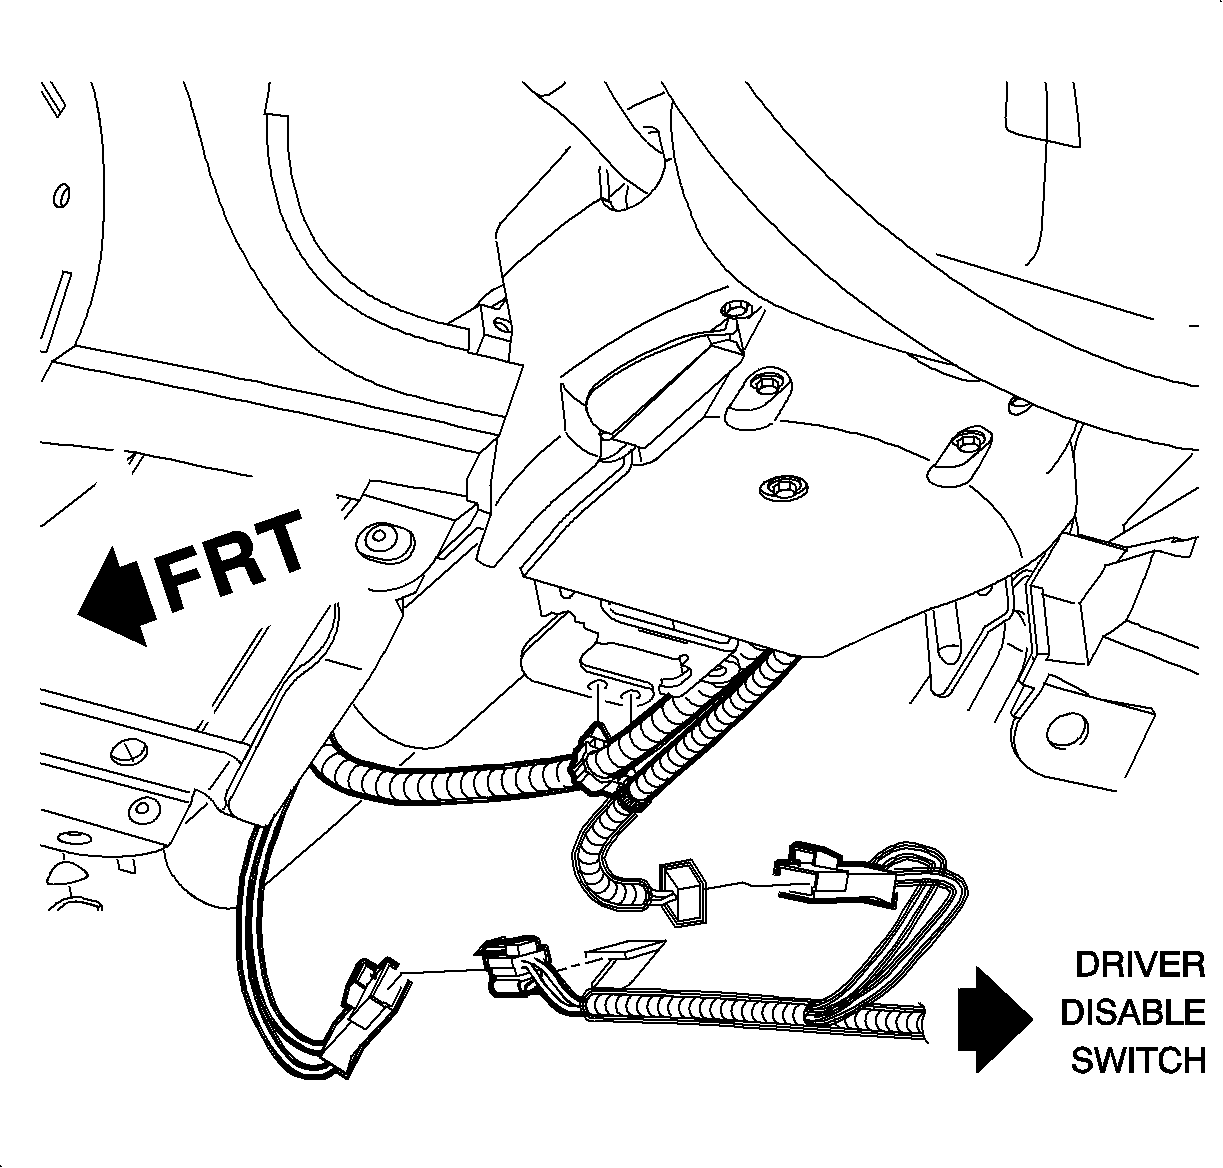
- Route the ground wire from the air bag OFF display
assembly (or assemblies) under the I/P assembly to the H-brace in front of the console
assembly.
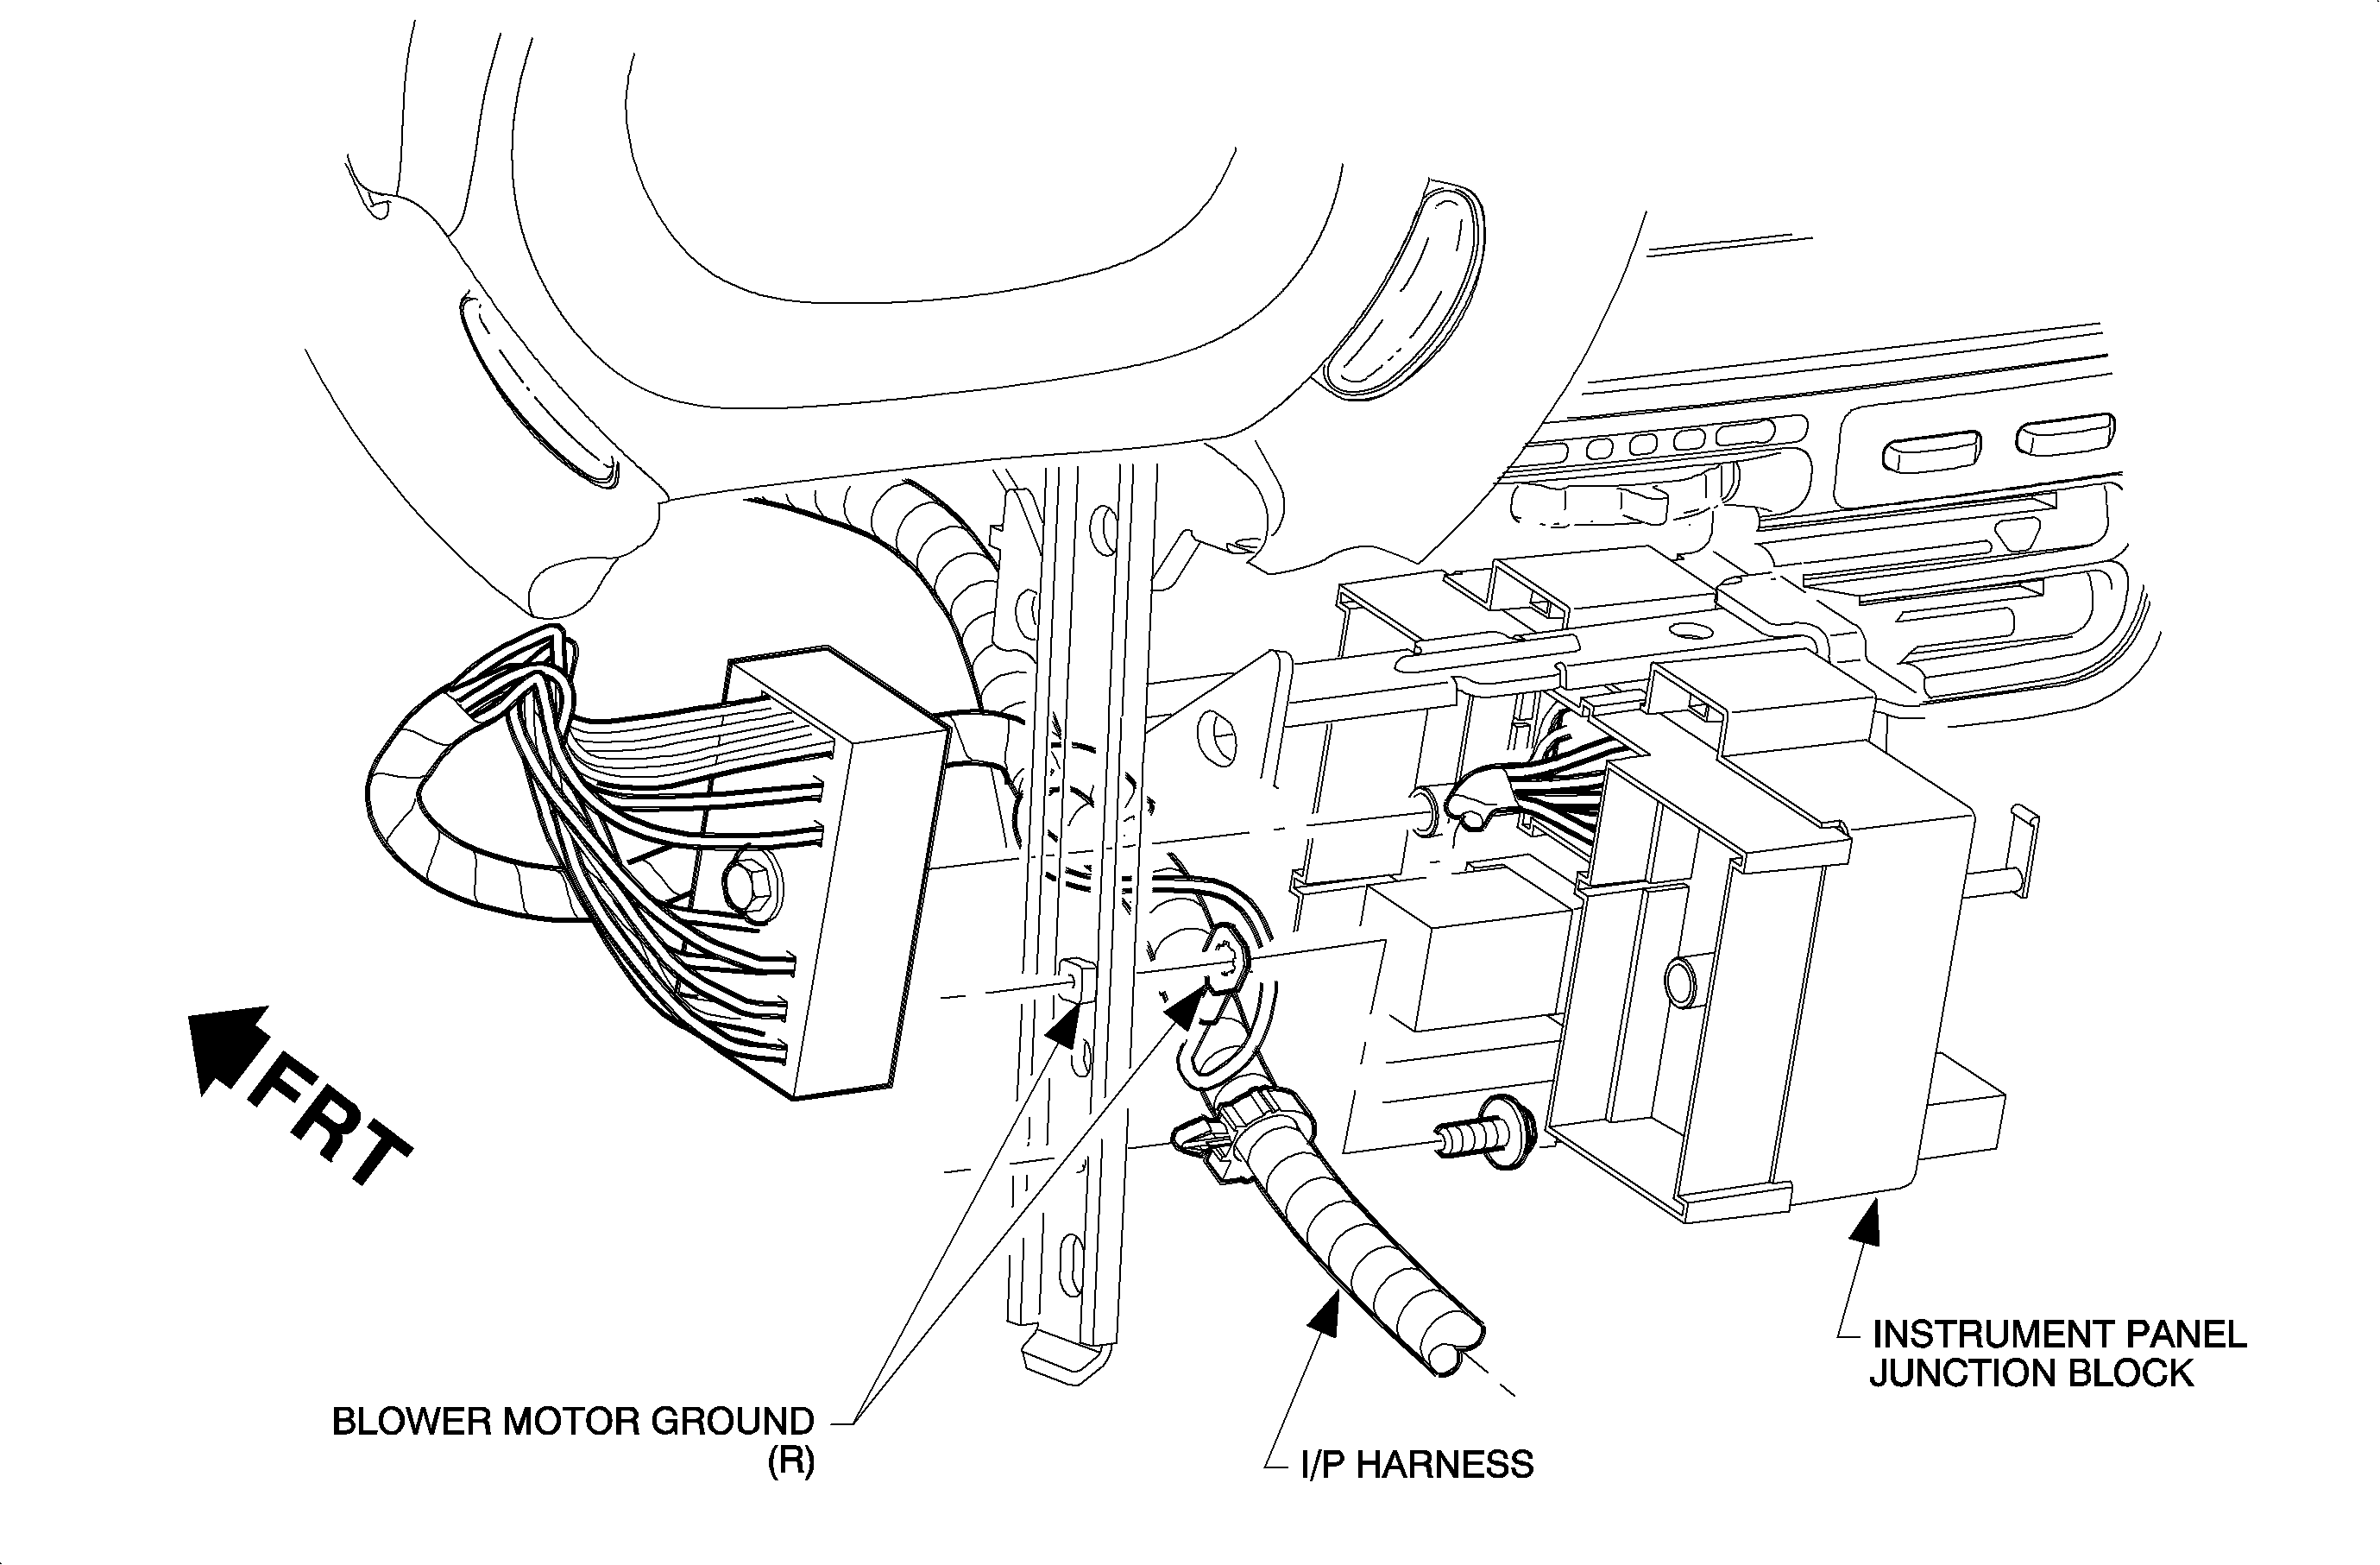
- Locate the blower motor ground on the H-brace and remove the ground fastener.
- Attach the air bag OFF display assembly (or assemblies) ground wire ring
terminal(s) to the H-brace along with the blower motor ground. Refer to the illustration.
- Connect the air bag OFF display assembly (or
assemblies) connector(s). If more than one air bag ON-OFF switch is installed, make
sure to connect the correct air bag OFF display assembly connector to the appropriate
air bag ON-OFF switch assembly wiring connector.
- The driver switch OFF display connector is green.
- The passenger switch OFF display connector is red.
- Install the I/P compartment assembly.
Important
Do not cut any air bag ON-OFF switch assembly wires, except for the pink power
feed wire as instructed in the following steps. Make sure to loop and tie strap any
excessive length of air bag ON-OFF switch assembly wiring harness.
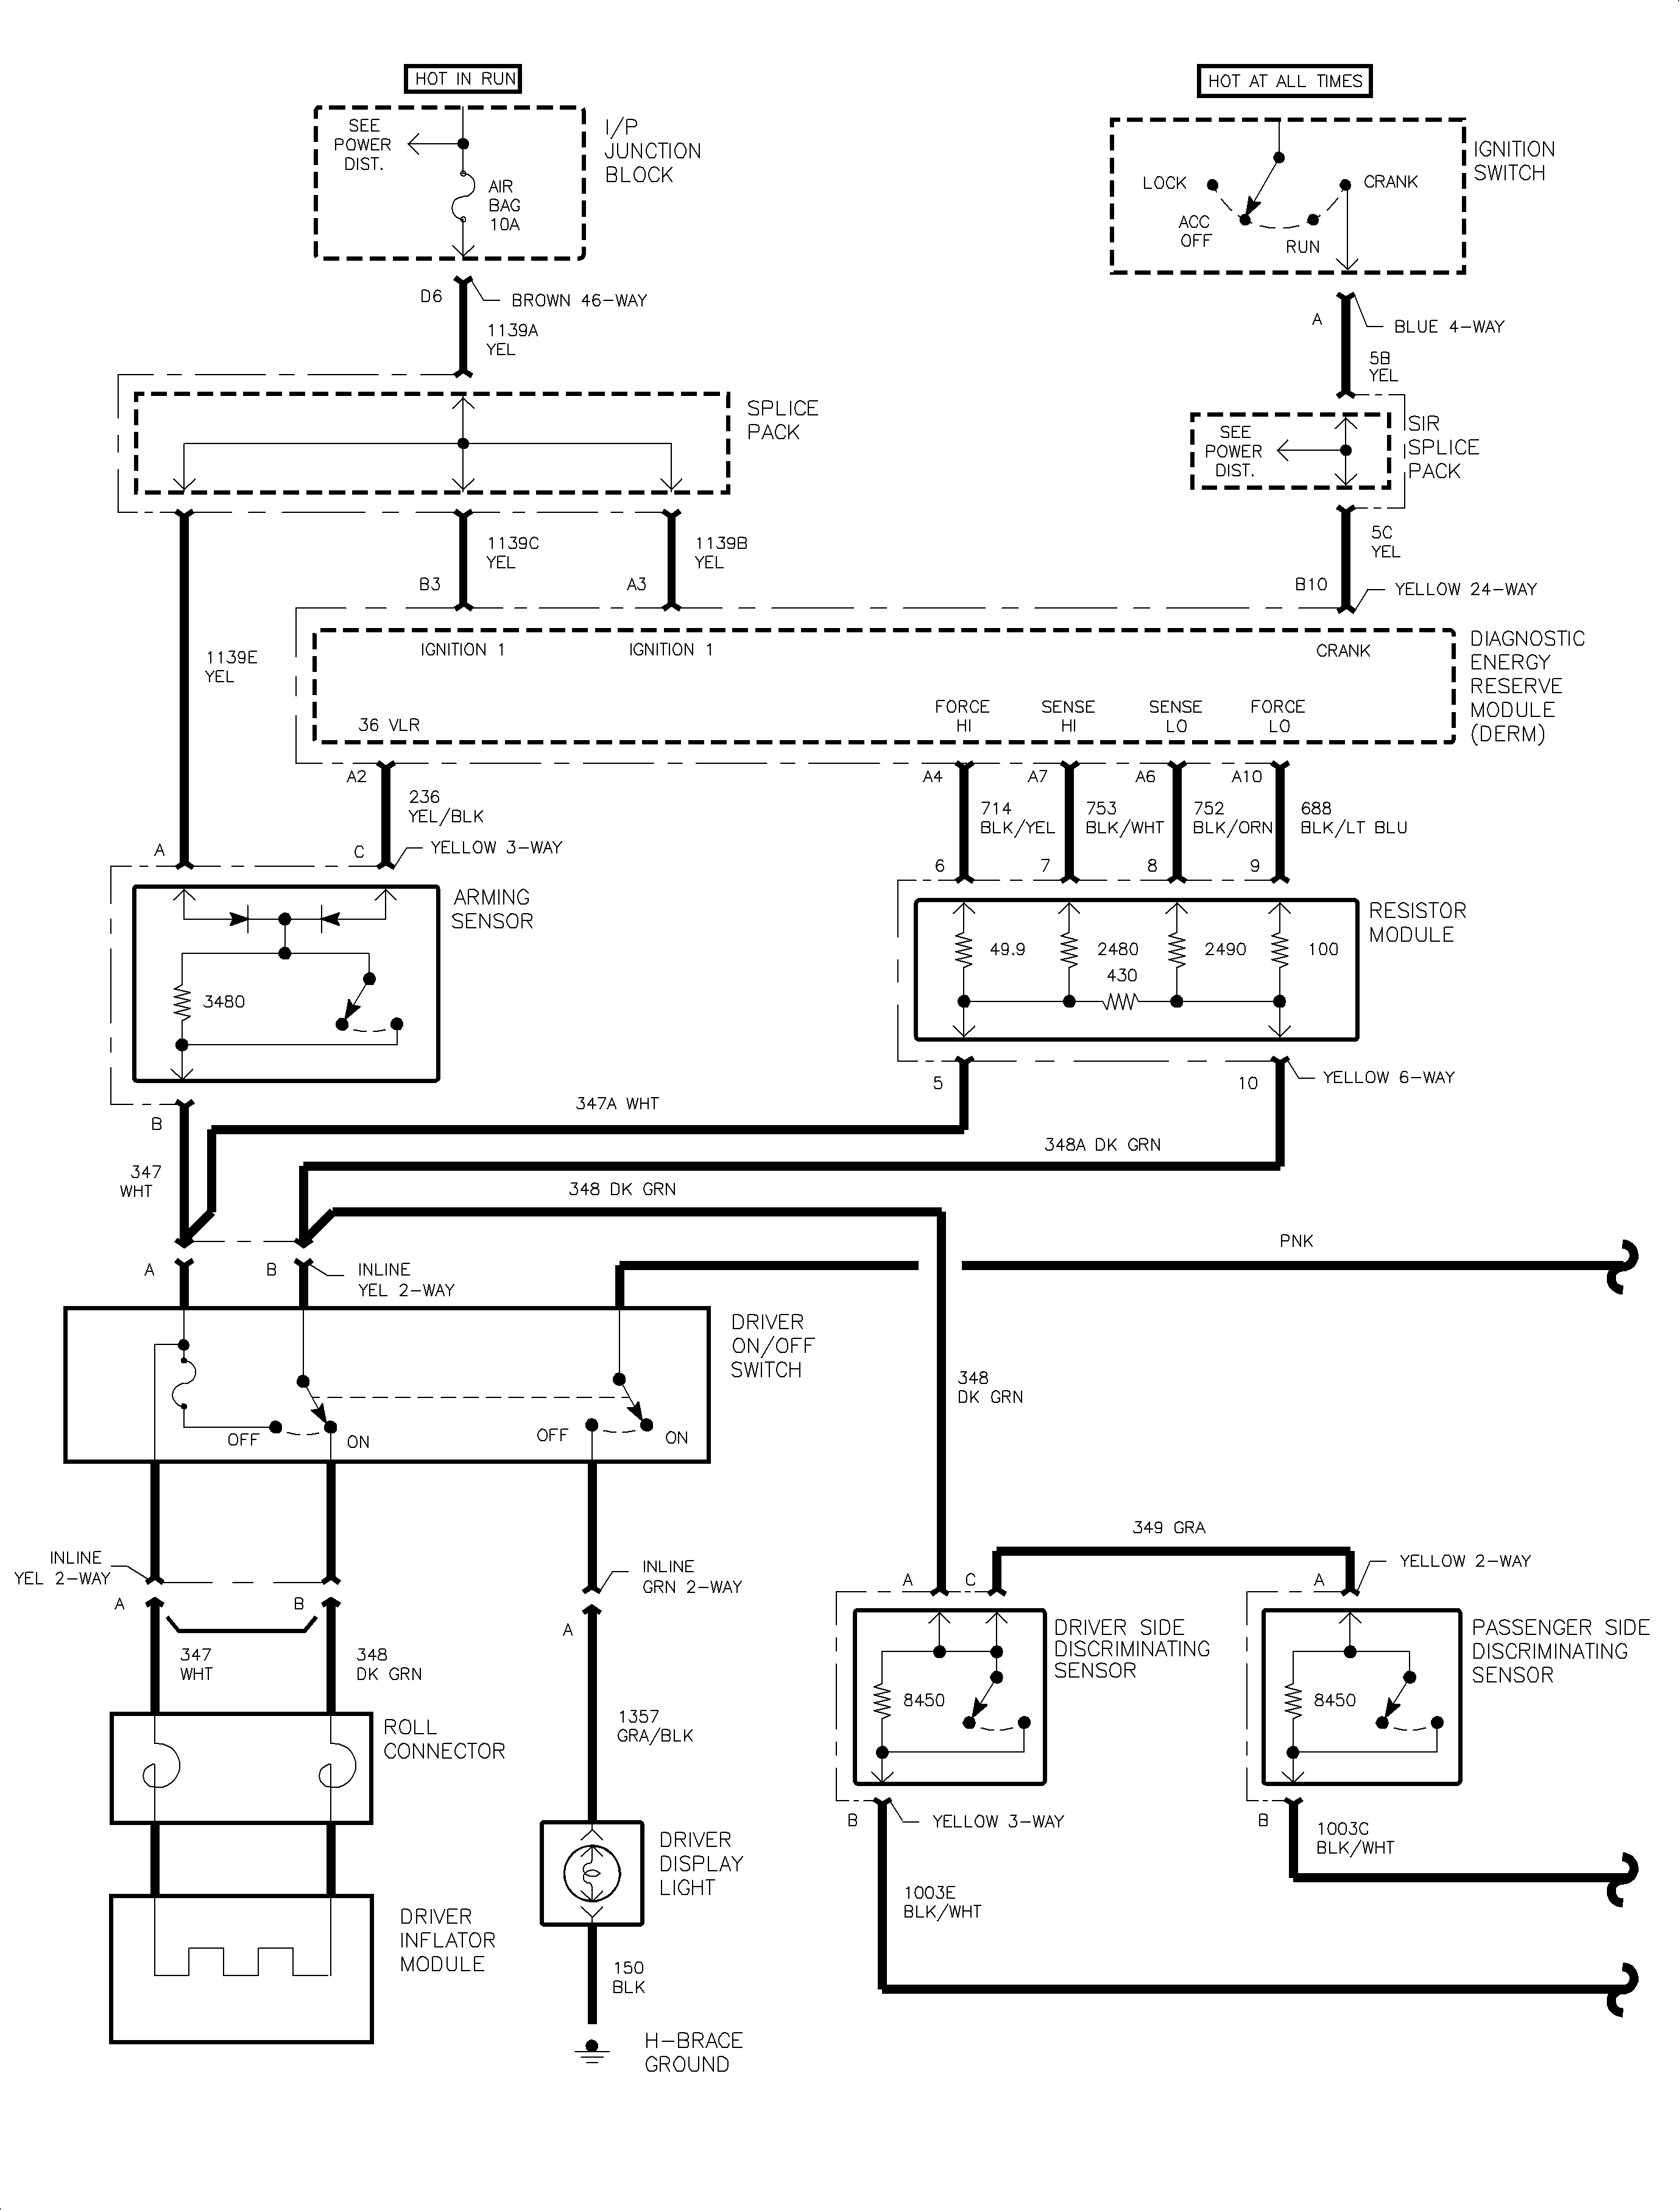
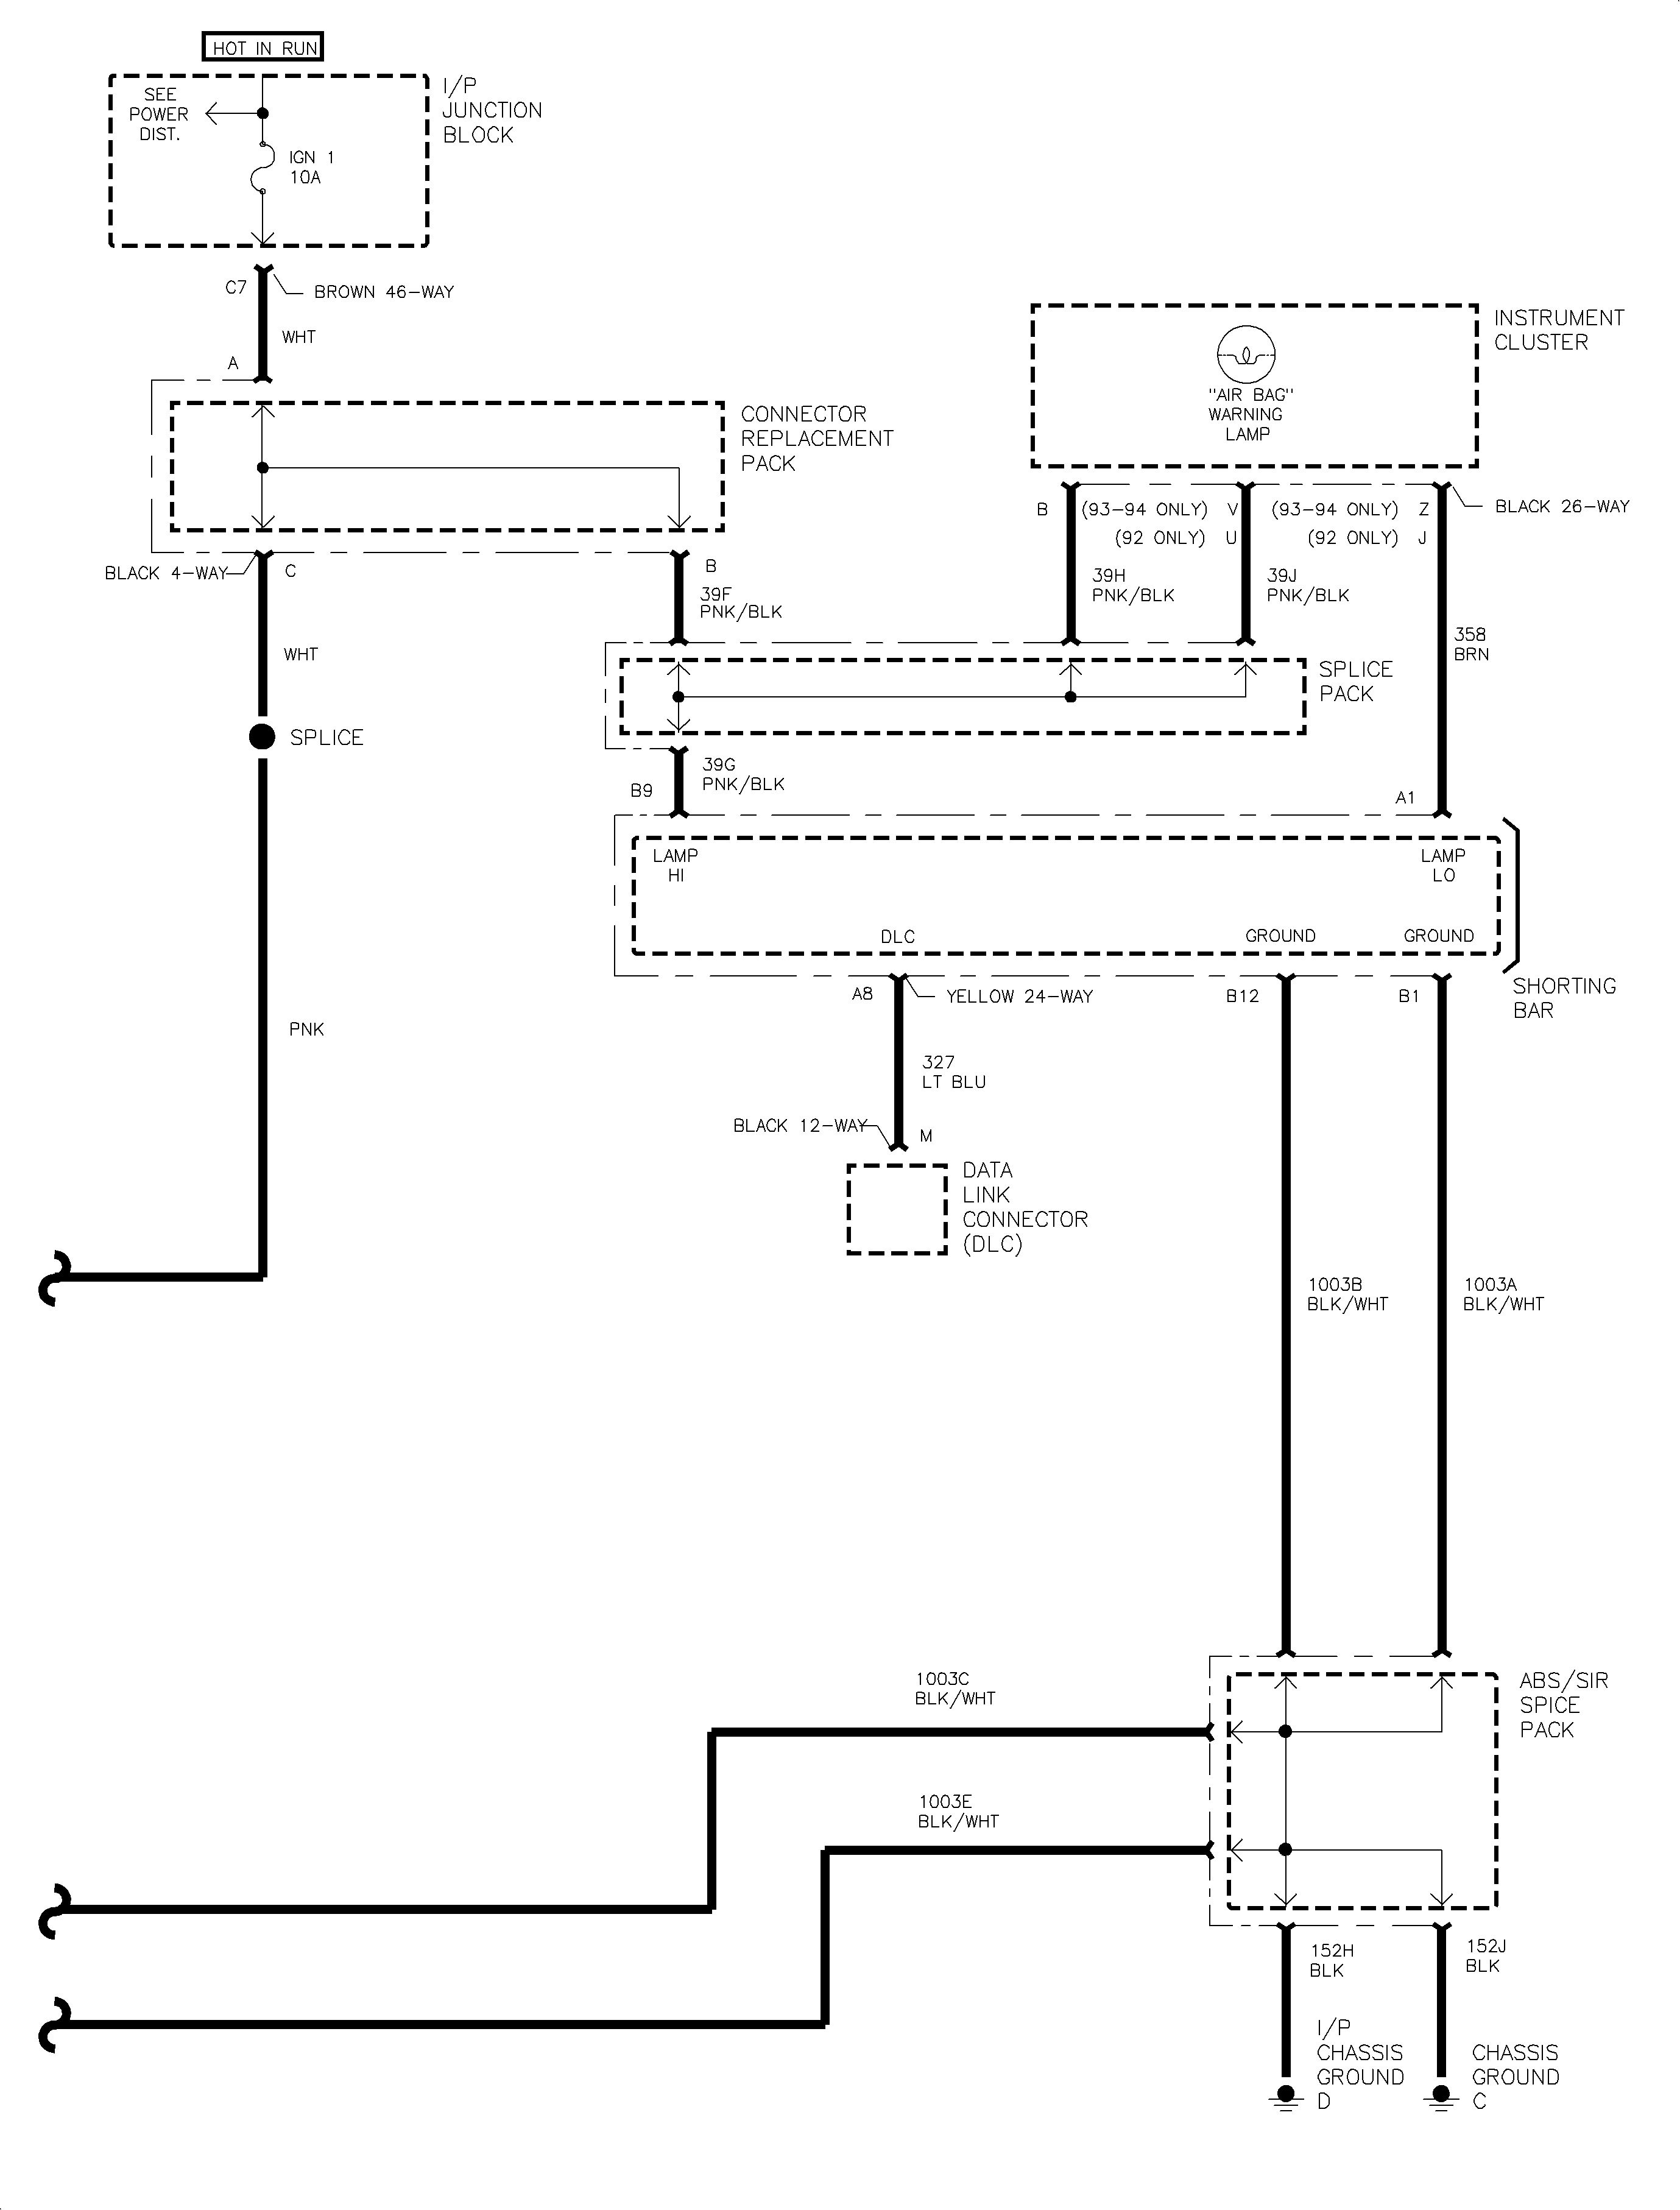
- Refer to the appropriate schematic in this bulletin.
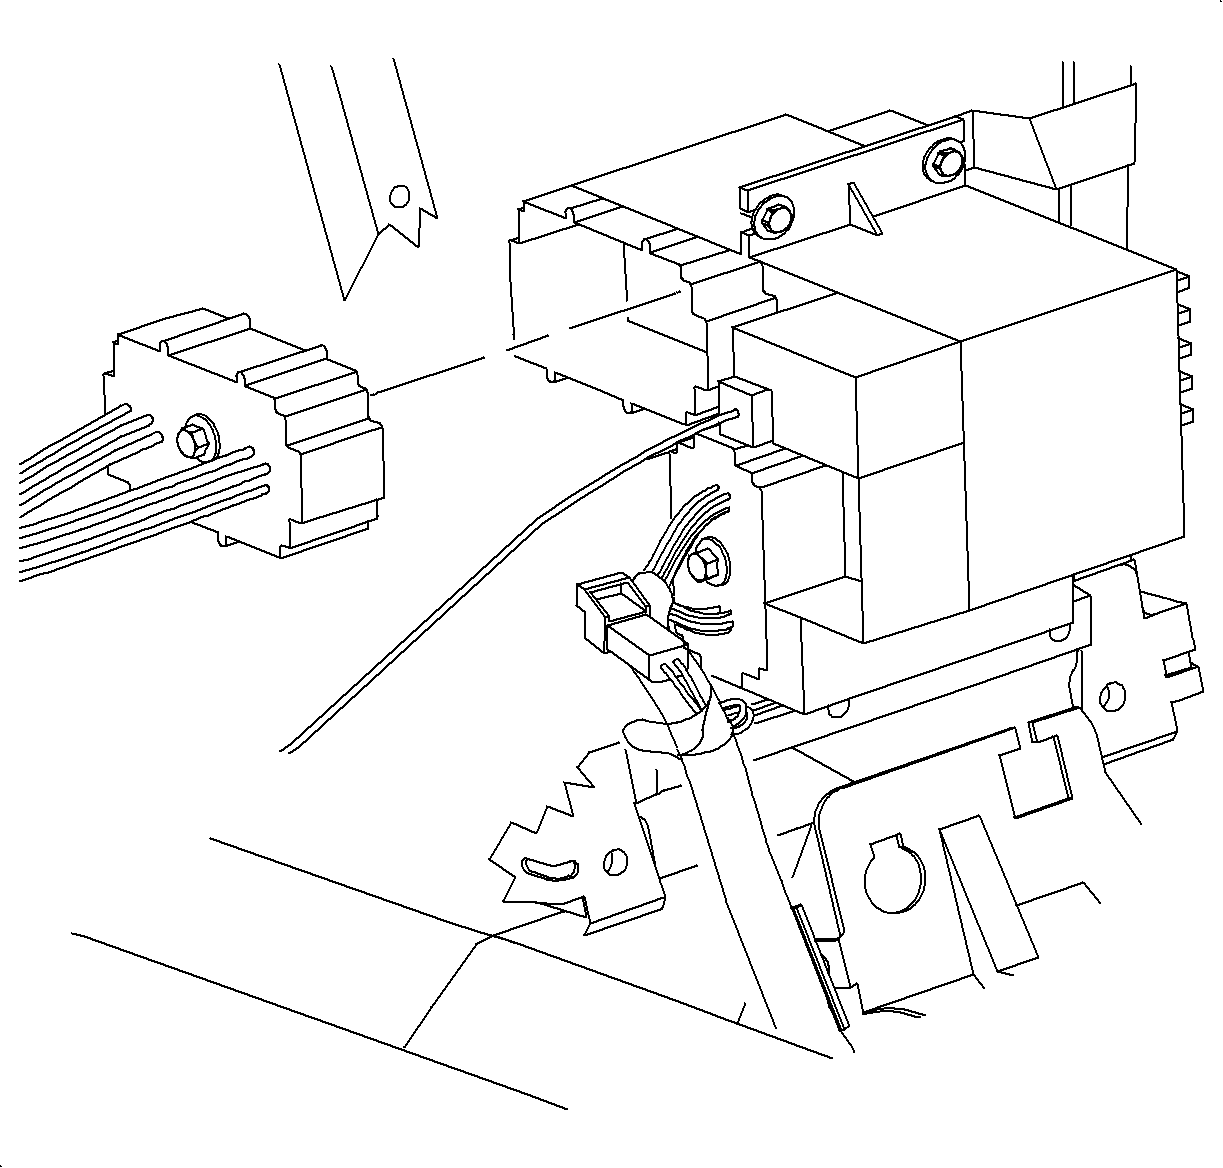
- For 1992-1994 Vehicles:
- Disconnect the brown 46-way connector from the instrument panel junction
block (IPJB).
- Back out terminal for circuit 39 (ignition) from cavity C7.
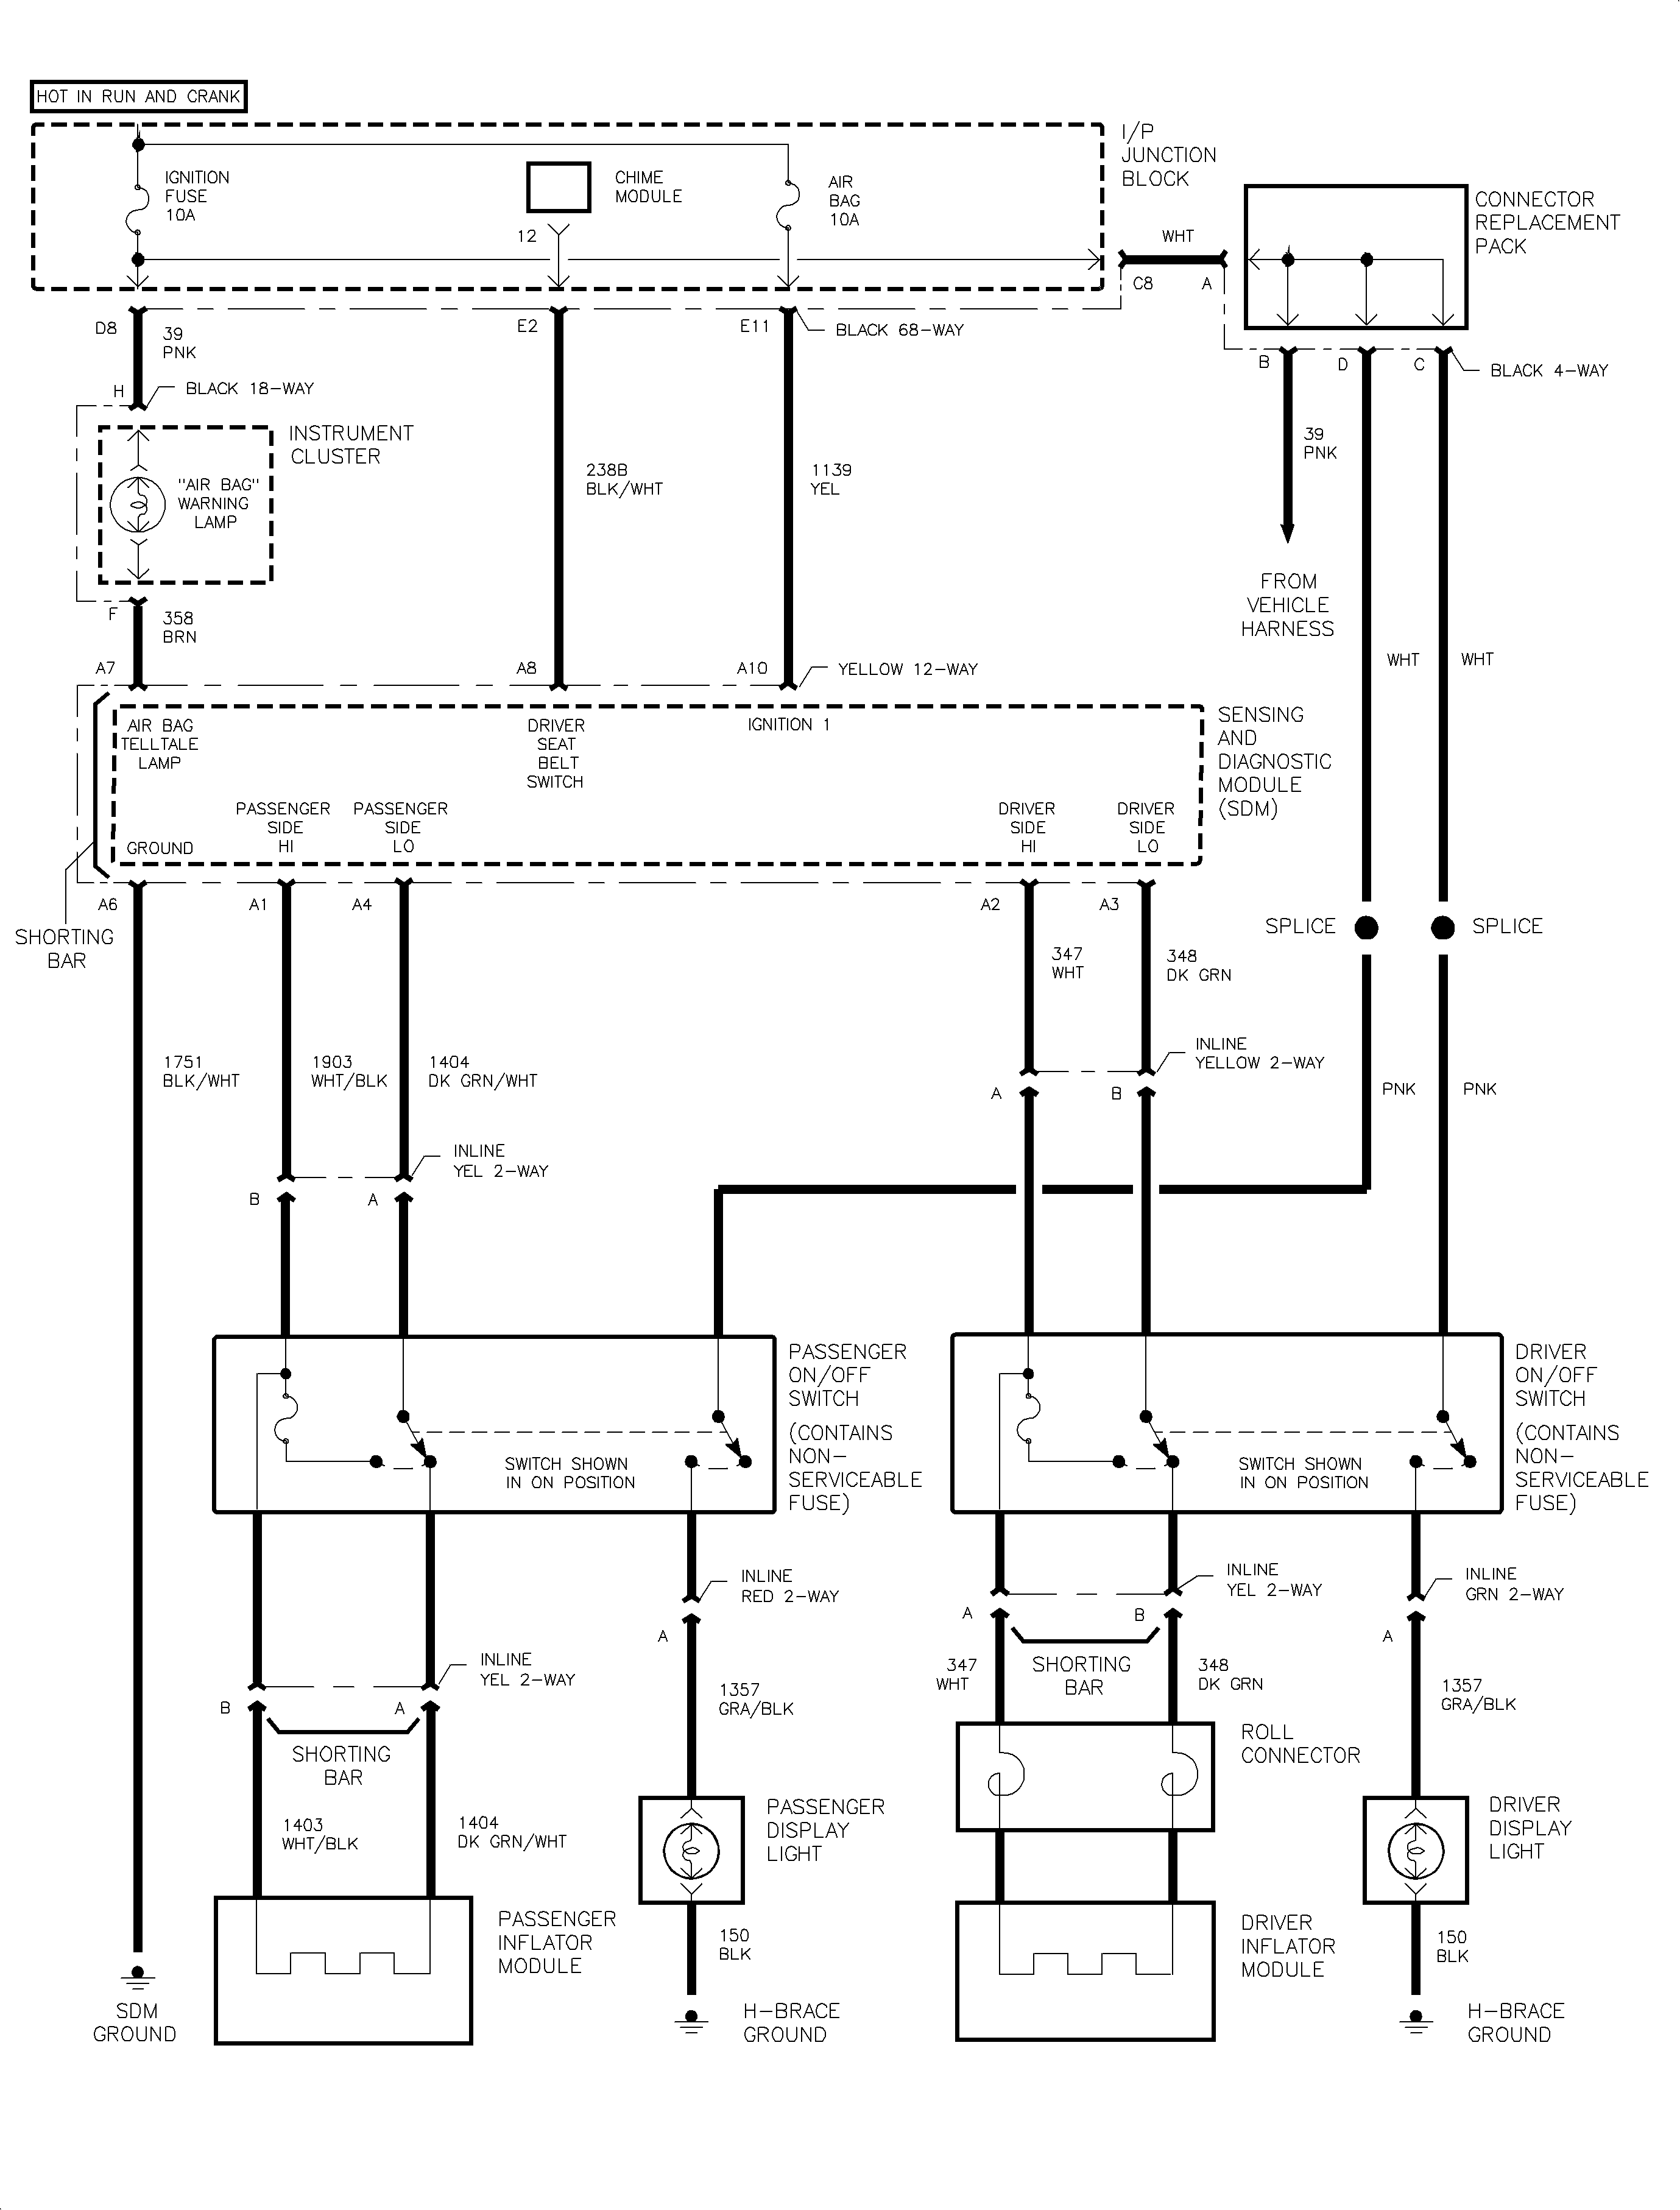
- For 1995-1998 Vehicles:
- Disconnect the black 68-way connector from the instrument panel junction
block (IPJB).
- Back out the terminal for circuit 39 (ignition) from cavity C8.
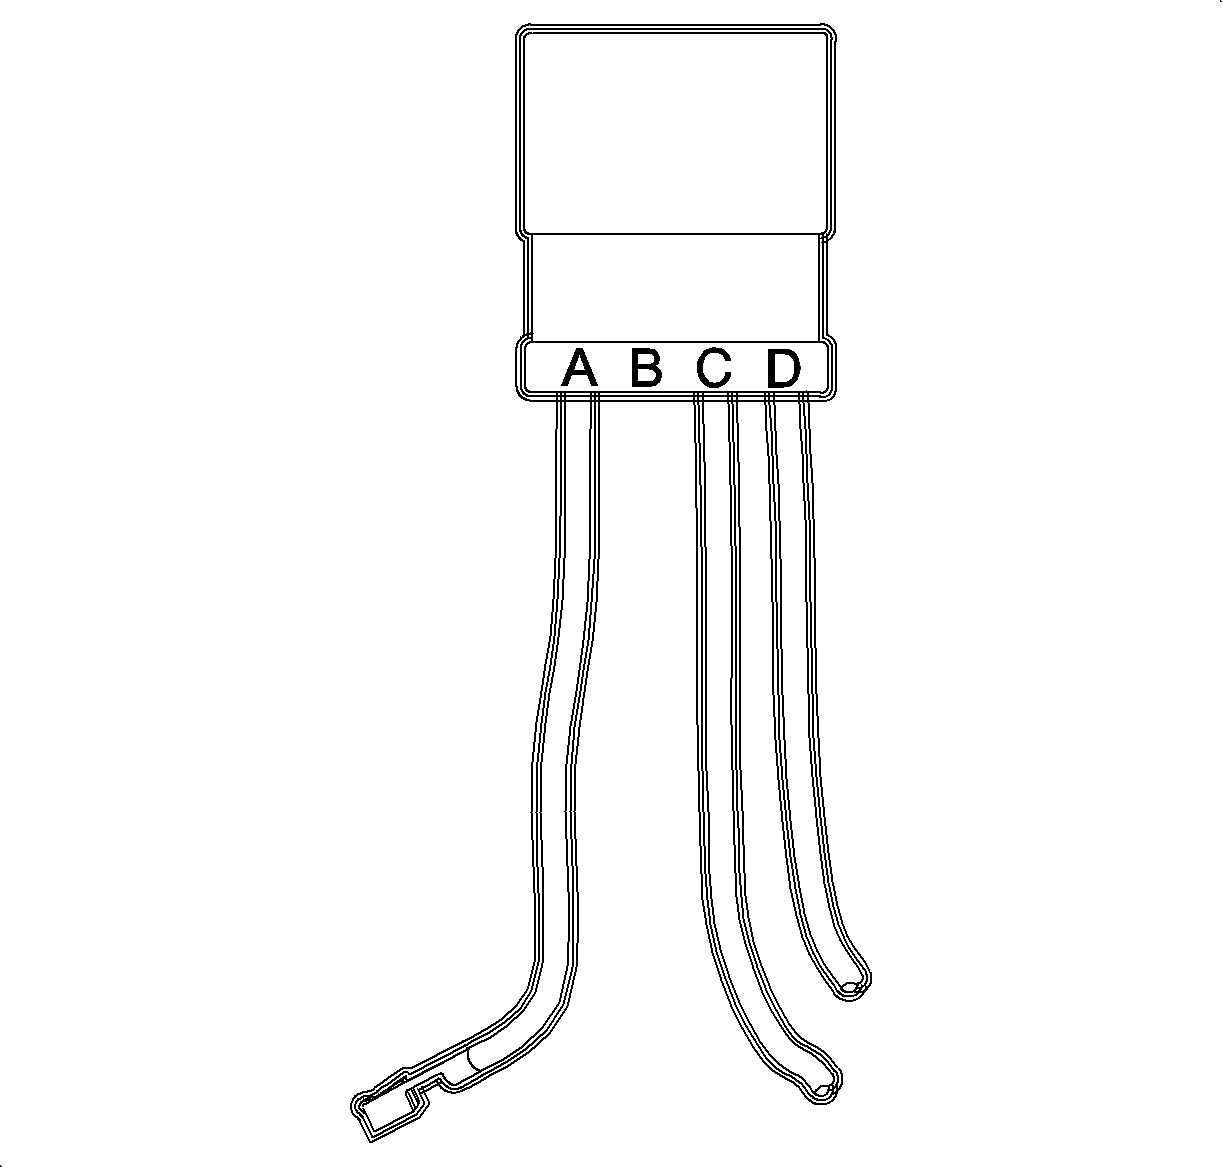
- Install the terminal backed out in step 43 or
44 (circuit 39) into cavity B of the connector replacement pack P/N 21024610
included in the kit.
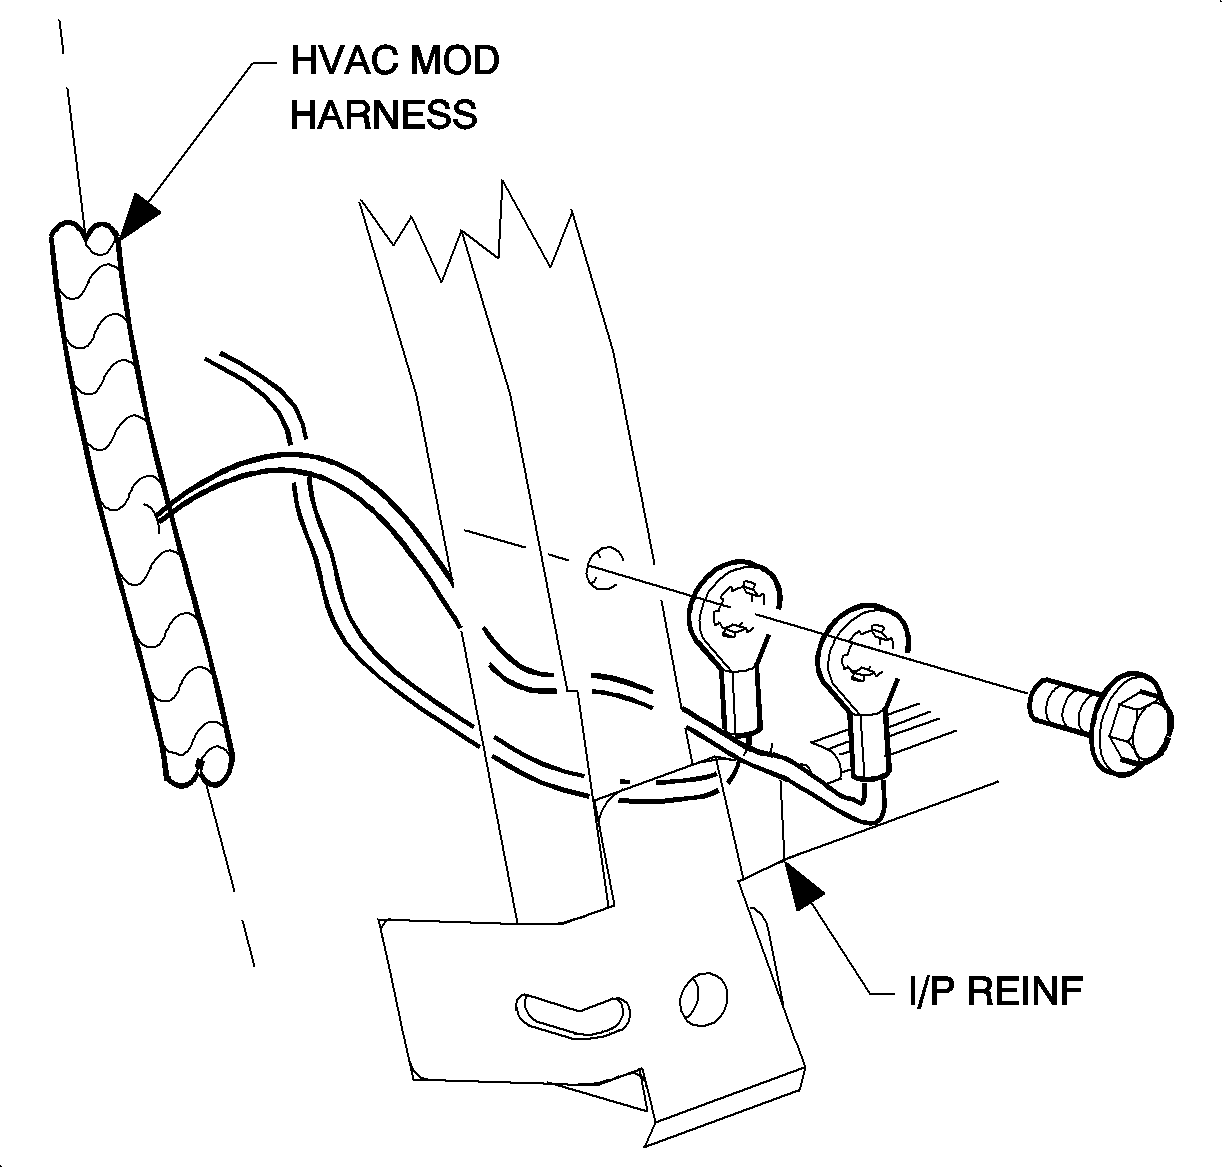
- Loosen the defroster duct by removing the screws
and unsnapping the duct from the mode valve assembly. The defroster duct should only
be lifted enough to provide clearance to route the air bag ON-OFF switch wire harnesses.
- For driver's side air bag ON-OFF switch:
- Route the yellow air bag ON-OFF switch wiring harness and pink wire over
the HVAC module.
- Continue to route the yellow air bag ON-OFF switch wiring harness along
the I/P harness to steering column support brackets, down between the column support
bracket to the base of the steering column.
- For passenger side air bag ON-OFF switch, route the pink wire from the
air bag ON-OFF switch assembly over the HVAC module following the I/P harness, then
down on the driver's side of the HVAC module to the IPJB.
- Cut the pink wire from the air bag ON-OFF switch
assembly, between the switch and the in-line fuse. Cut the wire close to the in-line
fuse to allow enough wire length to reach the connector replacement pack P/N 21024610.
Discard the in-line fuse.
- If installing one air bag ON-OFF switch assembly:
- Using a salmon crimp and seal connector, provided with the connector replacement
pack P/N 21024610, splice the pink wire from the air bag ON-OFF switch assembly
to the wire from cavity C of the connector replacement pack.
- Tape back the unused wire from cavity D of the connector replacement pack
P/N 21024610.
- Proceed to step 52.
- If installing 2 air bag ON-OFF switch assemblies:
- Using a salmon crimp and seal connector, provided with the connector replacement
pack P/N 21024610, splice the pink wire from the air bag ON-OFF switch assembly
to the wire from the driver's air bag ON-OFF switch assembly to the wire from cavity
C of the connector replacement pack.
- Using a salmon crimp and seal connector, provided with the connector replacement
pack P/N 21024610, splice the pink wire from the passenger's air bag ON-OFF
switch assembly to the wire from cavity D of the connector replacement pack.
- Proceed to step 52.
- For 1992-1994 vehicles:
- Install wire terminal from cavity A of the connector replacement pack
P/N 21024610, into the IPJB brown 64-way connector at cavity C7.
- Install the brown 46-way connector to the IPJB.
- For 1995-1998 vehicles:
- Install the wire terminal from cavity A of the connector replacement pack
P/N 21024610, into the IPJB black 68-way connector at cavity C8.
- Install the black 68-way connector to IPJB.
- Secure the connector replacement pack P/N 21024610, and any excess
wire length with tape to the I/P harness to prevent rattles.
- With the ignition switch OFF, turn the air bag switches to the OFF position.
- For driver's air bag ON-OFF switch assembly:
- Using wire ties, secure the yellow disable switch wiring harness and pink
wire to the I/P wire harness to ensure that the yellow switch wiring harness and/or
pink wire are not subject to chafe or rattle.
- Connect the yellow 2-way connectors, from the air bag ON-OFF switch, in
series to the driver's air bag connectors at the base of the steering column.
- Use the connector position assurance (CPA) devices to secure the connectors.
- Loop and secure the excess air bag ON-OFF switch wire harness with tape
an/or tie straps to prevent rattle or chafing of the wire harness.
- For passenger's air bag ON-OFF switch assemblies:
- Connect the yellow 2-way connectors, from the air bag ON-OFF switch, in
series to the passenger's air bag connectors.
- Use the connector position assurance (CPA) devices to secure the connectors.
- Loop and secure the excess air bag ON-OFF switch wire harness with tape
an/or tie straps to prevent rattle or chafing of the wire harness.
- Install the AIR BAG fuse into the IPJB.
- Connect the negative battery cable.
- Verify operation of the air bag ON-OFF switch(es) and air bag OFF display(s).
Air bag OFF display(s) should light when the air bag ON-OFF switch(es) is turned to
the OFF position. Air bag OFF display(s) should go OFF when the air bag ON-OFF switch(es)
is turned to the ON position.
- If the system is operating properly, proceed to the next step.
- If the system is not operating properly, refer to SIR ON-OFF Switch Kit
Symptoms Diagnosis in this bulletin. Once the system is operating properly, proceed
to the next step.
- Install the right and left IPJB access panels.
- Install the defroster duct.
Important
Make sure to tuck in all flaps.
- Install the upper trim panel insulator.

Important
Be careful when removing or replacing the upper trim panel to prevent damage
to the vehicle identification number (VIN) plate.
- Install the upper trim panel into the clips at the base of the windshield.
Important
For Sedans and Wagons, make sure the upper trim panel seal is correctly seated
on the forward edge before installing the upper trim panel.
- For Sedans and Wagons, lower panel, making sure the upper trim panel alignment
tabs interlock with the windshield garnish slots.
- For all vehicles:
- Push down at the clip locations to secure.
- Install and tighten the screws
- Install screw caps.
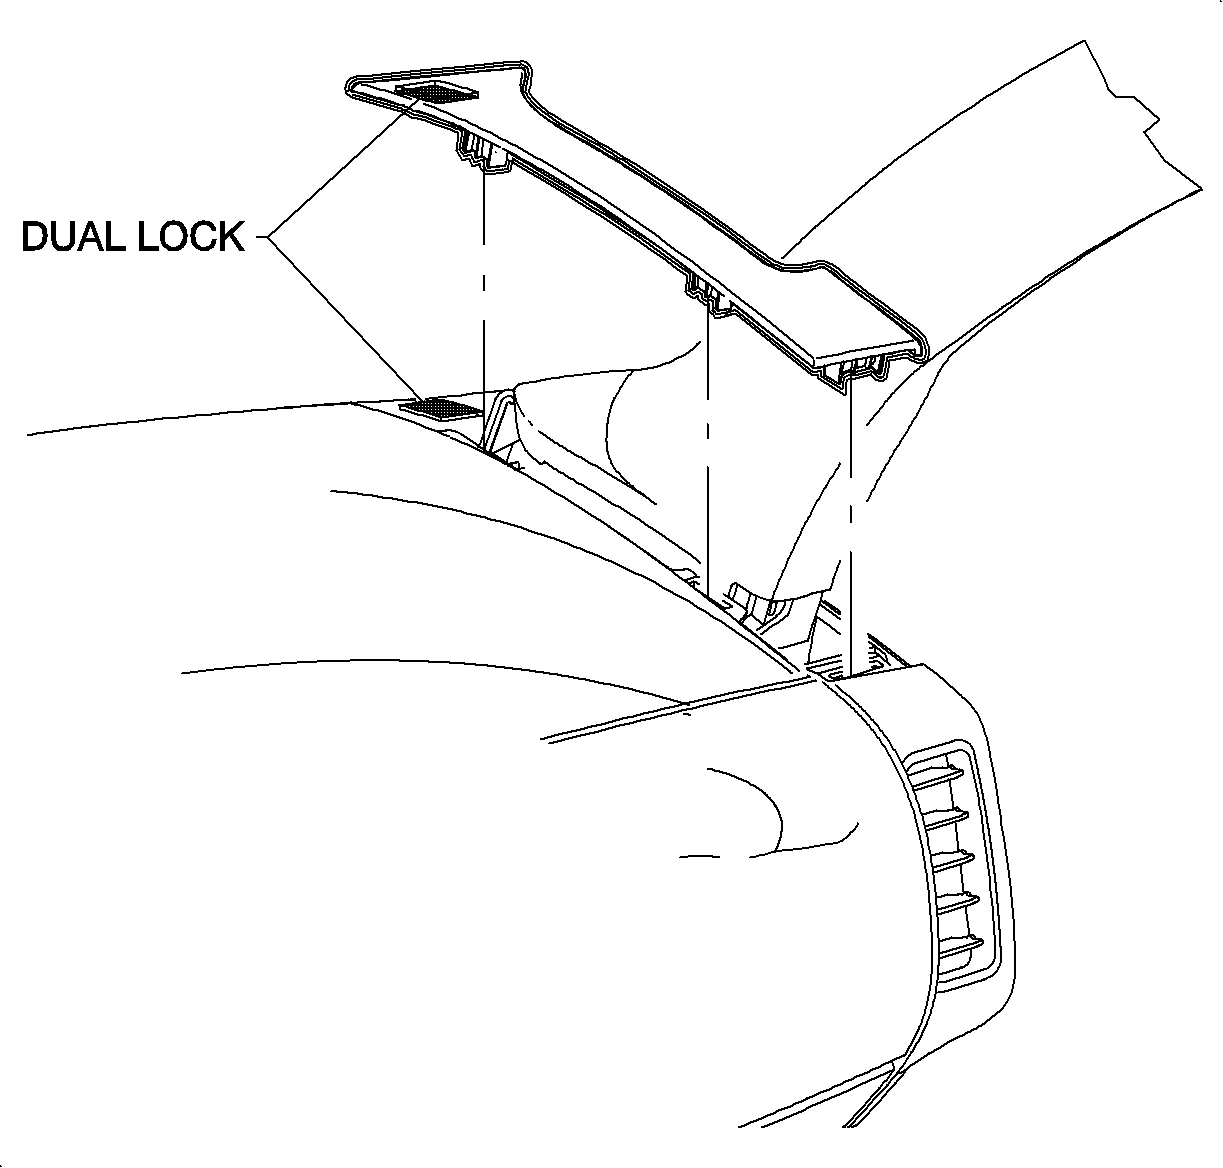
- For 1995 Sedans and 1995-1996 Coupes, install
the upper trim panel extensions by pushing down at clip and dual lock locations.
- Make sure the customer received the owners manual insert.
Service Procedures for Removal of Air Bag ON-OFF Switches.
- Follow steps 1-4 of the Service Procedure
for Installation of Air Bag ON-OFF Switches in this bulletin.
- Remove the connector position assurance devices from the 2 yellow 2-way
connectors located near the base of the steering column and disconnect the connectors.
- Follow steps 6-7 of the Service Procedure for Installation of Air
Bag ON-OFF Switches in this bulletin.
- Remove the connector position assurance devices from the 2 yellow 2-way
connectors from the passenger air bag and disconnect the connectors.
- Follow steps 9-11 of the Service Procedure for Installation of Air
Bag ON-OFF Switches in this bulletin.
- Disconnect the air bag OFF display connector(s) to air bag ON-OFF switch(es).
- For each air bag ON-OFF switch to be removed from the vehicle:
- Cut the pink wire from the air bag ON-OFF switch to the white wire from
the connector replacement pack.
- Tape the ends of the cut white wires.
- Loosen the defroster duct by removing the screws
and unsnapping the duct from the mode valve assembly. The defroster duct should only
be lifted enough to provide clearance to route the air bag ON-OFF switch wire harnesses.
- Remove the air bag ON-OFF switches and wiring harnesses from the vehicle.
- Remove the air bag OFF display assembly or assemblies.
- On vehicles without a sunroof, remove the air bag OFF display assembly
or assemblies and wiring harness from the headliner.
- On vehicles with a sunroof, using a small screwdriver, remove the sunroof
bezel, air bag OFF display assembly or assemblies and wiring harness. Then, reinstall
the sunroof bezel by snapping it into place.
- Remove the wiring for the air bag OFF display
assembly or assemblies. Wiring runs across the front of the headliner, tucked between
the headliner and roof panel, and continues down the right A-pillar to the I/P compartment
opening.
- Remove the ground wire ring terminal from the
H-brace at the blower motor ground. One ground wire ring terminal for each air bag
ON-OFF switch.
- Reinstall the blower motor ground.
- Install the right side A-pillar garnish molding.
- Install the I/P compartment assembly. See also
GRAPHIC SMVIS61417AB
- Connect the yellow 2-way passenger air bag connector
to the yellow 2-way vehicle wiring harness connector. Install the connector position
assurance (CPA) device.
- Connect the yellow 2-way driver air bag connector,
at the base of the steering column, to the yellow 2-way vehicle wiring harness connector.
Install the connector position assurance (CPA) device.
- Connect the negative battery cable.
- Install the AIR BAG fuse to the IPJB junction block.
- Refer to the appropriate model year SIR Service Manual and perform the
SIR Diagnostic System Check to verify proper operation of the SIR system.
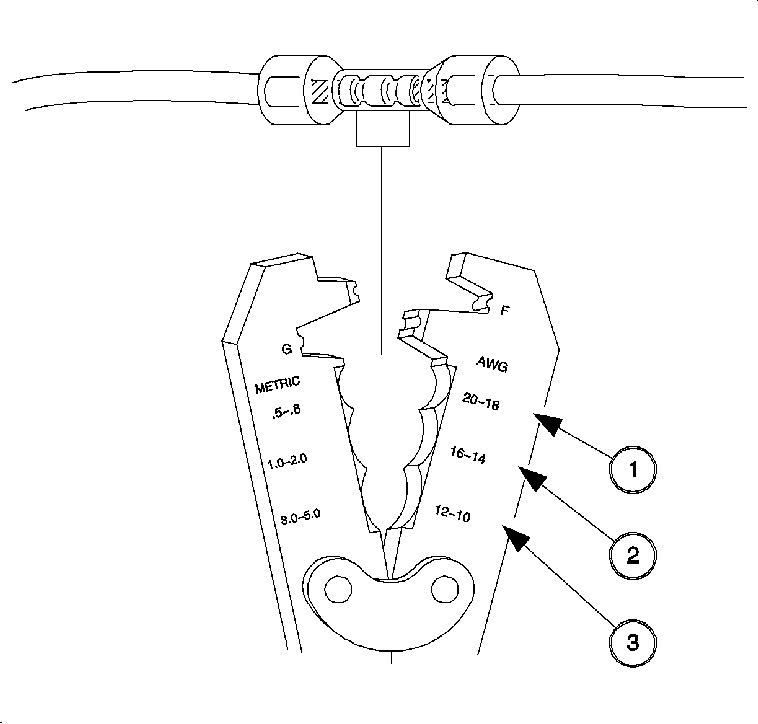
Wire Splicing
With the wiring used in the Saturn vehicles, it is recommended that approved
Delphi Packard Electric Crimp and Seal Splice Sleeves, or equivalent, be used.
- Remove the insulation from both ends, recommended strip length is 9.5 mm
(3/8 in). Caution must be used to prevent cutting the wire strands. Locate
the new splice a minimum of 40 mm (1½ in) from an outlet or other
splice.
- Determine the proper sleeve for the gage of wire. Position the stripped
ends in the sleeve until the wires hit stop.
Important
When using the salmon splice sleeve with 0.35 (22gage) wire, remove 19 mm
(3/4 in) of insulation. Bend the stripped portion in half to double the thickness
of the wire going into the splice sleeve. Twist the stripped, doubled wire and insert
it into the splice sleeve.
- Hand crimp the sleeve using the approved crimping
tool. Gently tug on the wires to ensure they are secure before applying heat to them.
Caution
Do not use a match or open flame to apply heat to a splice sleeve.
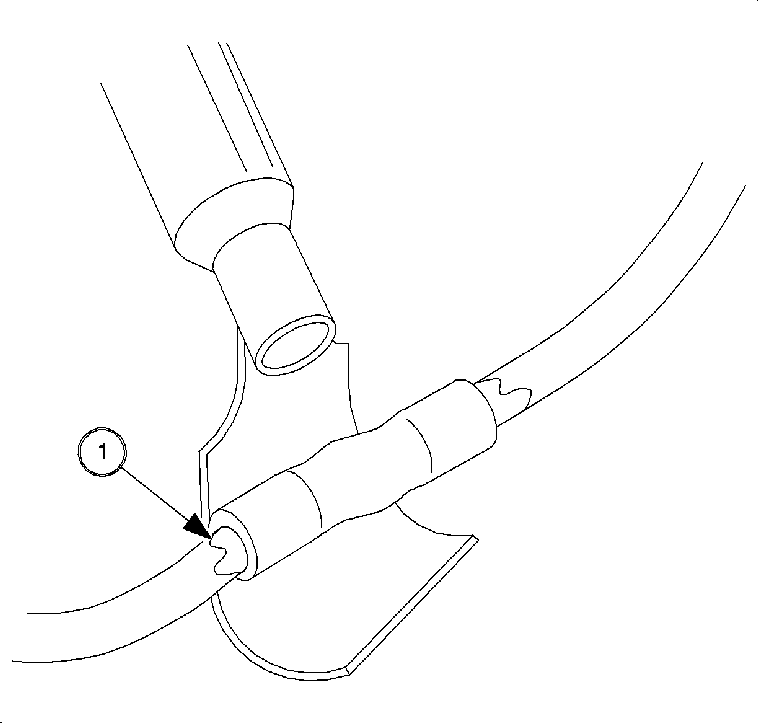
- Apply heat using Ultratorch or equivalent,
heating the splice sleeve to 175°C (347°F). Heat until the glue flows around
the edges of the splice sleeve.
- Check for continuity in the wire.
| Salmon
| Blue
| Yellow
|
Wire Size
| 0.35, 0.50, 0.80
| 1.0, 2.0
| 3.0, 5.0
|
Gage
| 22, 20, 18
| 16, 14
| 12, 10
|
Packard P/N*
| 12089189
| 12089190
| 12089190
|
Special Tools P/N**
| 217670
| 217671
| 271672
|
*Order through Packard at 1-800-PACKARD (1-800-722-5273)
**Order through Saturn special Tool Catalog. Included with Terminal Repair Kit
(SA9138Z).
|
SIR Disable Switch Kit Symptom Diagnosis
Air Bag Light ON
Step
| Action
| Yes
| No
|
1
|
- Connect a Scan tool.
- Are there any Driver or Passenger Loop DTCs set?
| Go to step 2
| Go to step 3
|
2
|
- Record DTCs.
- Ignition switch OFF.
- Disconnect Disable switches from the vehicles wiring.
- Enable the SIR system and clear DTCs.
- Perform the SIR Diagnostic System Check
- Do the DTCs reset?
| Go to step 3
| Go to step 4
|
3
| Follow the service manual diagnostics for the model year of the vehicle.
| -
| -
|
4
| Replace the Disable switch. Perform the SIR Diagnostic System Check.
| -
| -
|
Air Bag OFF Display Light ON with Switch in ON Position
Step
| Action
| Yes
| No
|
1
|
- Ignition switch OFF.
- Disconnect the display assembly connector -- CKT 1357 from the switch.
- Ignition ON. Is the display light still ON?
| Go to step 2
| Go to step 3
|
2
|
- Repair the short-to-battery in circuit 1357.
- Perform the SIR Diagnostic System Check
| -
| -
|
3
|
- Replace the disable switch.
- Perform the SIR Diagnostic System Check
| -
| -
|
Air Bag OFF Display Light OFF with Switch in OFF Position
Step
| Action
| Yes
| No
|
1
|
- Ignition switch OFF.
- Check Ign 1 fuse.
- Is fuse blown?
| Go to step 2
| Go to step 5
|
2
|
- With the disable switch in the ON position, check for a short-to-ground
in circuit 39.
- Is circuit 39 grounded?
| Go to step 4
| Go to step 3
|
3
|
- Disconnect the display light connector.
- With the disable switch in the ON position. check for a sort-to-ground
in circuit 1357 to the lay light.
- Is circuit 1357 grounded?
| Go to step 4
| Go to step 10
|
4
|
- Repair the short-to-to ground in circuit 1357.
- Replace Ign 1 fuse.
| -
| --
|
5
|
- With the disable switch in the OFF position, check for B+ at the display
light connector.
- Is B+ present?
| Go to step 6
| Go to step 7
|
6
|
- Check display light ground circuit 150 connection at the H-brace.
- Is th ground connection good?
| Go to step 12
| Go to step 8
|
7
|
- Check disable switch circuit 39 connection to IPJB.
- Is the circuit connection good?
| Go to step 11
| Go to step 9
|
8
| Repair the ground circuit.
| -
| -
|
9
| Repair the circuit 39 connection.
| -
| --
|
10
|
- Replace the disable switch.
- Replace the Ign 1 fuse.
- perform the SIR Diagnostic System Check.
| -
| -
|
11
|
- Replace the disable switch.
- Perform the SIR Diagnostic System Check.
| --
| --
|
12
| Replace the display light assembly.
| --
| --
|
Parts Requirements:
Disable Switch Kits
Part #
| Description
| Qty/Kit
| Part OF 2104747
| Part OF 2104748
| Serviced Separately
|
1ST Design Square Key Head Design 1992-1997 Interim
|
2104747
| Switch Kit-Driver SIR Disable
|
|
|
|
|
2104748
| Switch Kit-Passenger SIR Disable
|
|
|
|
|
N/A
| Switch Asm -- Drvr
| 1
| X
| --
| NO
|
N/A
| Switch Asm -- Pass
| 1
| --
| X
| NO
|
1240325
| Dis[play Asm -- Drvr
| 1
| X
| --
| YES
|
12450326
| Display Asm -- Pass
| 1
| --
| X
| YES
|
12453799
| Applique -- Drvr Display
| 1
| X
| --
| YES
|
12453800
| Applique -- Pass Display
| 1
| --
| X
| YES
|
N/A
| Bracket -- Switch Mounting
| 1
| X
| X
| NO
|
10125439
| ivet -- Switch Mounting
| 2
| X
| X
| Yes
|
N/A
| Screw -- Bracke to Switch
| 2
| X
| X
| NO
|
N/A
| Clip -- Display Asm
| 1
| X
| X
| NO
|
N/A
| Screw -- Clip to Display
| 2
| X
| X
| NO
|
21020792
| Tie Strap
| 8
| X
| X
| YES
|
21024610
| Connector Replacement Pack
| 1
| X
| x
| YES
|
N/A
| Instruction Sheet
| 1
| X
| X
| NO
|
N/A
| Owner's Manual Insert
| 1
| X
| X
| NO
|
N/A
| Template -- switch Mounting
| 1
| X
| X
| NO
|
Disable Switch Kits
Part #
| Description
| Qty/Kit
| Part OF2104749
| Part OF 2104750
| Serviced Separately
|
2ND Design Round Key Head Design 1997 Interim --1998
|
21024749
| Switch Kit -- Driver SIR Disable
|
|
|
|
|
21024750
| Switch Kit -- Passenger SIR Disable
|
|
|
|
|
N/A
| Switch Asm --Drvr
|
1
| X
| --
| NO
|
N/A
| Switch Asm -- Pass
| 1
| --
| X
| NO
|
12450325
| Display Asm-- Drvr
| 1
| --
| X
| YES
|
12450326
| Display Asm-- Pass
| 1
| X
| --
| YES
|
12453799
| Applique-- Drvr Display
| 1
| --
| X
| YES
|
12453800
| Applioque-Pass Display
| 1
| X
| --
| YES
|
N/A
| Bracket-- Switch Mounting
| 1
| X
| X
| NO
|
10125439
| Rivet-Switch Mounting
| 2
| X
| X
| YES
|
N/A
| Screw-Bracket to Switch
| 2
| X
| X
| NO
|
N/A
| Clip -- Display Asm
| 1
| X
| X
| NO
|
N/A
| Screw -- Clip to Display
| 2
| X
| X
| NO
|
21020792
| Tie Strap
| 8
| X
| X
| YES
|
21024610
| Connector Replacement Pack
| 1
| X
| X
| YES
|
N/A
| Instruction Sheet
| 1
| X
| X
| NO
|
N/A
| Owner's Manual Insert
| 1
| X
| X
| NO
|
N/A
| Template -- witch Mounting
| 1
| X
| X
| NO
|
Claim Information:
|
ImportantThis is a customer paid procedure and NOT a warranty repair. The recommended
labor times required for installing an air bag ON-OFF switch kit are as follows:
|
--
| Case Type
| Description
| Labor Operation Code
| Time
|
--
| CP
| Install Driver Air Bag ON-OFF Switch Kit (1992-1994 vehicles)
| T9778
| 1.7 hrs
|
--
| CP
| Install Driver Air Bag ON-OFF Switch Kit(1995-1998 vehicles)
| T9778
| 1.6 hrs
|
--
| CP
| Install Passenger Air Bag ON-OFF Switch Kit (1995-1998 vehicles)
| T9779
| 1.6 hrs
|
--
| CP
| Install Driver and Passenger Air Bag ON-OFF Kits (1995-1998 vehicles)
| T9780
| 1.9 hrs
|
--
| CP
| Remove Driver Air Bag ON-OFF Kit (1992-1994 vehicles)
| T9788
| 1.0 hrs
|
--
| CP
| Remove Driver Air Bag ON-OFF Kit (1995-1998 vehicles)
| T9788
| 1.0 hrs
|
--
| CP
| Remove Passenger Air Bag ON-OFFKit (1995-1998 vehicles)
| T9789
| 1.0 hrs
|
--
| CP
| Remove Driver and Passenger Air Bag ON-OFF Kits (1995-1998 vehicles)
| T9790
| 1.1 hrs
|
Important
Make sure to:
- Make a photocopy of the customer's letter from the NHTSA and retain the
photocopy in the CSO VIN jacket, stapled to the CSO hardcopy.
- That the NHTSA Form Installation of Air Bag ON-OFF Switches is completed
and mailed to NHTSA at the address shown on the form.
GM bulletins are intended for use by professional technicians,
NOT a "do-it-yourselfer". They are written to inform these
technicians of conditions that may occur on some vehicles, or to
provide information that could assist in the proper service of a
vehicle. Properly trained technicians have the equipment,
tools, safety instructions, and know-how to do a job properly and
safely. If a condition is described, DO NOT assume that the
bulletin applies to your vehicle, or that your vehicle will have
that condition. See your GM dealer for information on whether
your vehicle may benefit from the information.
|

|
WE SUPPORT VOLUNTARY TECHNICIAN CERTIFICATION
|
© Copyright General Motors Corporation.
All Rights Reserved.