Audio System AM Band Radio Noise #98-T-43A - (Jan 2, 2003)
Audio System AM Band Radio Noise -- Install Engine-to-Chassis Ground
Strap -- Due to revisions under Models Affected and Parts Requirements, this
bulletin is being revised and supercedes bulletin 98-T-42, which should
be discarded.1995-1998 Saturn S-Series vehicles built up at and including VIN
XZ319158 -- 1998 vehicles built after VIN XZ319158 had the ground strap installed
during production.
Condition:
Customers may comment that while listening to certain AM radio stations, they
hear ignition related noise. The radio noise follows engine RPM.
Cause:
During normal engine operation, ignition components in the engine compartment
emit certain electrical noise. Depending on the location of the vehicle antenna mast,
these electrical noises may enter the radio through the antenna system. These noises
may then be interpreted by the radio as radio signals and be amplified in the form
of noise. Typically, the only AM radio stations that are affected are fringe stations.
Fringe stations are stations that are beyond their intended usable range.
Important
The range for most AM stations is greater
than for FM stations, especially at night. The longer range, however, can cause stations
to pick up noise from things like ignition components, storms, and power lines.
Correction:
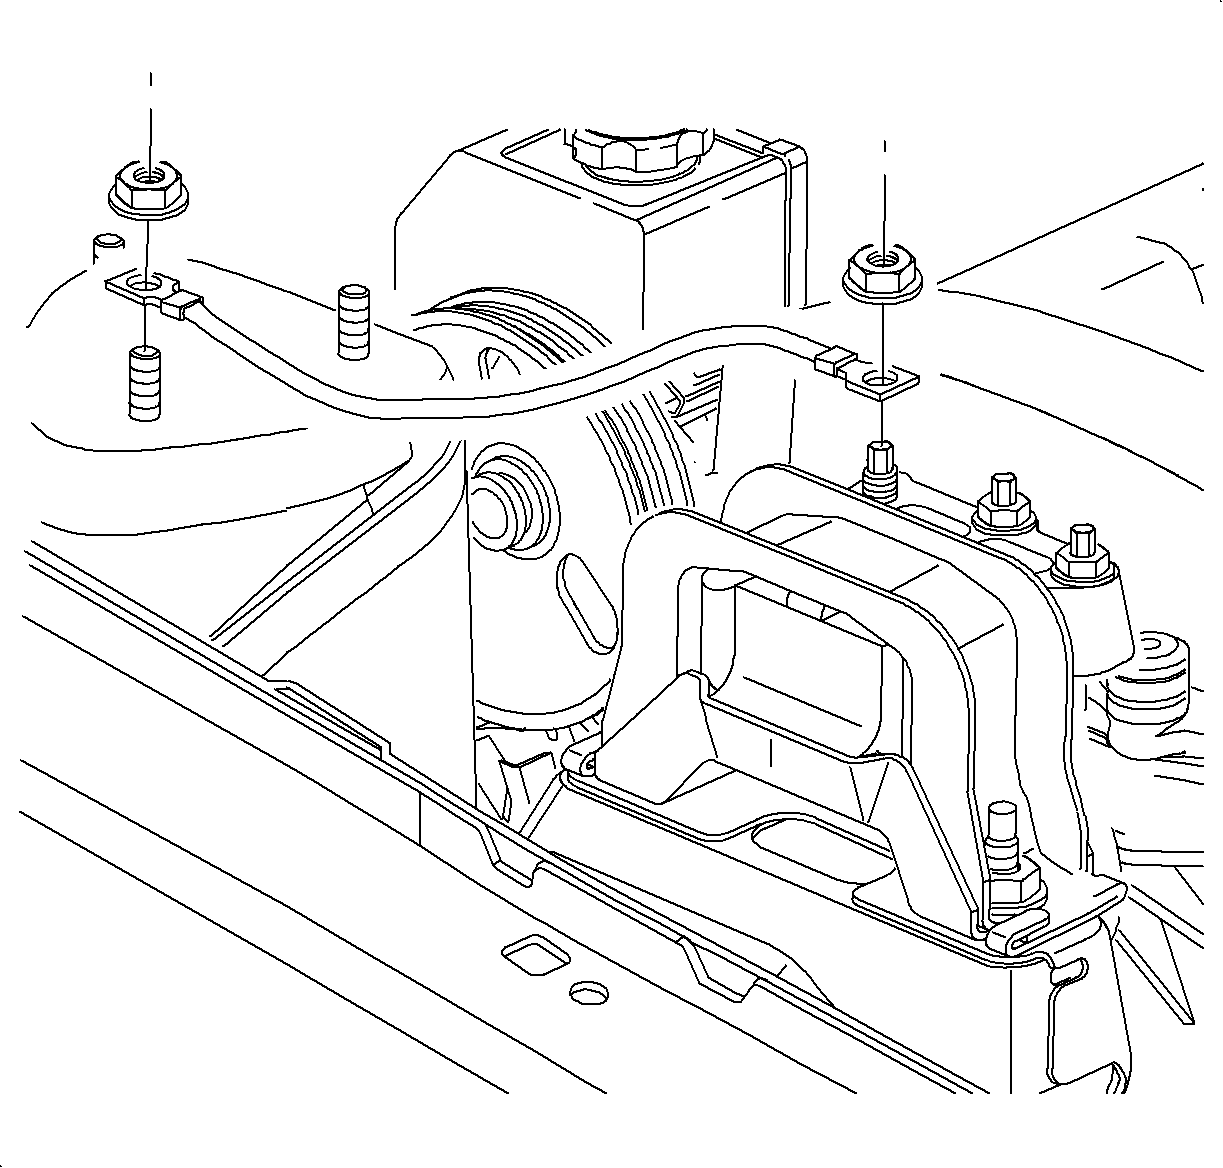
Attach a ground strap from the upper engine mount to the right side strut attachment
stud.
Procedure:
- With the engine running, verify the noise is on fringe AM stations only.
If the noise is on AM and FM, just FM, and/or cassette/CD, refer to the Audio System
section of the appropriate model year Audio System & I/P Cluster service manual
and/or Technical Bulletins 96-T-28A or 98-T-19.
- Using a jumper wire with alligator clips, attach one end to the engine
front cover torque axis mount stud and the other end to the strut tower nut, do not
attach to the stud, the nut is a better ground.
- If the noise is reduced or eliminated, continue with step 3.
- If the noise is not reduced or eliminated, refer to the Audio System section
of the appropriate model year Audio System & I/P Cluster service manual for additional
diagnostic information.
Important
When removing the engine mount-to-front cover
nut, use a 7 mm wrench on top of the stud to prevent the stud from rotating.

- Remove the engine mount-to-front cover nut from the
rear stud.
- If the stud rotates while removing the nut, go to step 4.
- If the stud does not rotate while removing the nut, go to step 7.
Notice
Do not over apply thread locker or allow
it to accumulate in the bottom of the hole. The front cover could be damaged when
the stud is installed.
Important
If reinstalling a previously installed stud,
the threads must be thoroughly cleaned before applying Loctite 242 P/N 21485277,
or equivalent. If installing a new stud, the stud may or may not have a pre-applied
threadlocker. The front cover hole must be thoroughly cleaned using a 10 mm
x 1.5 mm tap to clean the treads and compressed air to remove particles from
the stud hole.
- Apply Locktite 242 P/N 21485277, or equivalent, to 6-8 middle
treads of clean front cover stud.
- Apply Locktite 242 P/N 21485277, or equivalent, to the treads
of the holes in the engine front cover using a cotton tipped applicator keeping the
top 2 treads clean.
- Install the stud into the front cover.
TightenTighten the stud to 25 N·m (18 lb ft).
- Using the ground strap P/N 21012387, attach one end to the engine
mount rear stud> Install a new nut P/N21006320.
TightenTighten the nut to 50 N·m (37 lb ft).
Important
Use a new nut P/N21012387 to service all
years, 1995-1999. The new nut has a lower profile which allows for additional
free tread above the nut.
- Using a new nut, p/n 21012387, attach the other end of the ground strap
to the outboard side strut stud.
TightenTighten the nut to 29 N·m (21 lb ft).
- With the radio tuned to a fringe AM station and with the engine running,
verify the noise is reduced or eliminated. If the noise is not reduced or eliminated,
refer to the Audio System section of the appropriate model year Audio System &
I/P Cluster service manual and/or Technical Service Bulletins 95-T-28A
or 98-T-19.
Parts Requirements:
Part Number
| Description
|
21025099
| Wire Asm -- Eng Grd
|
21006320
| Nut -- Torque Prevailing
|
21012387
| Nut -- Strut Mount
|
21485277
| Threadlocker -- Locktite 242
|
Claim Information:
| To receive credit for this repair during the warranty coverage period, submit
a claim through the Saturn Dealer System as Follows:
|
--
| Case Type
| Description
| Labor Operation Code
| Time
|
--
| VW
| Install Ground Strap Between Upper Engine Mount Stud and Right Front Strut Tower
Stud
| Z4006
| 0.2 hrs
|
|
ImportantIf Threadlocker is billed to the customer
service order (CSO), the part amount may not exceed $1.15 -- includes 30% markup.
|
GM bulletins are intended for use by professional technicians,
NOT a "do-it-yourselfer". They are written to inform these
technicians of conditions that may occur on some vehicles, or to
provide information that could assist in the proper service of a
vehicle. Properly trained technicians have the equipment,
tools, safety instructions, and know-how to do a job properly and
safely. If a condition is described, DO NOT assume that the
bulletin applies to your vehicle, or that your vehicle will have
that condition. See your GM dealer for information on whether
your vehicle may benefit from the information.
|

|
WE SUPPORT VOLUNTARY TECHNICIAN CERTIFICATION
|
© Copyright General Motors Corporation.
All Rights Reserved.