Document ID# 1229566
1998 Saturn SL2/SC2/SW2
 

SIR Diagnostic System Check Chart C


Object Number: 1207173  Size: MF
Click here for detailed picture of above image.
Circuit Description

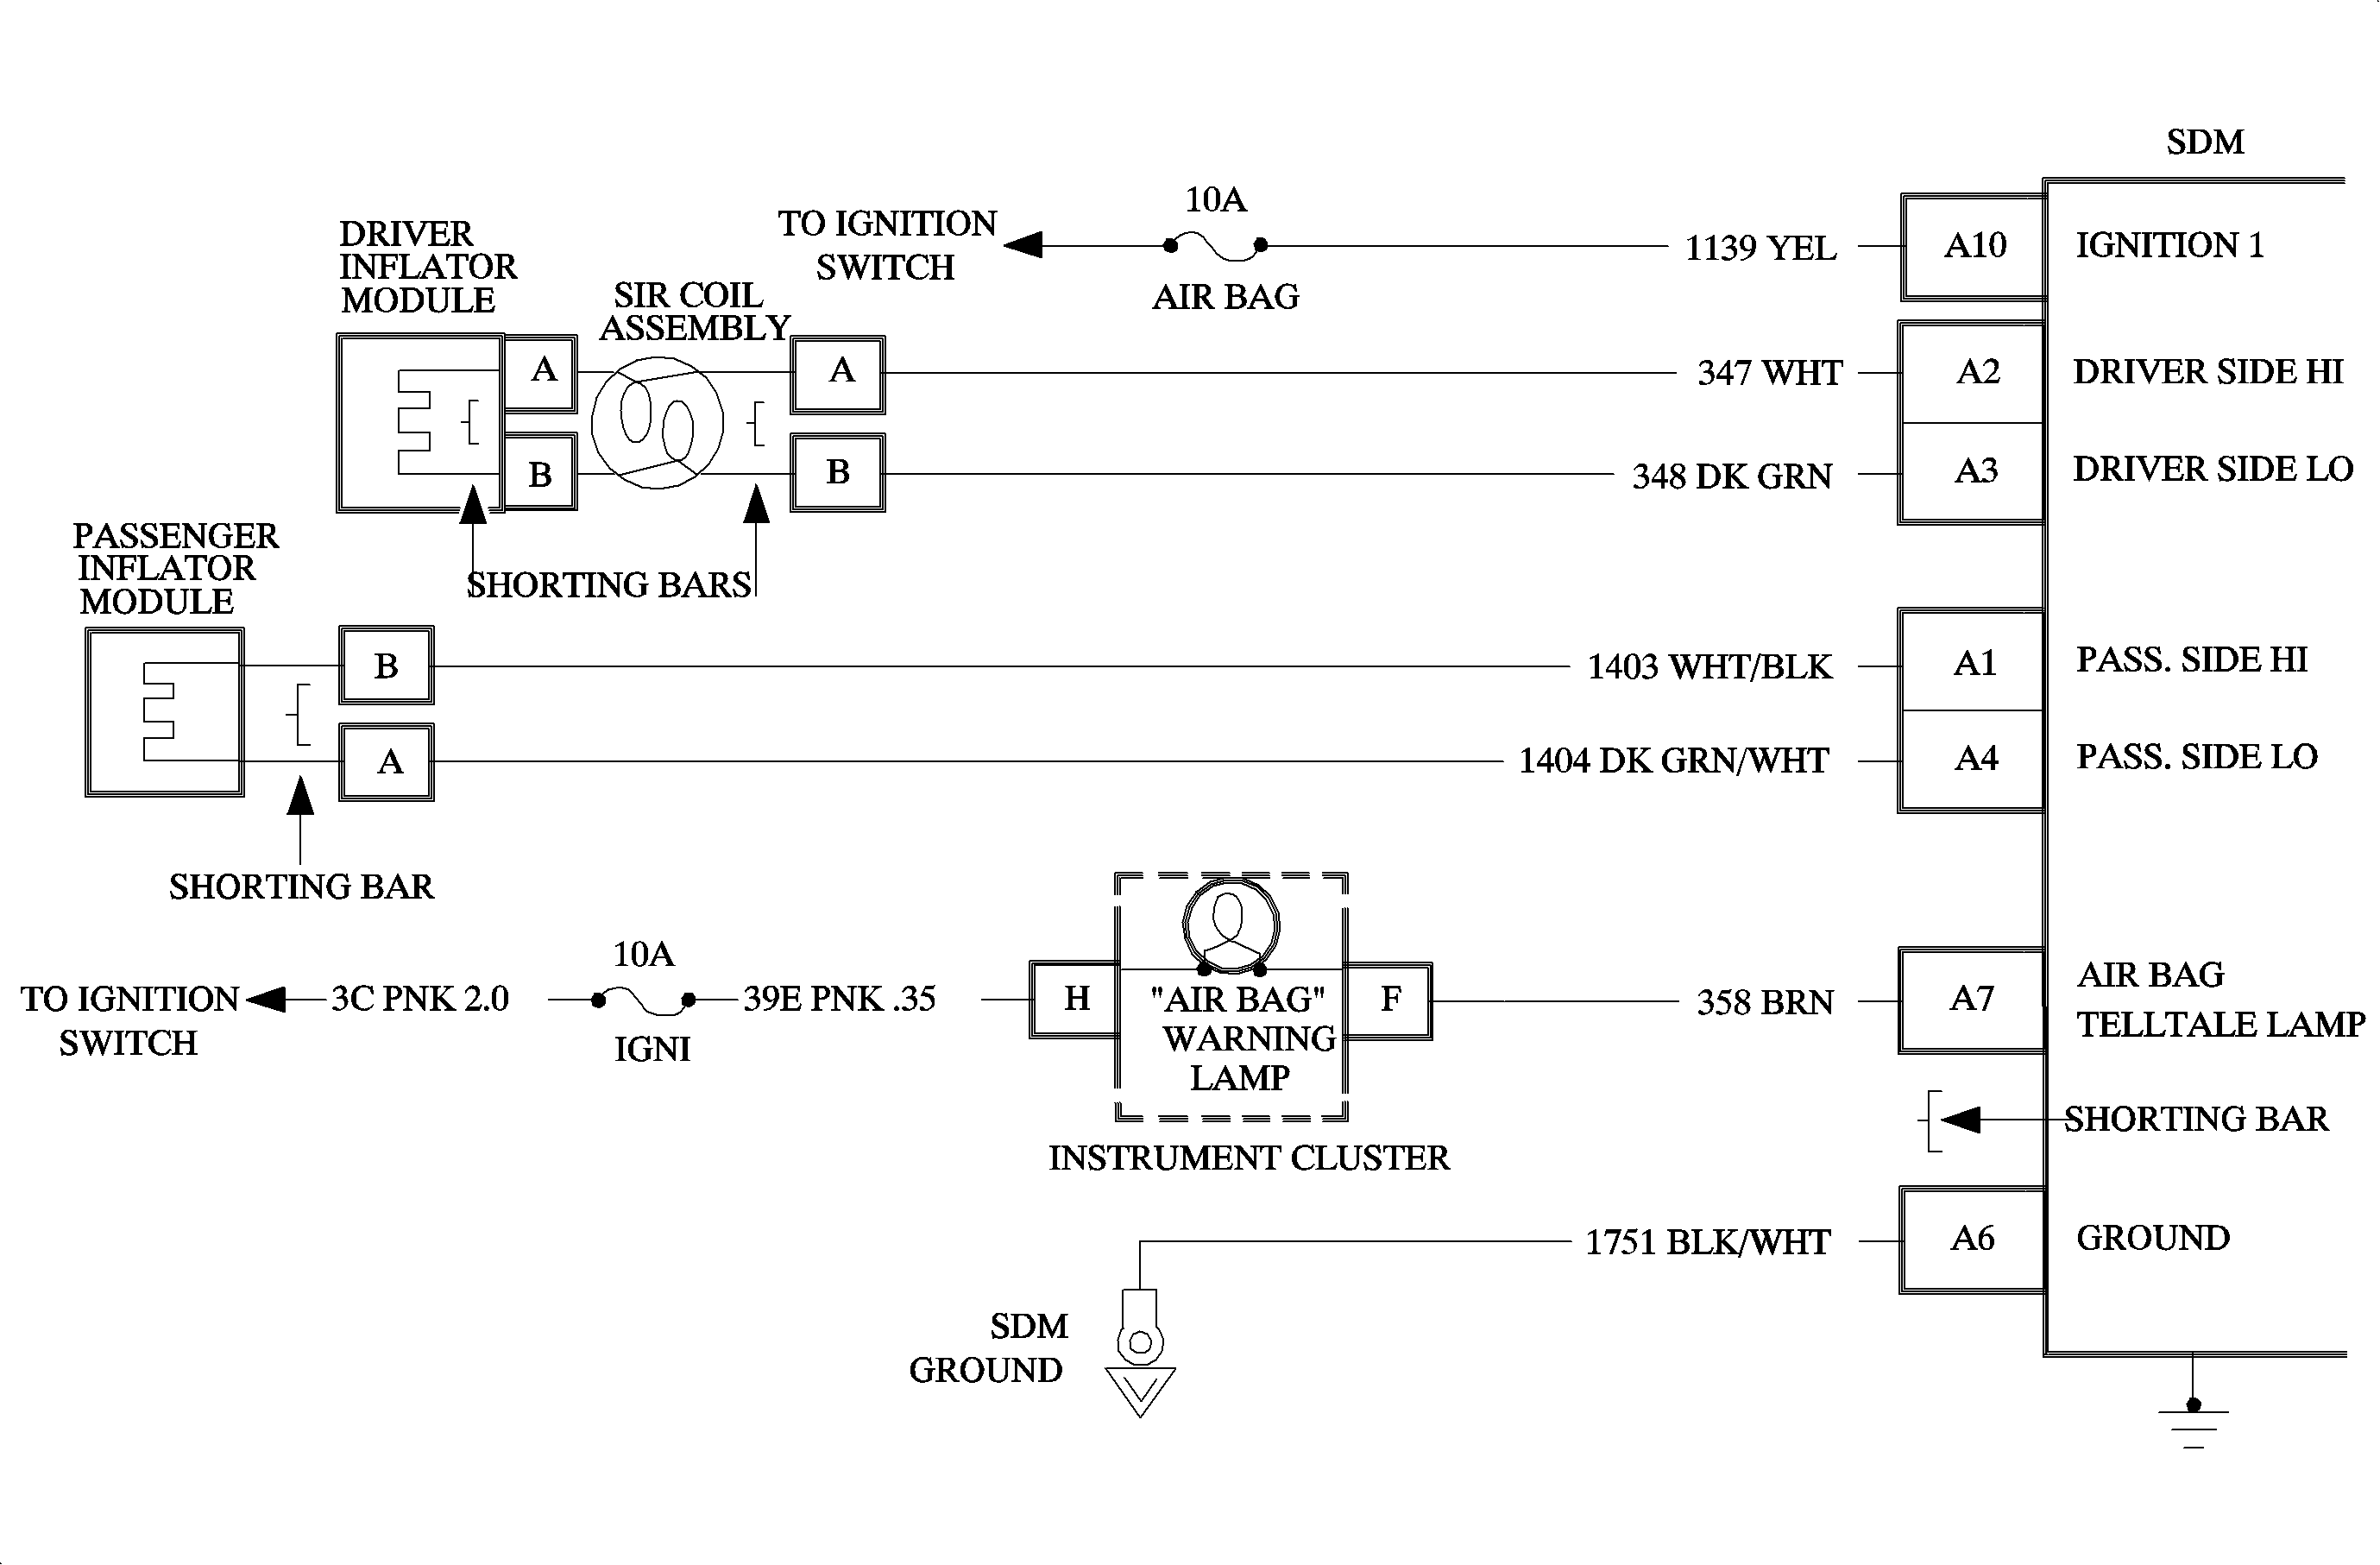
When the ignition switch is first turned On, "Ignition 1" voltage is applied to the AIR BAG telltale lamp which is connected to the "AIR BAG" terminal A7 of the SDM. The AIR BAG fuse applies system voltage to the "Ignition 1" input terminal A10 of the SDM. The SDM responds by flashing the AIR BAG telltale lamp seven times by providing a ground. If "Ignition 1" is outside the normal operating voltage range (approximately 9 VDC to 16 VDC), the AIR BAG telltale lamp will come On solid with no diagnostic trouble code set.

Test Description

The numbers below refer to the step numbers on the diagnostic table.

  1. This step verifies the bulb check for the MIL (SERVICE ENGINE SOON telltale lamp).

  2. This step verifies that the AIR BAG telltale lamp will turn On with the shorting bar at the SDM connector engaged.

  3. This step checks verifies the IGN 1 fuse.

  4. This step verifies circuit 39E, the AIR BAG telltale bulb and circuit 358.

  5. This step checks for a short to ignition from circuit 358 or an internal SDM failure.

  6. This step checks the instrument cluster connector and the AIR BAG telltale lamp bulb.

  7. This step verifies the continuity of circuit 358.

  8. This step verifies IGN 1 fuse.

  9. This step verifies the continuity of circuit 39E.

  10. This step verifies the continuity of circuit 39E.

Step

Action

Yes

No

1

Did you perform the Diagnostic System Check - SIR?

Go to Step 2

Go to SIR Diagnostic System Check

2

  1. Turn ON the ignition.
  2. Does the MIL (SERVICE ENGINE SOON telltale lamp) indicator come On?

Go to Chart A

Go to Step 5

3

  1. Turn OFF the ignition.
  2. Disconnect SDM.
  3. Check for proper connection and terminal tightness from harness to SDM at terminal A7.
  4. If ok, turn ON the ignition.

Is AIR BAG telltale lamp ON?

Go to Chart A

Go to Step 5

4

  1. Turn OFF the ignition.
  2. Remove and inspect Ignition 1 fuse.

Is fuse good?

Go to Step 5

Go to Step 12

5

  1. Turn OFF the ignition.
  2. Remove Ignition 1 fuse.
  3. Measure resistance on SDM harness connector from terminal A7 to each terminal of the Ignition 1 fuse holder.

Is either resistance measurement less than 25 ohms?

Go to Step 7

Go to Step 8

6

  1. Remove upper trim I/P panel to access instrument cluster connector.
  2. Disconnect instrument cluster.
  3. Reconnect SDM.
  4. Ignition switch On for 20 seconds.
  5. Measure voltage on instrument cluster harness connector terminal F to ground.

Is voltage one volt or less?

Go to Chart A

Go to Step 13

7

  1. Remove upper trim I/P panel to access instrument cluster connector.
  2. Check for proper connection to instrument cluster at connector terminal F.
  3. If not ok, repair and go to Step 19
  4. If ok, then remove instrument cluster and inspect AIR BAG telltale bulb.

Is bulb good?

Go to Step 8

Go to Step 9

8

  1. Install AIR BAG telltale bulb.
  2. Measure resistance from instrument cluster harness connector terminal F to SDM harness connector terminal A7.

Is resistance five ohms or less?

Go to Step 11

Go to Step 10

9

  1. Replace AIR BAG telltale lamp.
  2. Install instrument cluster.

Go to Step 19

--

--

10

  1. Repair open in circuit 358
  2. Install instrument cluster.

Go to Step 19

--

--

11

  1. Service instrument cluster.
  2. Install instrument cluster.

Go to Step 19

--

--

12

  1. Replace Ignition 1 fuse.
  2. Turn ON ignition, wait 10 seconds, turn OFF ignition.
  3. Remove and inspect Ignition 1 fuse.

Is fuse good?

Go to Step 15

Go to Step 14

13

  1. Disconnect instrument cluster.
  2. Check for proper connection at instrument cluster harness connector terminal H.
  3. If ok, then remove Ignition 1 fuse.
  4. Measure resistance from the instrument cluster harness connector terminal H to each terminal of the Ignition 1 fuse holder.

Is either measurement five ohms or less?

Go to Step 16

Go to Step 17

14

  1. Disconnect driver and passenger inflator modules, yellow two-way connectors located at the base of the steering column under the I/P top cover.
  2. Disconnect SDM.
  3. Replace ignition 1 fuse.
  4. Turn ON ignition, wait 10 seconds.
  5. Turn OFF ignition.
  6. Remove and inspect Ignition 1 fuse.

Is fuse good?

Go to Step 19

Go to Step 18

15

  1. Install Ignition 1 fuse.
  2. Go to step 20

--

--

16

  1. Repair open in power feed to Ignition 1 fuse circuit 3C.
  2. Install Ignition 1 fuse.
  3. Go to step 20

--

--

17

  1. Repair open in circuit 39E.
  2. Install Ignition 1 fuse.
  3. Go to step 20

--

--

18

  1. Repair short-to-ground in circuit 39.
  2. Replace Ignition 1 fuse.
  3. Go to step 20

--

--

19

Install Ignition 1 fuse.

Go to Chart A

--

--

20

  1. Reconnect all SIR system components. Ensure all components are properly mounted.
  2. Repeat SIR Diagnostic System Check.

--

--


  Document ID# 1229566
1998 Saturn SL2/SC2/SW2