
The radio head faceplate interfaces with the operator through control buttons/knobs, a liquid crystal display (LCD), a four channel integrated amplifier, and playback mechanisms, CD and/or tape. The controls operate various music modes and conditions of the audio subsystem which enable the operator to control power, volume, fade, balance, bass, and treble equalization settings, along with media playback control, CD, or tape. The LCD is located in the center of the radio head faceplate for the operator to see the feedback from the radio. The radio head processes AM or FM stereo signals from the antenna system and sends the output to the speakers. The radio head also processes and plays the pre-recorded music from the in-dash CD and/or tape playback mechanism or the remote CD changer. The tape mechanism is able to differentiate between FeO2 (Type 1) or CrO2 (Type II/IV) type tapes. The functions of the playback mechanism, CD or tape, are controlled by the controls on the radio head faceplate.
The radio head is located in the middle of the instrument panel and is fastened using 2 chassis side-mounted brackets which utilize 2 fasteners and 2 rubber pins, one on each side of the radio opening, for locating the radio. The radio head is electrically connected to the radio IP harness via a 24-way connector for base radios and up-level radios. There is also a 12-way connector for up-level radios to connect the CD changer/player jumper connector. A ground strap terminal is located on the right rear side of the radio head unit and the antenna connector is located on the left rear side of the radio head unit. The harness connectors, antenna connector, and ground strap are inserted prior to mounting the radio in the vehicle. To allow for radio serviceability, sufficient room is allocated behind the radio for the wires and the coax cable.
There are 4 different radios available: AM/FM stereo with compartment, AM/FM stereo CD with compartment, AM/FM stereo cassette, and AM/FM stereo cassette and CD. For more details on these radios, please refer to the System Check and the Radio Specifications sections in this service manual.
The clock time is displayed continuously even when the ignition is OFF. Back lighting of the display occurs when the ignition is ON. If the RCL button is pressed when the ignition is OFF, then the LCD back lighting will be ON temporarily.
There is a ground strap attached to the radio to ensure an effective ground path. The ground strap is a braided copper wire that routes from the rear of the radio to the bolt that attaches the IPFB to the H-brace The radio ground strap is connected to the radio by a spade type terminal. If the radio ground strap is not reconnected after being disconnected for service, the audio system will still function, but the sound quality will be reduced.
The 6-disc remote CD changer/player with magazine is mounted inside the armrest of the console. The CD changer/player is vertically mounted with the CD changer/player door opening closest to the front of the vehicle. To ensure CD changer/player skip performance the CD changer/player is mounted rigidly.
The remote CD changer/player has a separate fuse from the radio and receives its power and signals through the radio. The CD changer/player has a wiring jumper connected between the radio and CD changer/player which includes shielding for the audio signals. The CD changer/player is available only with up-level radios. If a customer with a base radio would like a CD changer/player, that customer must upgrade their radio to an up-level radio, either the AM/FM tape or the AM/FM tape and CD.
The speakers receive information from the radio in the form of electrical current through the speaker wires. The electrical current produces the electromagnetic forces which cause the speaker cone to move, which in turn creates acoustical energy. The acoustical energy radiates from the speakers and is received by the operator as sound. If the speaker wires occasionally become shorted-to-ground or to vehicle power, the radio will sense these conditions and shut down in a non-destructive manner. After the short condition is removed, normal radio operation will return.
The speakers are mounted to a flat door inner surface and provide a splash proof housing and seal through the use of a gasket on the speaker basket flange that meets the door inner sheet metal. The supporting structure is rigid as to not allow unwanted resonance or loss in bass frequencies. Grilles are used to protect the speaker covering since they allow the speaker the freedom to move and breath to make the performance more predictable. The minimum speaker impedance per channel is 4 ohms and the interface to the speakers is through 18 gage wire through the body harness. The front speakers are mounted low and forward in the front doors. The rear speakers for the coupe and sedan are mounted on the package shelf while the rear speakers for the wagon are mounted on the lift gate panel assembly.
The antenna system receives broadcast AM or FM stereo signals from free space and sends the signals to the radio receiver for processing via a coaxial antenna cable. The antenna cable is a coax cable, which connects the radio to the antenna. The antenna ground should not exceed 50 m ohms when measuring between the antenna connector shield and negative battery terminal. The AM broadcast is 522-1629 KHz in 9 KHz steps while the FM broadcast is 76-90 MHz in 100 KHz steps.
The mast antenna is mounted on the right front side of the vehicle. The fixed mast antenna has a single 1/4 wave monopole receiving element which protrudes from the vehicle. The fixed mast antenna directly receives RF signals and feeds the signal directly to the radio head for processing.
Programmable by following 2 steps:
Samples and picks out the strongest radio stations on the band, starting from the lowest station frequency.
Automatically locks in station signals for best possible reception.
Provides up and down seek capability for radio bands to search for the next receivable station.
Samples program selection for 5 seconds and then automatically moves to the next radio station. An audible tone indicates scan mode searching after button is held for more than 3 seconds.
Full depth of sound can be heard at low volume levels.
Allows the sound to be tailored to meet individual preferences. Seven different selectable preset tones are available along with the CSTM (custom) tone. The CSTM tone is set by pressing and rotating the BASS/TREB/FADE/BAL knob.
The setting can be permanently or temporarily shown on the display by pressing and holding the BASS/TREB/FADE/BAL knob until an audible tone is heard.
The BASS/TREB/FADE/BAL knob allows the bass, treble, fade, and balance modes to be adjusted. Push the knob in until the desired mode is on the display, then rotate to adjust.
All radios feature continuously dimmable nighttime incandescent back lighting for the graphics on the push-buttons and trimplate. The incandescent back lighting voltage is supplied from the vehicle light switch and is grounded through the radio wiring and the radio ground strap. The internal lamps are controlled by the high side pulse width modulated (PWM) dimmer control circuit through the BCM.
The LCD is backlit whenever ignition voltage is applied regardless if the radio power knob is ON or OFF. When the vehicle's exterior lights are turned ON, the interior lights knob, which is found to the left of the steering wheel, can be turned to adjust the illumination of the radio. Turning the knob clockwise makes the light get brighter, while turning the knob counter-clockwise results in the light being dimmer.
Radio functions operate a remotely located 6-disc CD changer/player.
On-board diagnostics (OBD) are available to check:
Tape is loaded with power assist.
Plays both sides of a tape with no need to eject.
Prevents tape damage if the ignition is turned OFF while tape is in play mode.
Controls tape functions: Previous (PREV), Next, Rewind (REW), and Fast Forward (FF).
The radio is played while the tape player is fast rewinding or fast forwarding a tape.
The tape player automatically locates the beginning of the next or current selection.
Changes side of the tape being played with the press of a button.
Reduces hiss on Dolby® encoded tapes.
Allows better sound quality when using metal tapes.
Repeats desired selection on the tape.
Rewinds or forwards the tape, until the function is disabled, to the desired location. The arrows on the display show which side of the tape is playing. The up arrow refers to the top side of the tape. The down arrow refers to the bottom of the tape.
Reminds the user to clean the cassette head after 30 hours of use.
CD is loaded with power assist.
The CD player automatically locates the beginning of the next or current, then previous if pressed 2 times in a row, selection on a CD.
Automatically plays tracks in a random order selected by a microprocessor in the radio.
Repeats desired track of the CD.
Plays the selection many times the normal speed to allow the user to search for a specific portion of a selection.
CD changer/player functions are controlled by selecting the mode using the radio head. No remote control is required. CD changer/player functions are displayed on the radio display when the CD/TP button is pressed and an arrow points to the CD changer/player symbol.
Use radio push-buttons to select any CD in the CD changer/player.
The CD changer/player automatically locates the beginning of the next or previous selection on a CD.
The CD changer/player plays the selection many times the normal speed to allow the user to search for a specific portion of a selection.
Automatically plays tracks in a random order selected by a microprocessor.
Repeats desired track of CD.
Brings soft and loud passages into a more desirable listening range.
Does not contain any CD trays to break or lose. Refer to Handling the Compact Disc Magazine in this service manual.
Base Speaker System: Extended Range Speaker (ERS) | |
| 4 +/- 10% @ 400 Hz |
| 15 Watts |
| 75 Hz +/- 15% |
| 89 dB +/- 2 dB |
Uplevel speaker System: Coaxial (COAX) | |
| 4 ohms+/- 10% |
| 20 Watts |
| 75 Hz +/- 15% |
| 90 dB +/- 2 dB |
Extra CD magazines are available through Saturn Service Parts.
Removing CD Magazine From CD Changer/PlayerTo eject the CD magazine from the CD changer/player, slide the CD changer/player door all the way open until it locks with a click. Press the CD changer/player eject button. The CD changer/player will load the last played CD back into the CD magazine, and the CD magazine will automatically eject.
Keep the CD changer/player door closed whenever
possible to prevent dirt, dust, or debris from getting inside. Cleaning
the CD changer/player is not recommended. The CD lens is very sensitive to scratches.
If one small abrasive particle is accidently brushed across the lens, the CD changer/player
will no longer operate.Important
If sun tan lotion, hand lotion, or hand cleaner is on the radio, it will soften
the paint, and the paint will eventually begin to peel. Inform the customer to not
get suntan lotion, hand lotion, or hand cleaner on the radio. If lotion or cleaners
are on the radio, wipe it off immediately.Notice
To clean the radio faceplate, use a water-damped cloth with a mild soap to remove the dirt. Do not use any harsh cleaners or chemicals as they may cause irreversible damage.
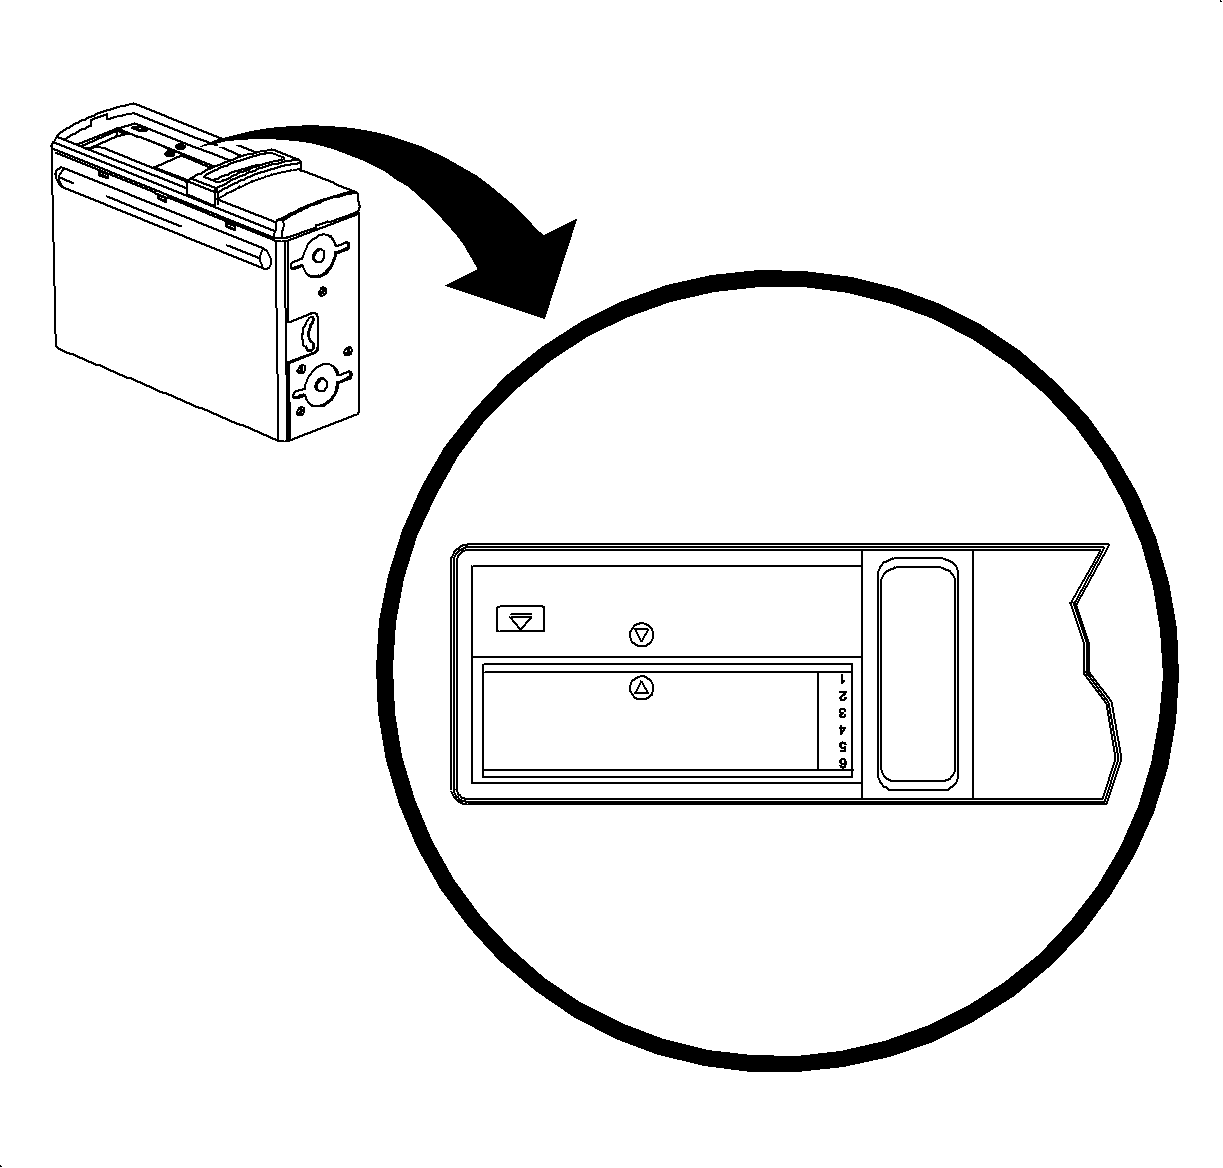
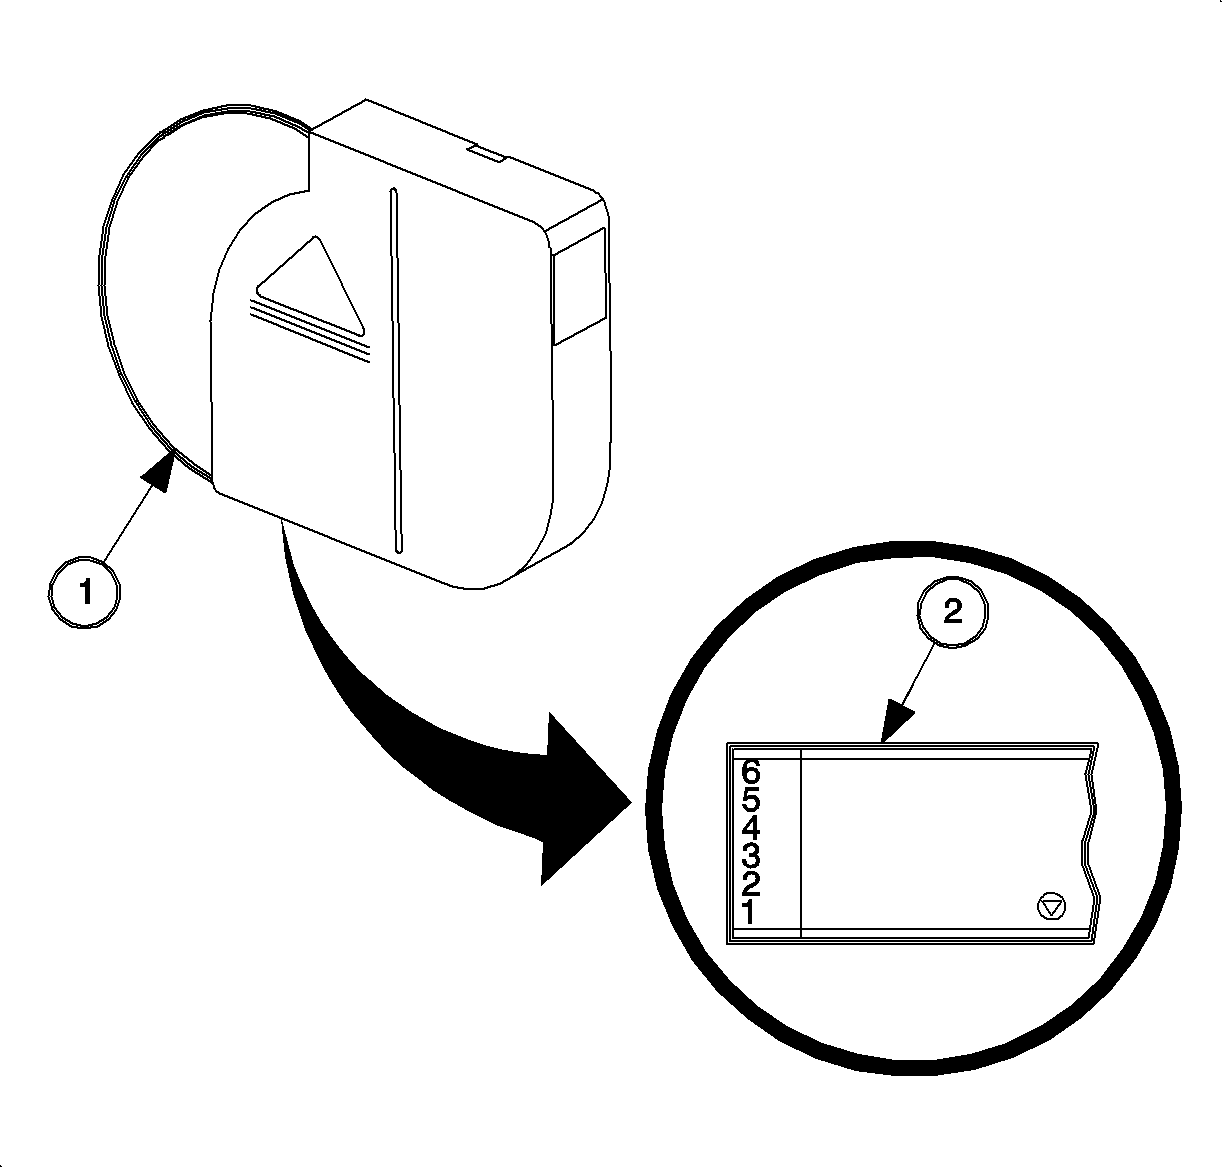
Load up to 6 CDs, label side up, in the CD magazine. The order the CDs are played is from the bottom of the CD magazine to the top, unless in RDM mode. If you look closely, one of the sides of the magazine shows the numbering of the slots 1-6.
If all the CDs in the magazine are loaded
incorrectly, no CDs will be played. The CD changer/player will play only those CDs
loaded correctly.Important
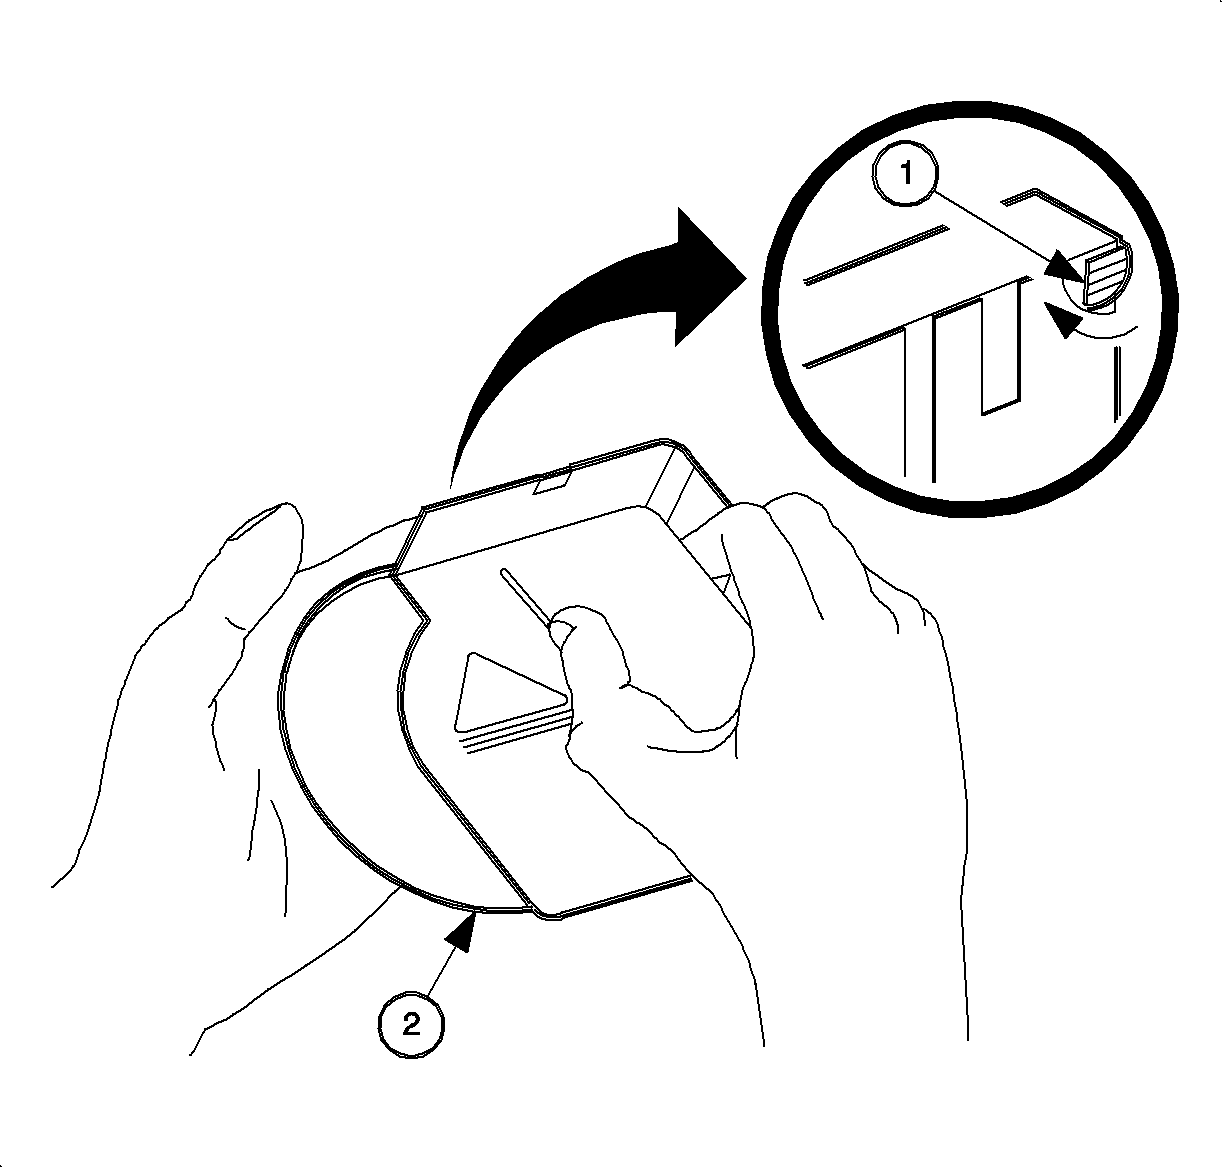
After removing the magazine from the CD changer/player, hold down CD magazine release lever and pull CDs out. The CD magazine release lever is located on the vertical side of the CD magazine, that the horizontal arrow points to. Do not drop the CDs.