To air check a clutch, apply compressed air to the corresponding pressure port with a rubber nozzle air gun.
WHEN CHECKING: | APPLY PRESSURE TO: |
|---|---|
1st Clutch | 1st Clutch Apply Pressure Port |
2nd Clutch | 2nd Clutch Apply Pressure Port |
3rd Clutch | 3rd Clutch Apply Pressure Port |
4th Clutch | 4th Clutch Apply Pressure Port |
Forward/Reverse Servo Piston |
|
Protect yourself by wearing safety glasses, earplugs, a respirator, gloves,
and safety shoes while performing work on the vehicle.Caution
Before you begin:
A small amount of air bubbles coming from the lube holes of the clutch housing
that is being air checked is normal.Important
If no air leak at clutch can be found, leak is most likely not a cut/torn clutch
piston, but is more likely one of the other potential causes listed in the section
for the appropriate clutch in question.Important
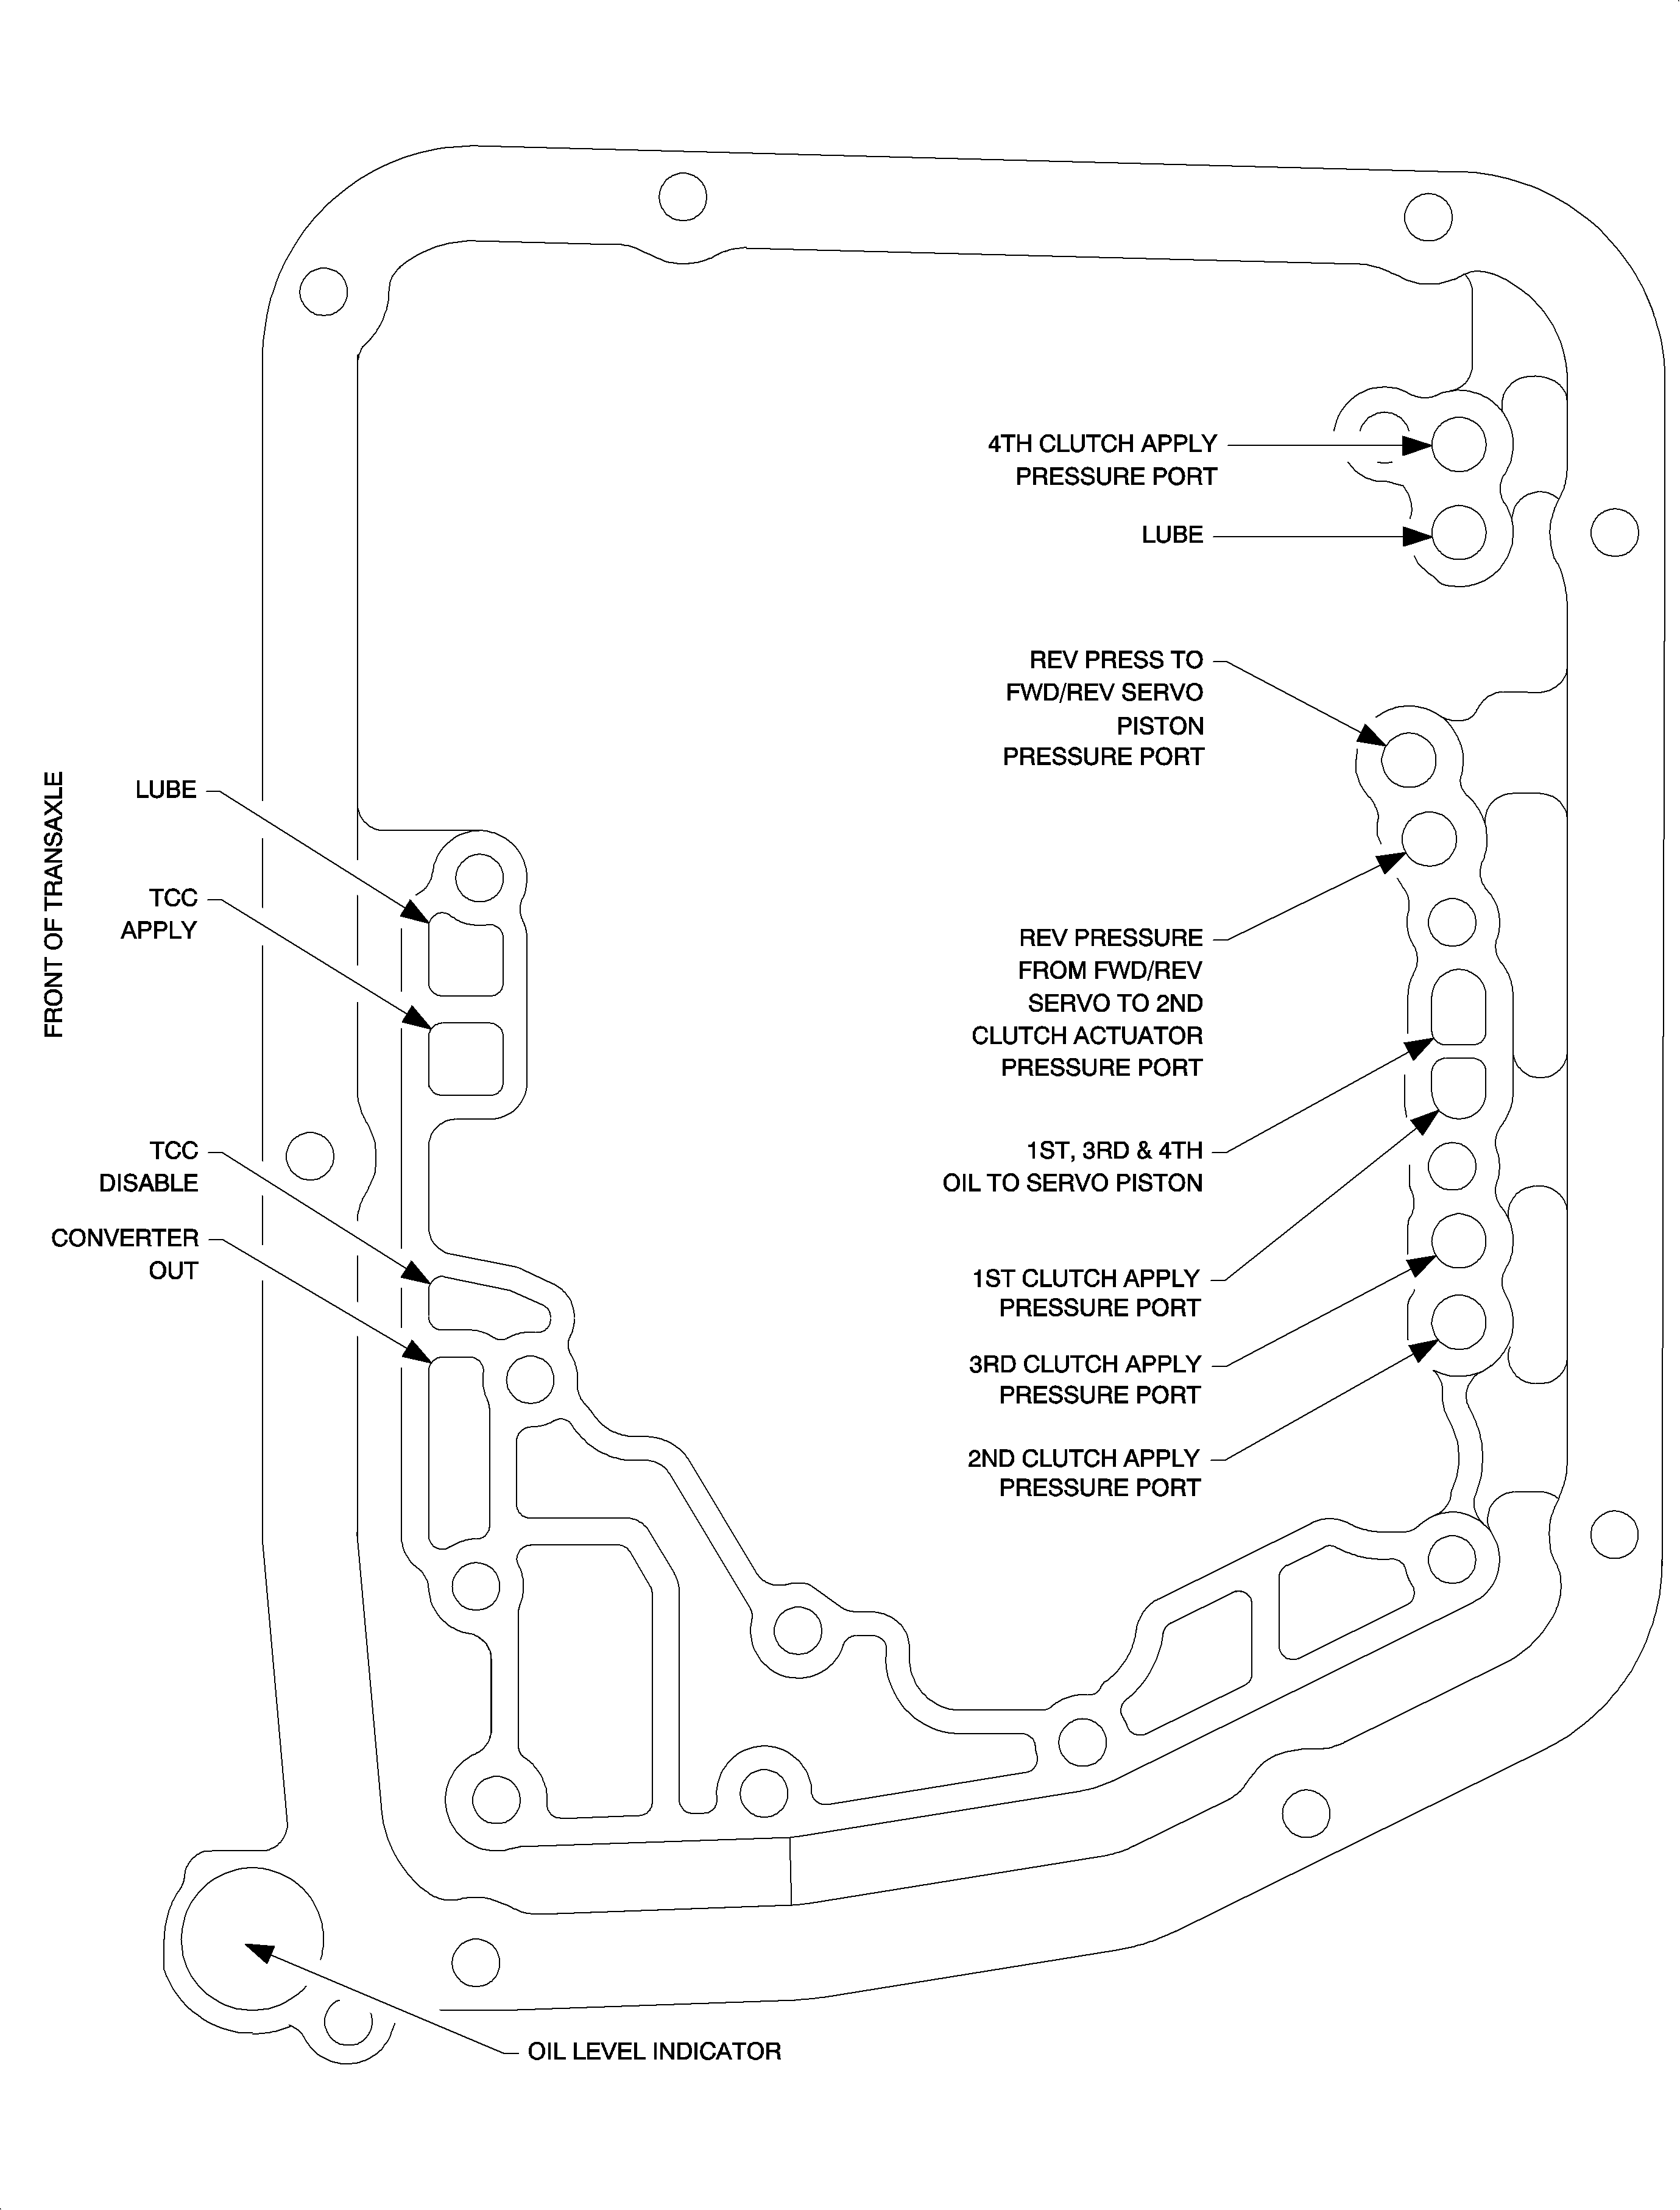
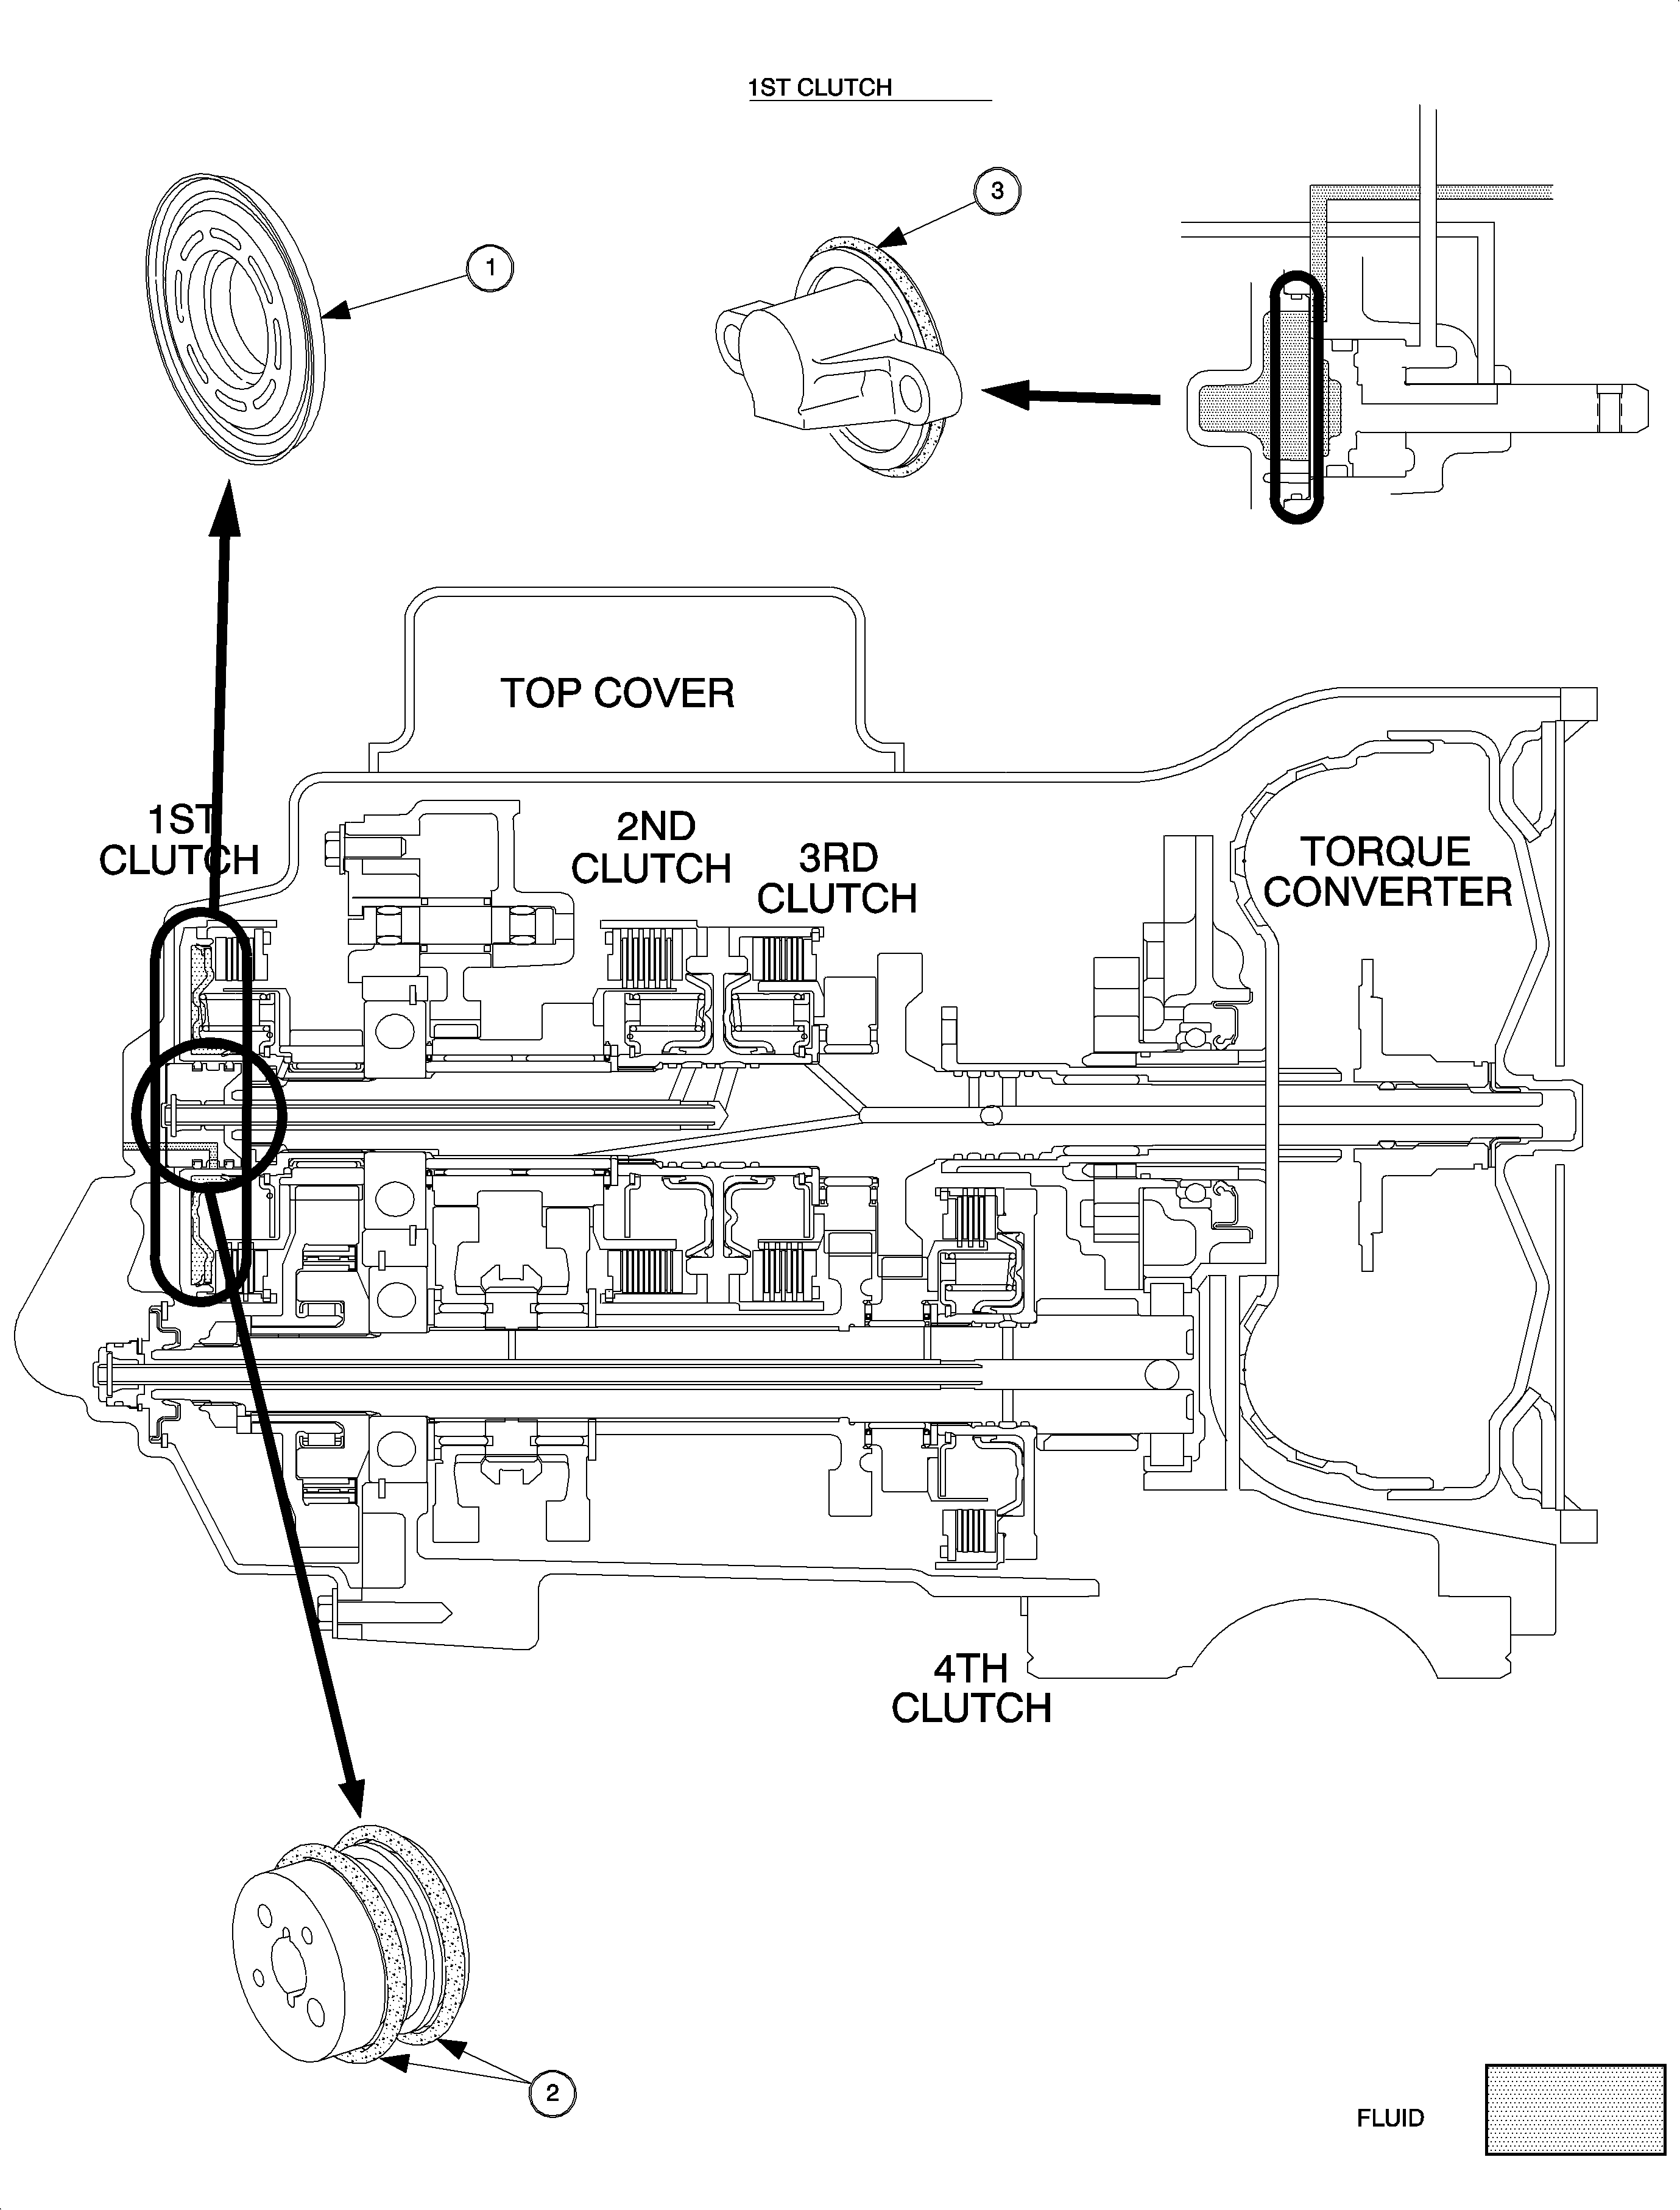
To air check 1st clutch hydraulic circuit, apply air to the 1st clutch apply pressure port. For proper location, refer to "Pressure Ports-Transaxle Case" in this service manual. Because first clutch is hidden by the transaxle end cover, the clutch plates cannot be watched for proper apply. When applying first clutch, watch for the input shaft to move slightly, indicating the clutch has applied or listen for a quick "clunk" sound to verify that the clutch has applied. If there is any question whether first clutch is applying, bench test the clutch using an air check fixture, tool P/N SA9147T.
A large leak in 1st gear circuit can cause a loss of other forward gears.Notice
A large leak in 1st gear circuit can cause a loss of other forward gears.
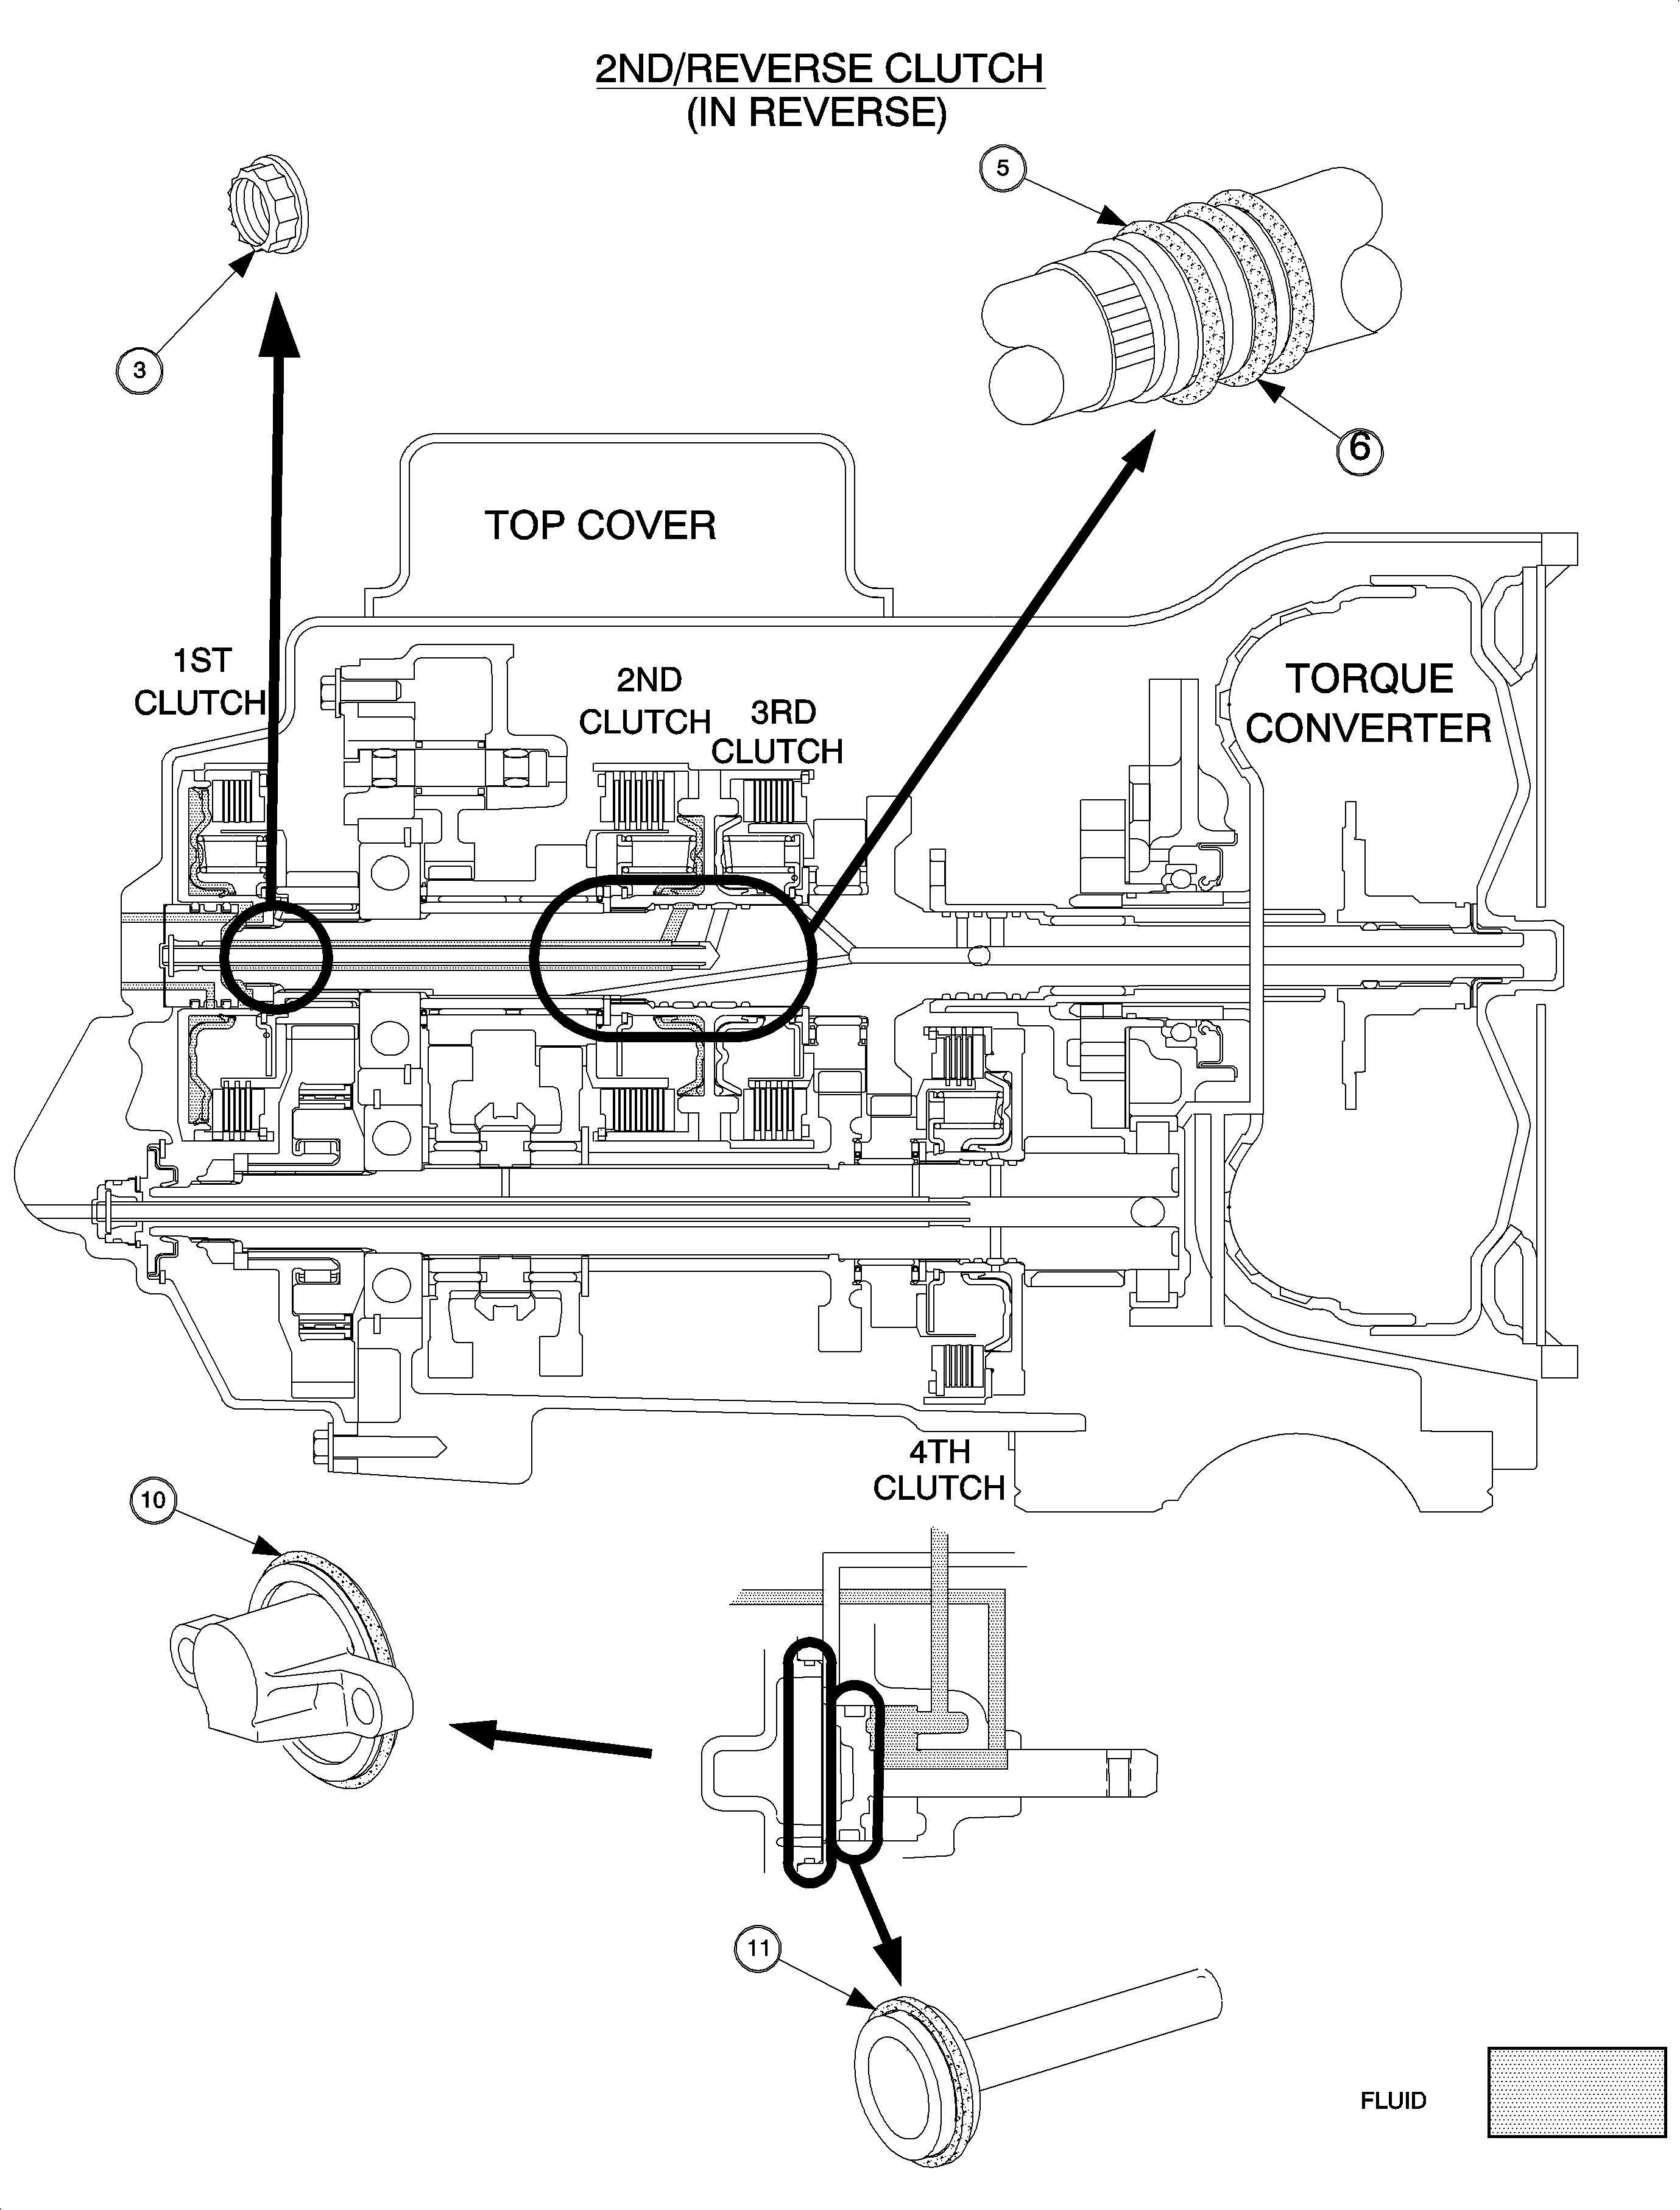
To air check 2nd clutch hydraulic circuit, apply air to the 2nd clutch apply pressure port. For proper location, refer to "Pressure Ports-Transaxle Case" in this service manual. When applying air to 2nd clutch, a small amount of cross leakage between 2nd and 3rd clutch is normal. This is due to a small amount of normal leakage around the input shaft feed tube bushing which is located between the 2nd and 3rd clutch.
If 2nd clutch does not apply properly when performing the air check, possible sources of leakage include:
If air/bubbles are observed coming from the lube port when the 2nd clutch apply
pressure port is pressurized, this may be an indication that the input shaft nut is
loose or not properly seated.Important
To verify that the bushing is at the correct depth, refer to the procedure titled
"Misplaced or Loose Input Shaft Inner Tube Bushing Check" procedure in this service
manual.Important
If the complaint is for reverse, inspect the forward/reverse servo piston following the procedures below in addition to the 2nd rev clutch hydraulic circuit procedures.
As pressure is applied to the reverse pressure to forward/reverse servo piston
pressure port, air pressure will cause a spray-back of oil out of the 1st, 3rd and
4th oil-to-servo piston port. In the event of hot transaxle oil, this could result
in personal injury.Caution
When following the above procedures, the forward/reverse servo piston should move, pulling the fork toward the reverse driven gear. If the forward/reverse servo piston does not apply properly, inspect for:
For detailed information on delay/harsh engagement into reverse, refer to the
"Delay/Harsh Engagement Into Reverse Diagnostic Chart" in this service manual.Important

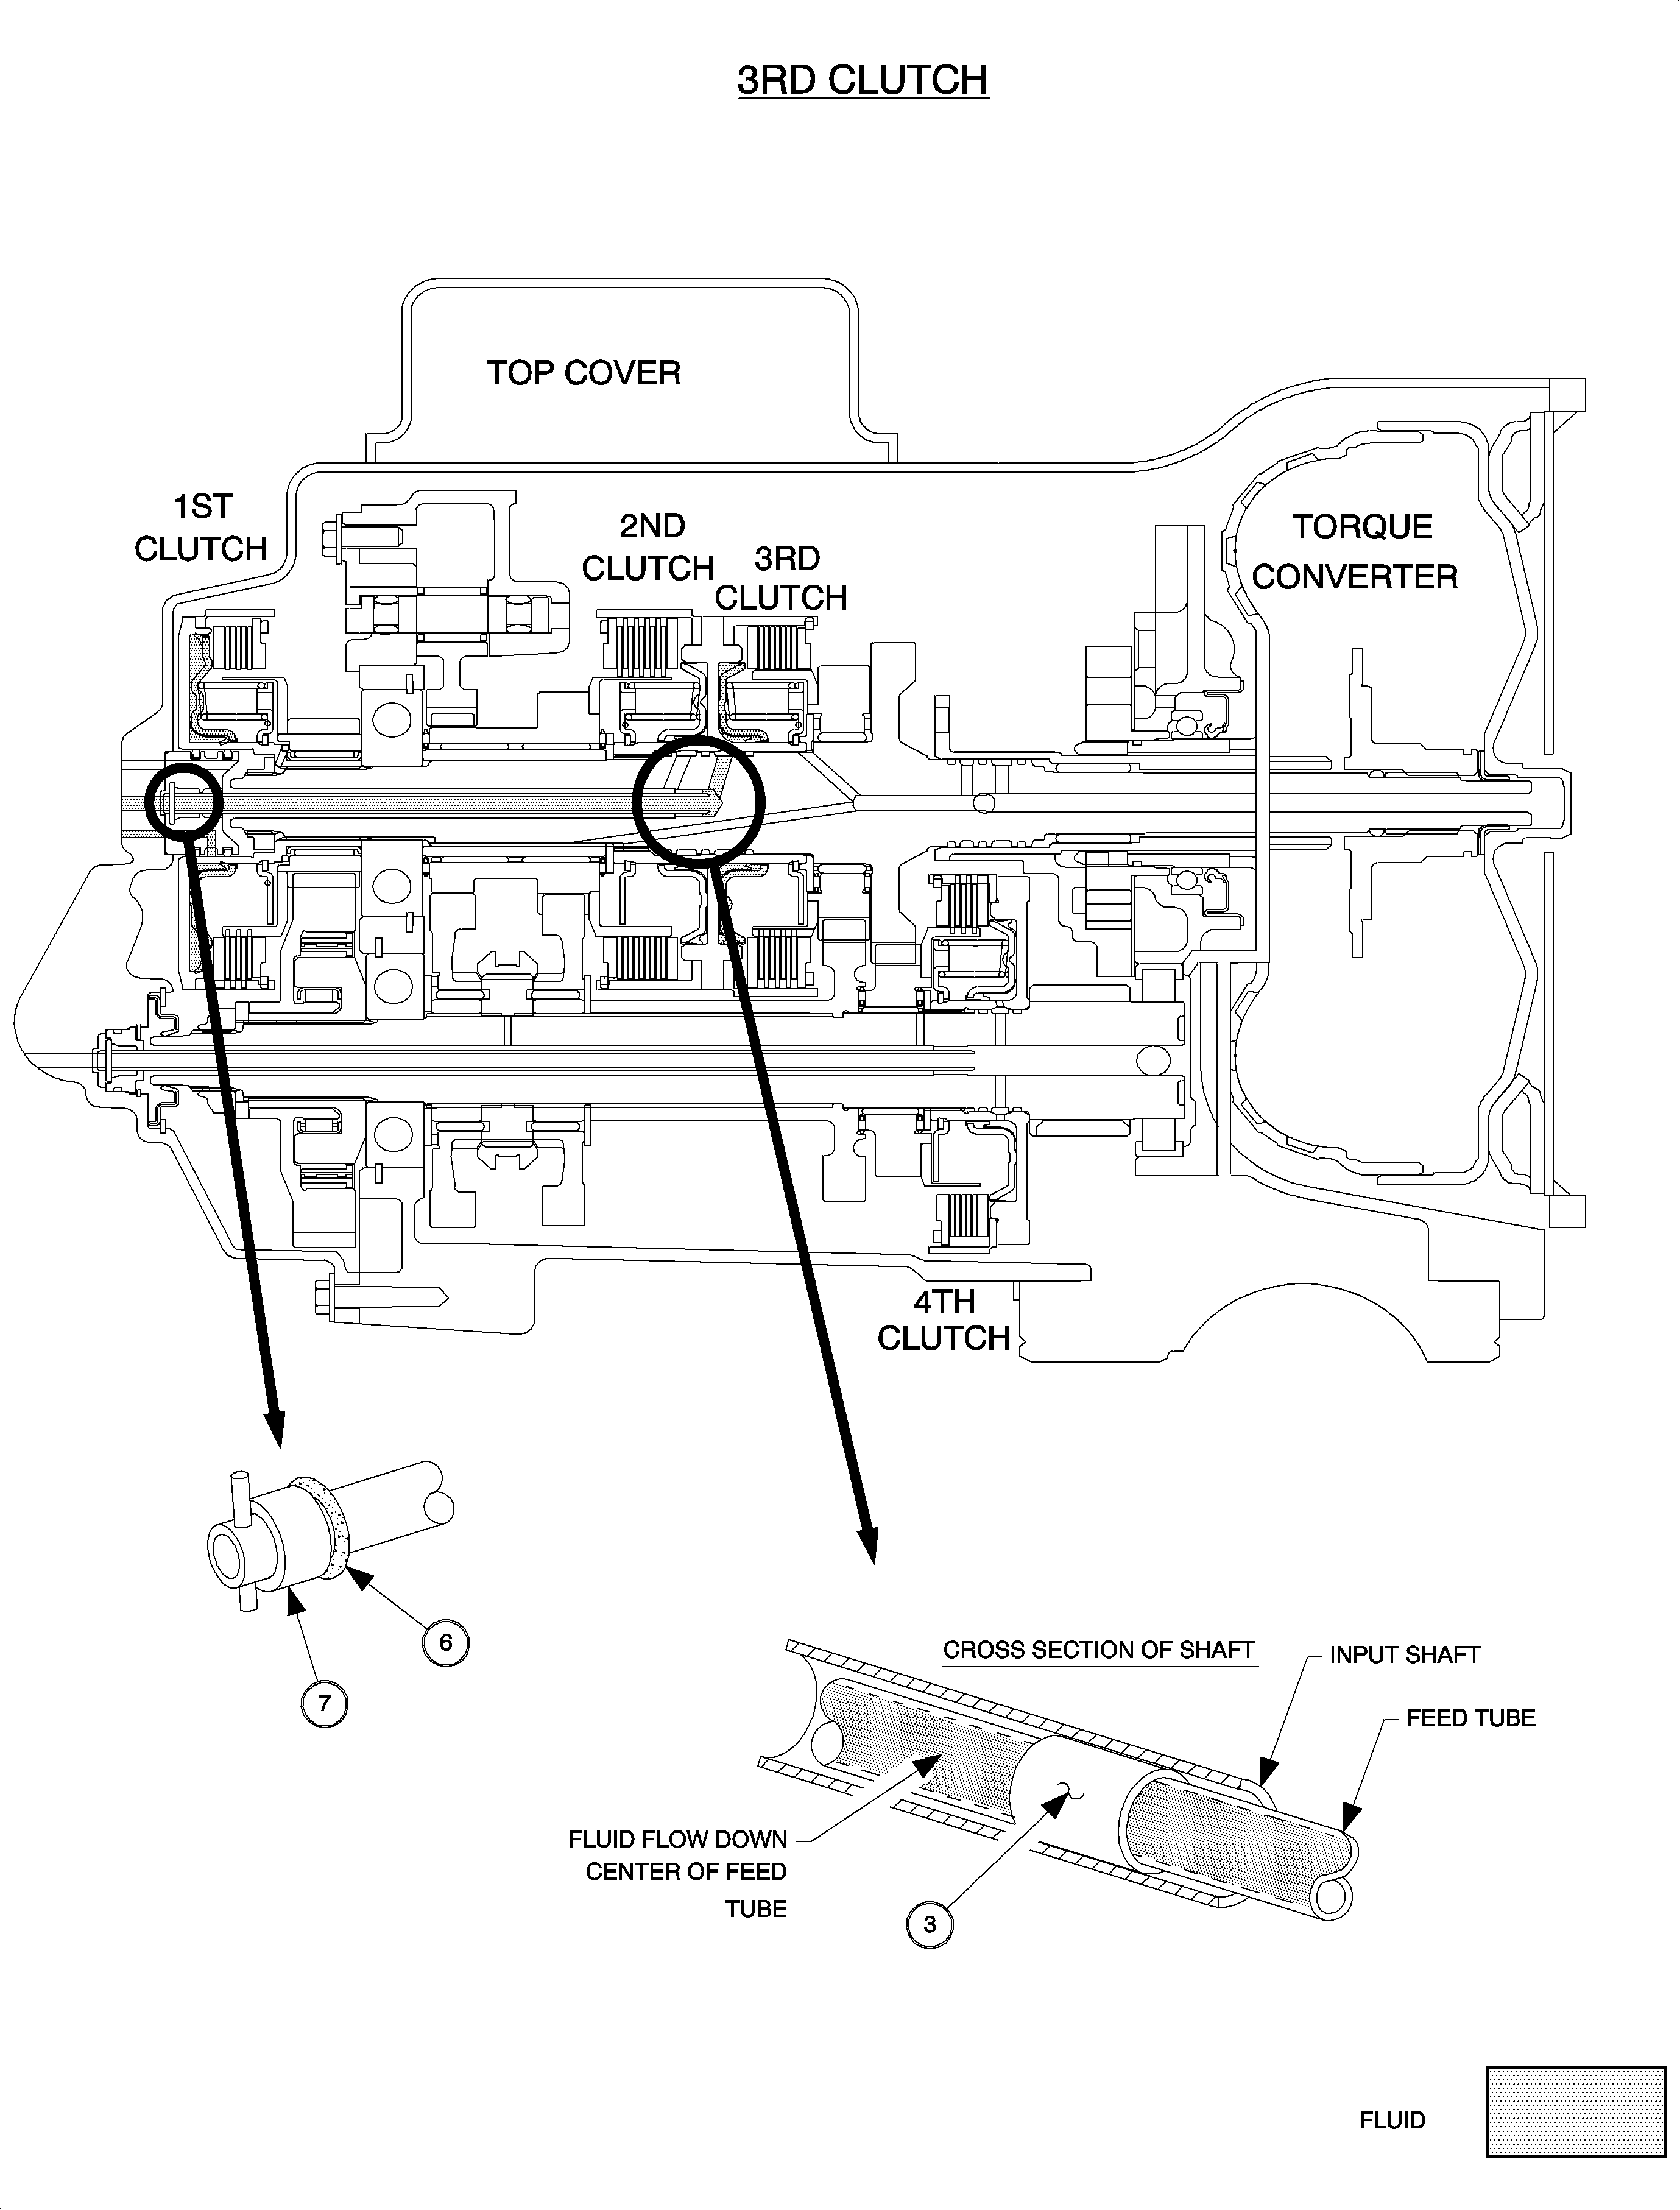
To air check 3rd clutch hydraulic circuit, apply air to the 3rd clutch apply pressure port. (For proper location, refer to "Pressure Ports-Transaxle Case" in this service manual.) When applying air to 3rd clutch, a small amount of cross leakage between 3rd and 2nd clutch is normal. Second clutch should not immediately apply when applying air to the 3rd clutch apply port, while blocking the 2nd clutch apply port. However, it is normal for 2nd clutch to apply within 2-3 seconds after applying air to the 3rd clutch apply port when the 2nd clutch apply port is blocked. This is due to a small amount of normal leakage around the input shaft O-ring seal between the 2nd and 3rd clutch.
If 3rd clutch does not apply properly when performing the air check, possible sources of leakage include:
To verify that the bushing is at the correct depth refer to the procedure titled
"Misplaced or Loose Input Shaft Inner Tube Bushing Check" procedure.Important

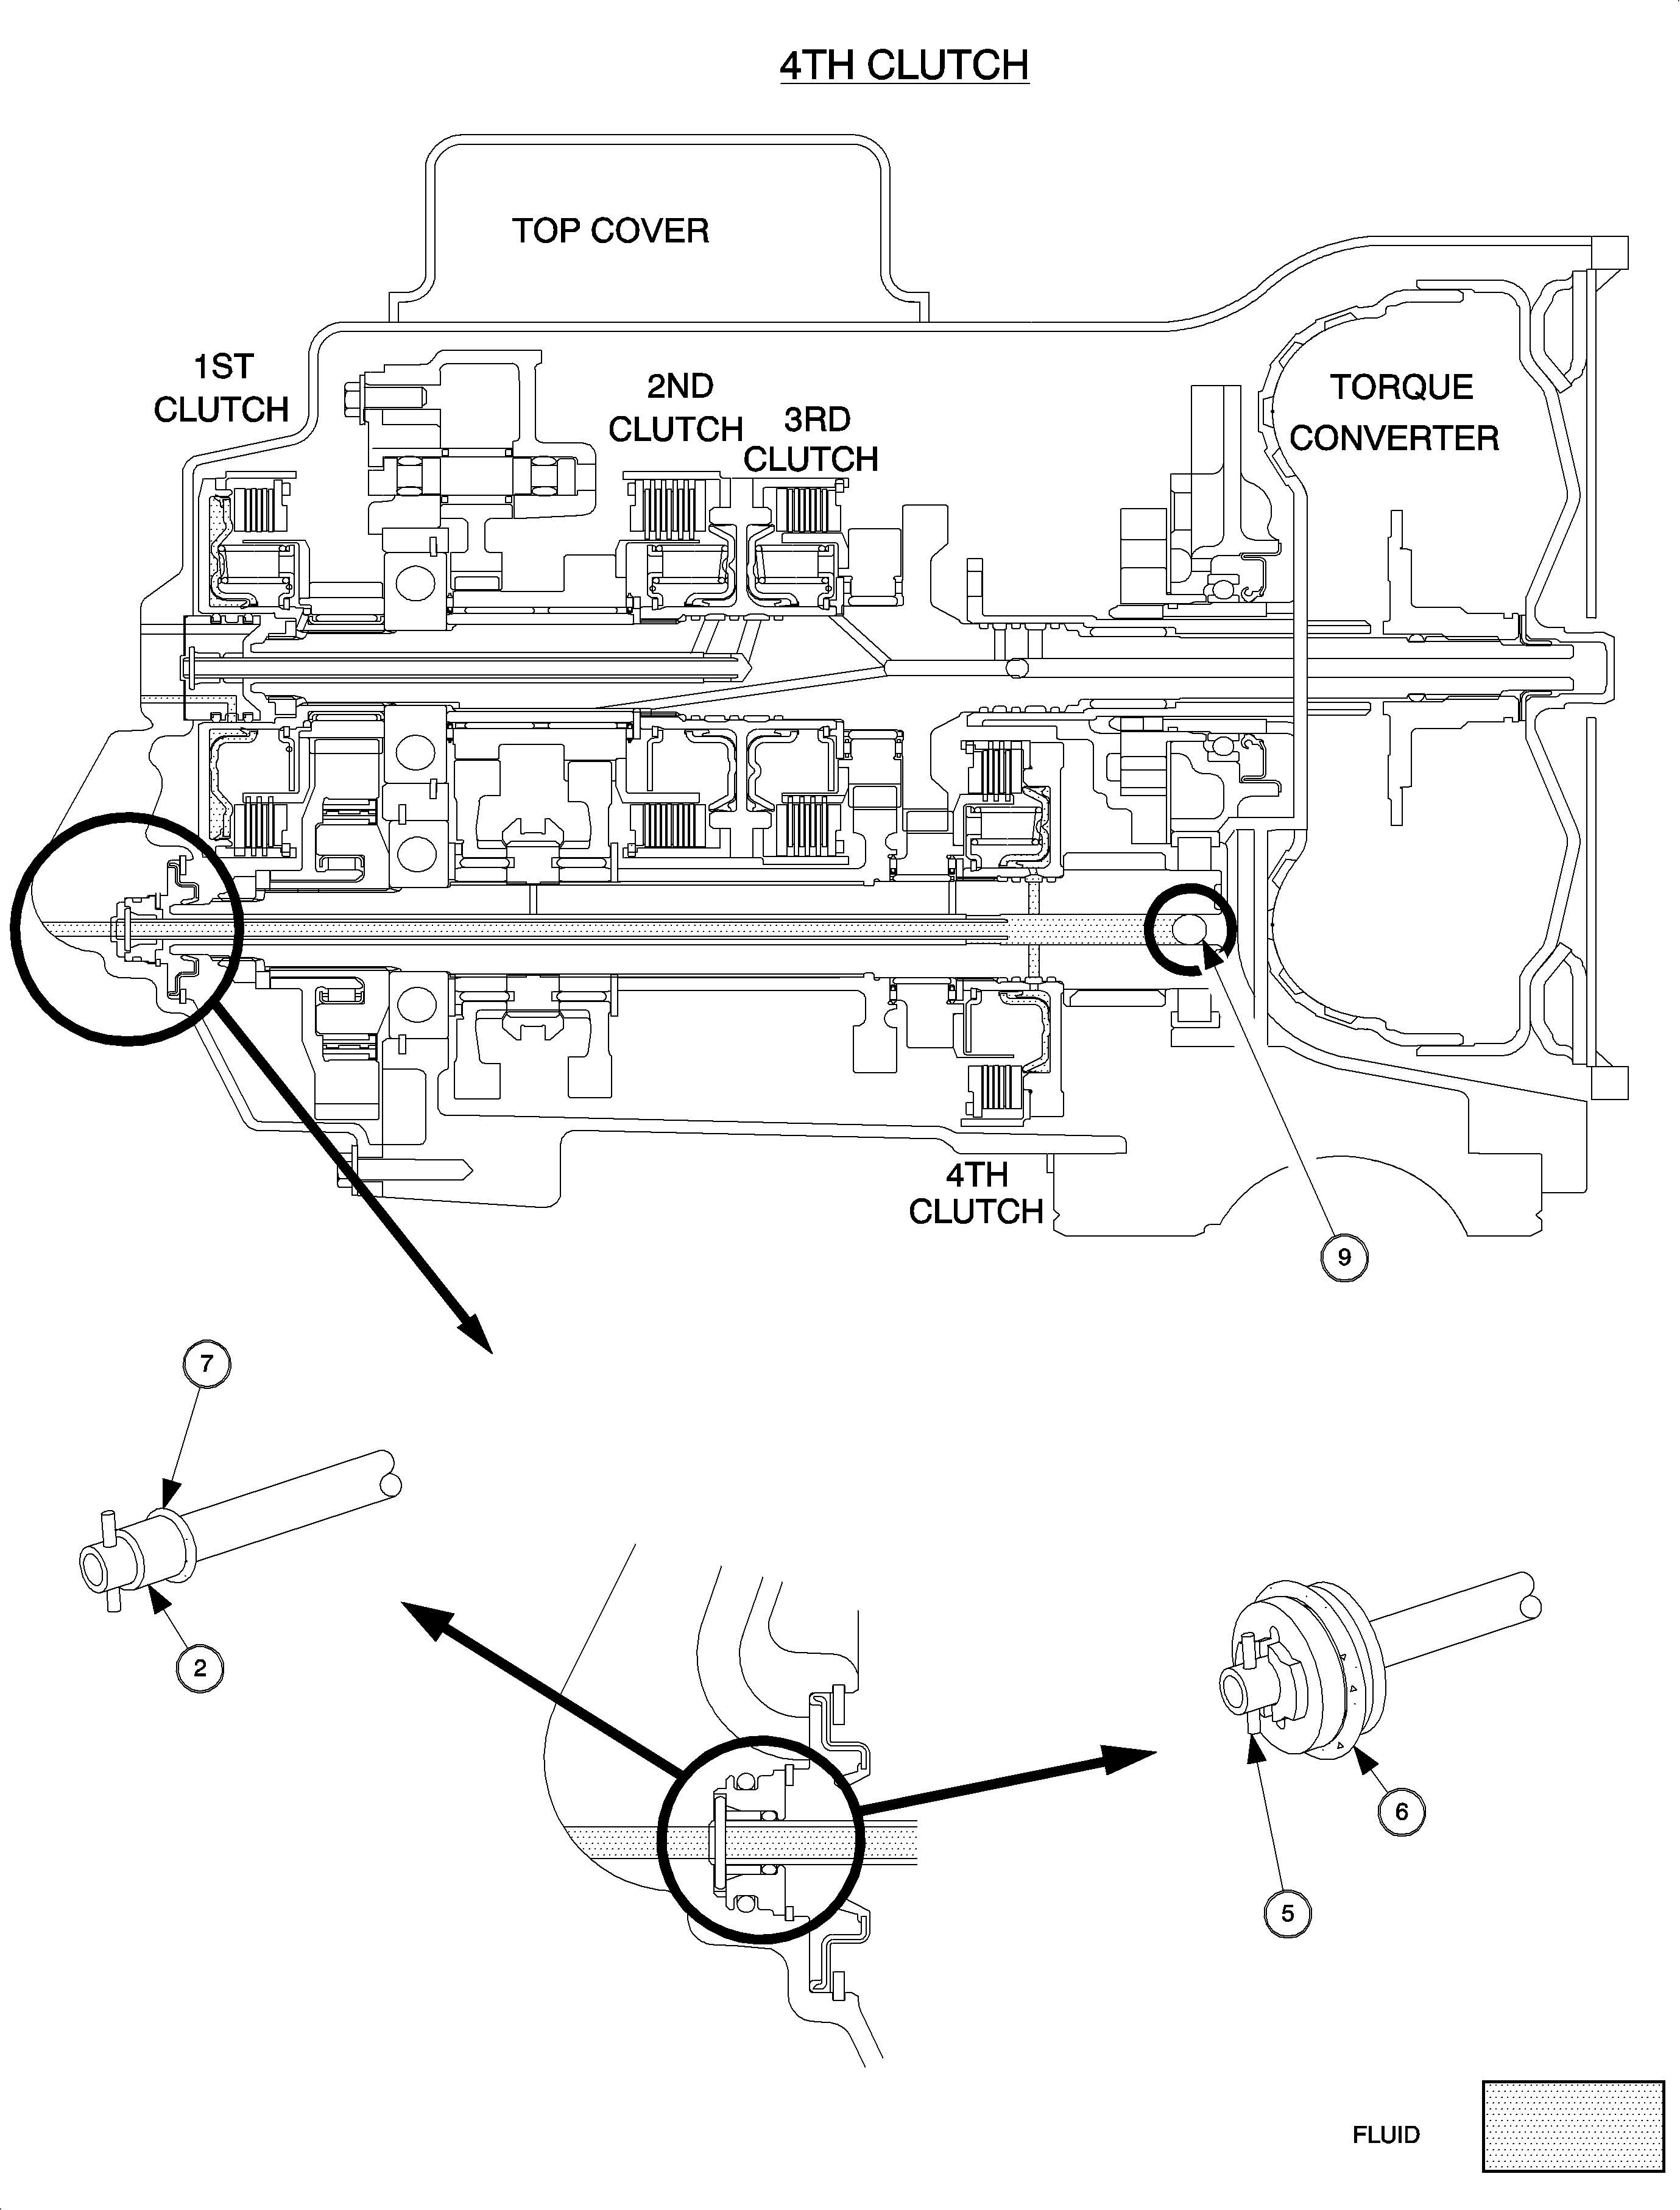
To air check 4th clutch hydraulic circuit, apply air to the 4th clutch apply pressure port. For proper location, refer to "Pressure Ports-Transaxle Case" in this service manual.
If 4th clutch does not apply properly when performing the air check, possible sources of leakage include:
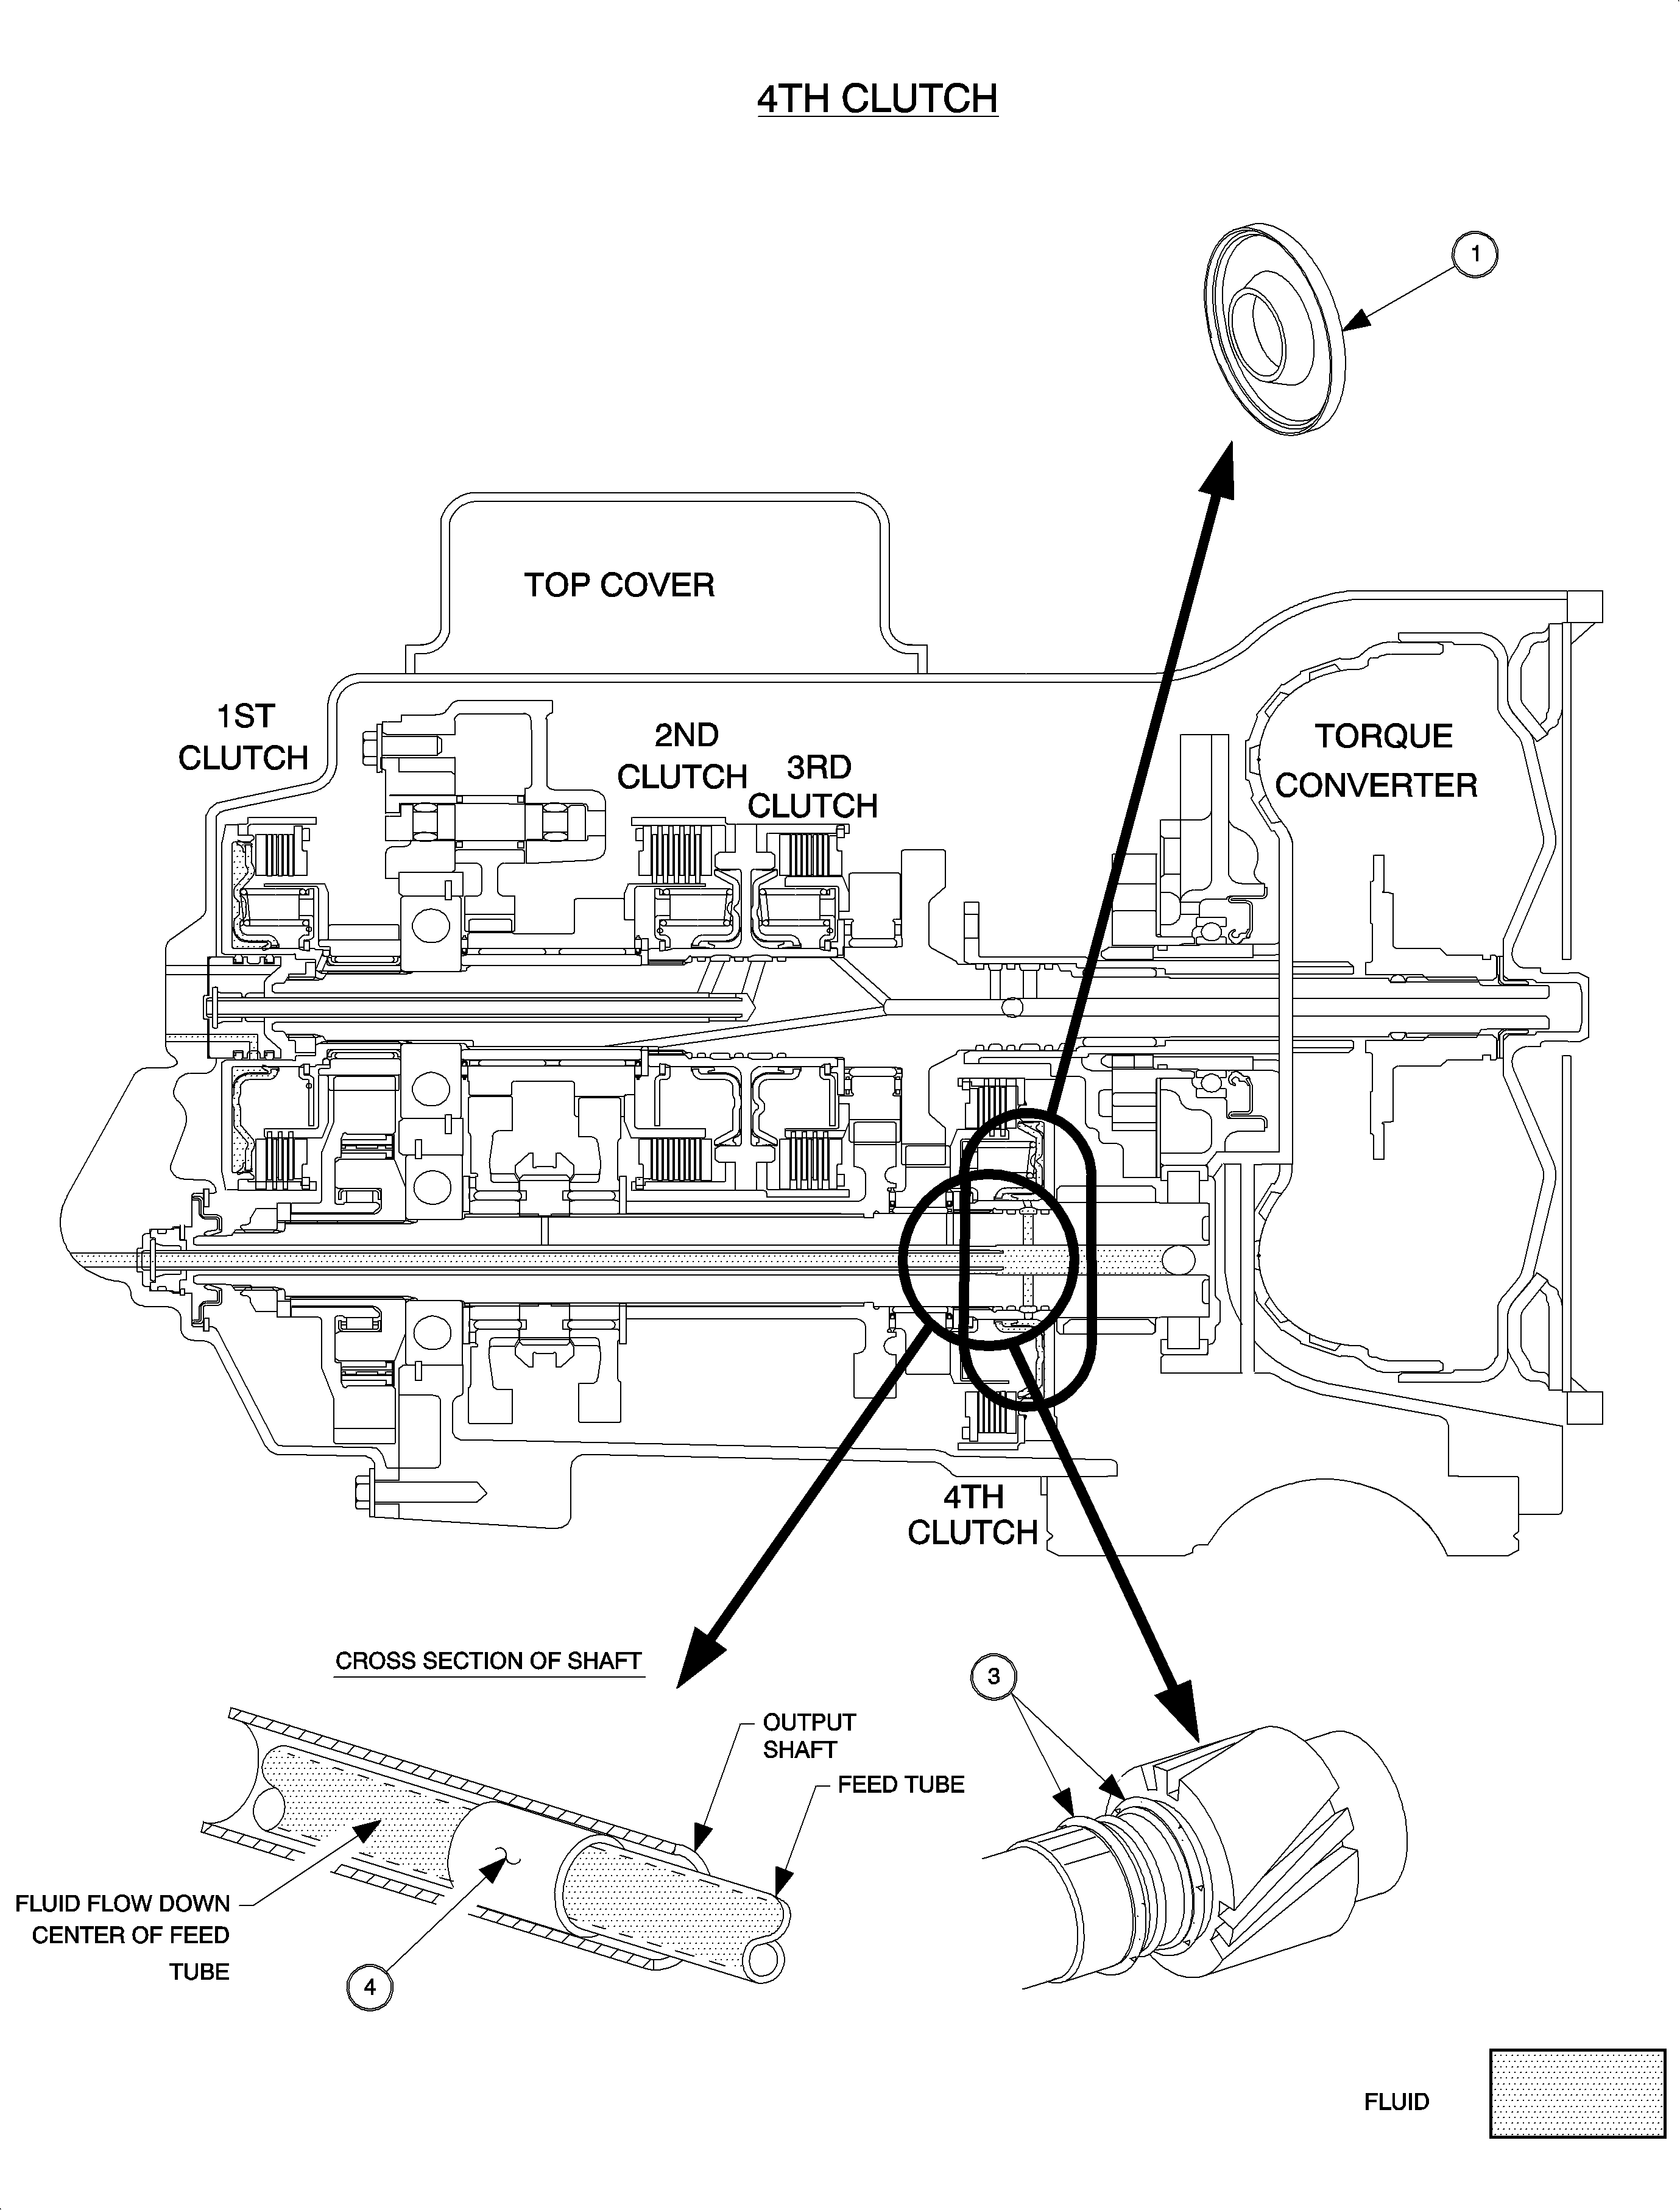
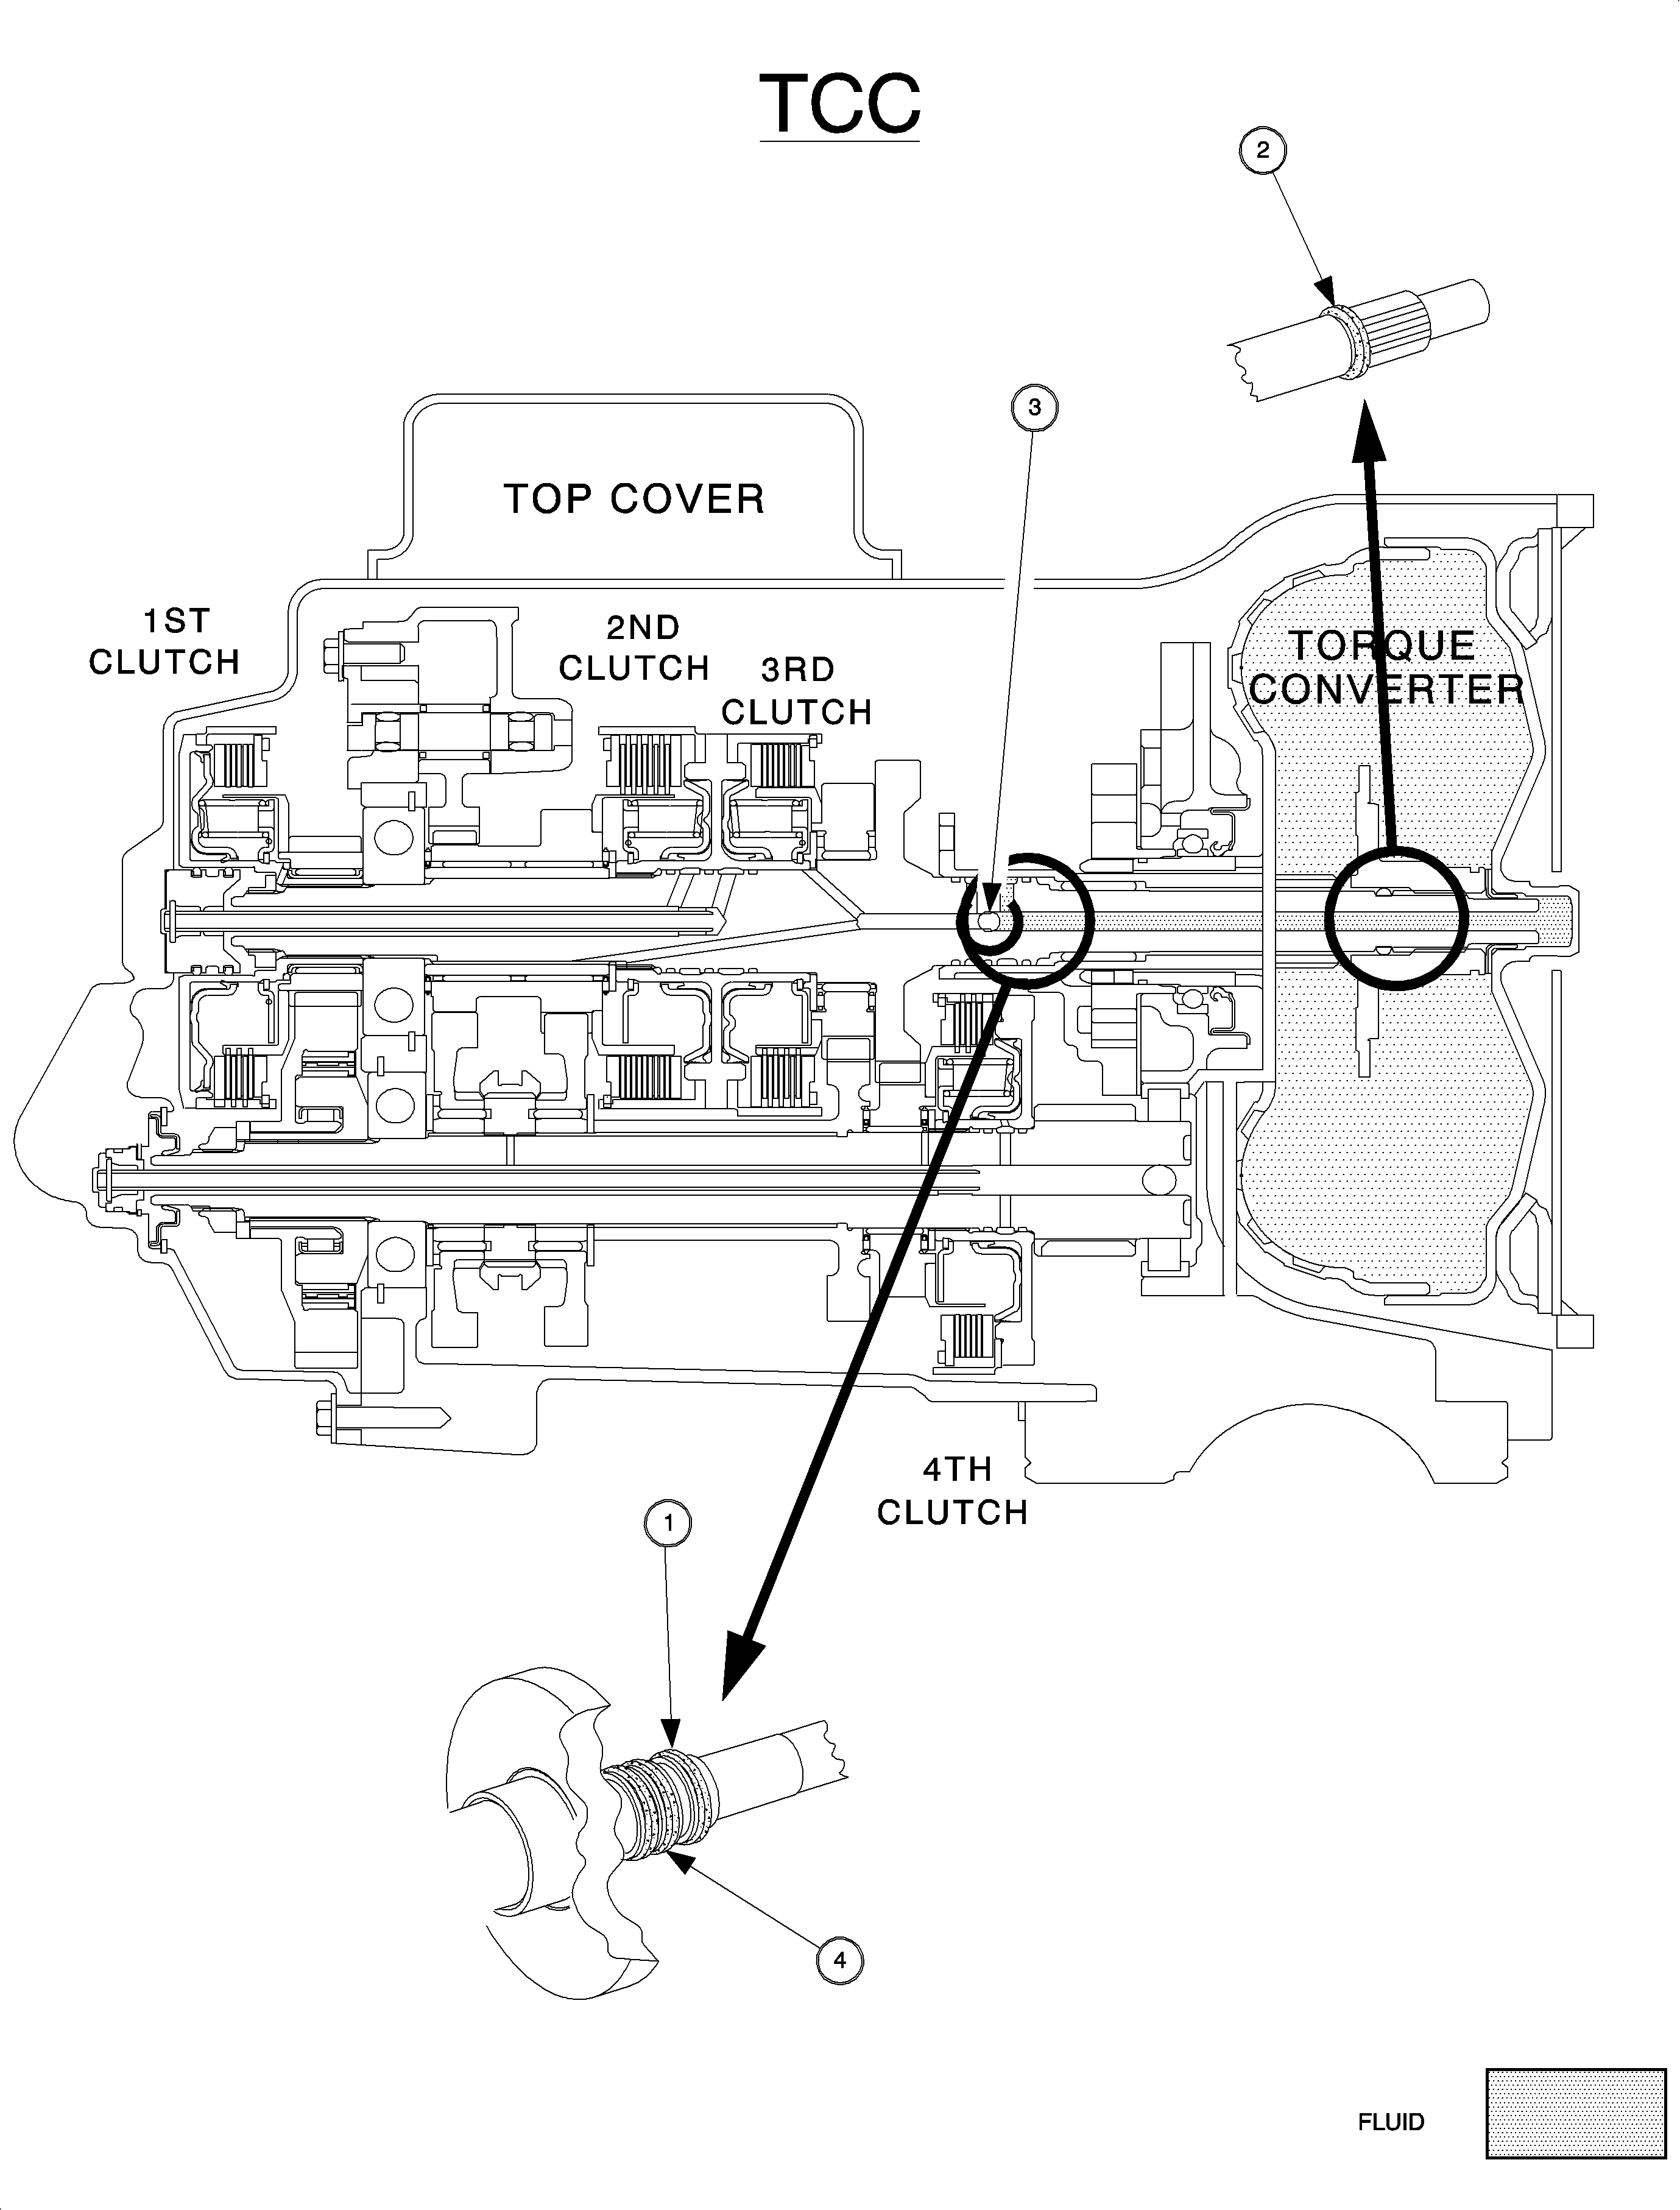
The TCC circuit cannot be checked reliably using air with the exception of checking for a missing input shaft check ball (3) or checking for a leaking Teflon seal that separates lube from TCC disable (4).
When applying air to the lube pressure port, a small amount of leakage will
normally be observed coming from TCC disable and/or converter out. If a gross leak
is observed, inspect for a missing input shaft check ball (3) or leaking Teflon
seal that separates lube from TCC disable (4).Important
To check for a missing input shaft check ball (3) or a leaking Teflon seal that separates lube from TCC disable (4), regulate air pressure to 25 psi. Apply air to the lube pressure port (next to TCC apply) and look for a significant amount of air coming from TCC disable or converter out ports.
Other sources of leaking in the TCC circuit, which cannot be detected with an air check include: