Top Tether Hardwar Package for Child Restraint Seats #97-T-47A - (Jan 2, 2003)
Top Tether Hardware Package for Child Restraint Seats -- Due to the
revisions under Models Affected, this bulletin supersedes bulletin 97-T-
47, which should be discarded.1991-1999 Saturn SL, SC and SW Models
Purpose
This bulletin informs Saturn Retailers personnel of our expectations for Saturn
owners who request information about top tether anchors for their Saturn vehicles.
At Saturn, top tether anchors for child restraint seats (CRS) have been made available
to all owners who request them.
Most forward facing child restraint seats (CRS) sold in the United States are
not sold with top tether straps, but have provisions for them. Top tethers can help
to better secure the seat in the vehicle. When a forward facing CRS, including a top
tether is used, specially designed components must be used to secure the child seat
top tether. These components are included in a Child Seat Restraint System Belt Bracket
Package from Saturn Service Parts Operations (SSPO).
Top tethers are not normally required or used with rearward facing infant restraint
seats. Rearward facing infant restraint seats should never be secured in the front
seat of an air bag equipped vehicle, unless the vehicle is equipped with an air bag
deactivation switch, and the switch has been used to turn the air bag OFF. To date,
Saturn vehicles are not equipped with deactivation switches.
As a restatement of existing Saturn policy, and in conjunction with the General
Motors initiative regarding this same subject, Saturn will provide Child Seat Restraint
System Belt Bracket Packages to owners in the United States who require them. The
Child Seat Restraint System Belt Bracket Package contains the necessary hardware for
anchoring a forward facing child restraint seat top tether in the rear seat. A Child
Seat Restraint System Belt Bracket Package will be provided to the retail customer
at no charge for the part or installation.
When a Saturn owner requests installation of a Child Seat Restraint System Belt
Bracket Package, it is to be installed at no charge to the customer. The parts and
labor charges associated with the installation of this Child Seat Restraint System
Belt Bracket Package may be claimed through the retail reimbursement system. Information
for submitting a claim to Saturn is contained within this bulletin. Retailer installation
of a Child Seat Restraint System Belt Bracket Package must be supported by a signed
customer service order.
Included in this bulletin are the installation procedures for installing the
Child Seat Restraint System Belt Bracket Package in all of the Saturn vehicles. Installation
instructions are also included in each Child Seat Restraint System Belt Bracket Package.
At the end of the installation procedures, part numbers are listed for the Child Seat
Restraint System Belt Bracket Packages.
Installation Procedures:
SEDAN
Choose an anchor location shown in the figure that is most convenient for the
customer. Additional hardware is available if you require more than one child restraint.
- Lower the rear seat backs.
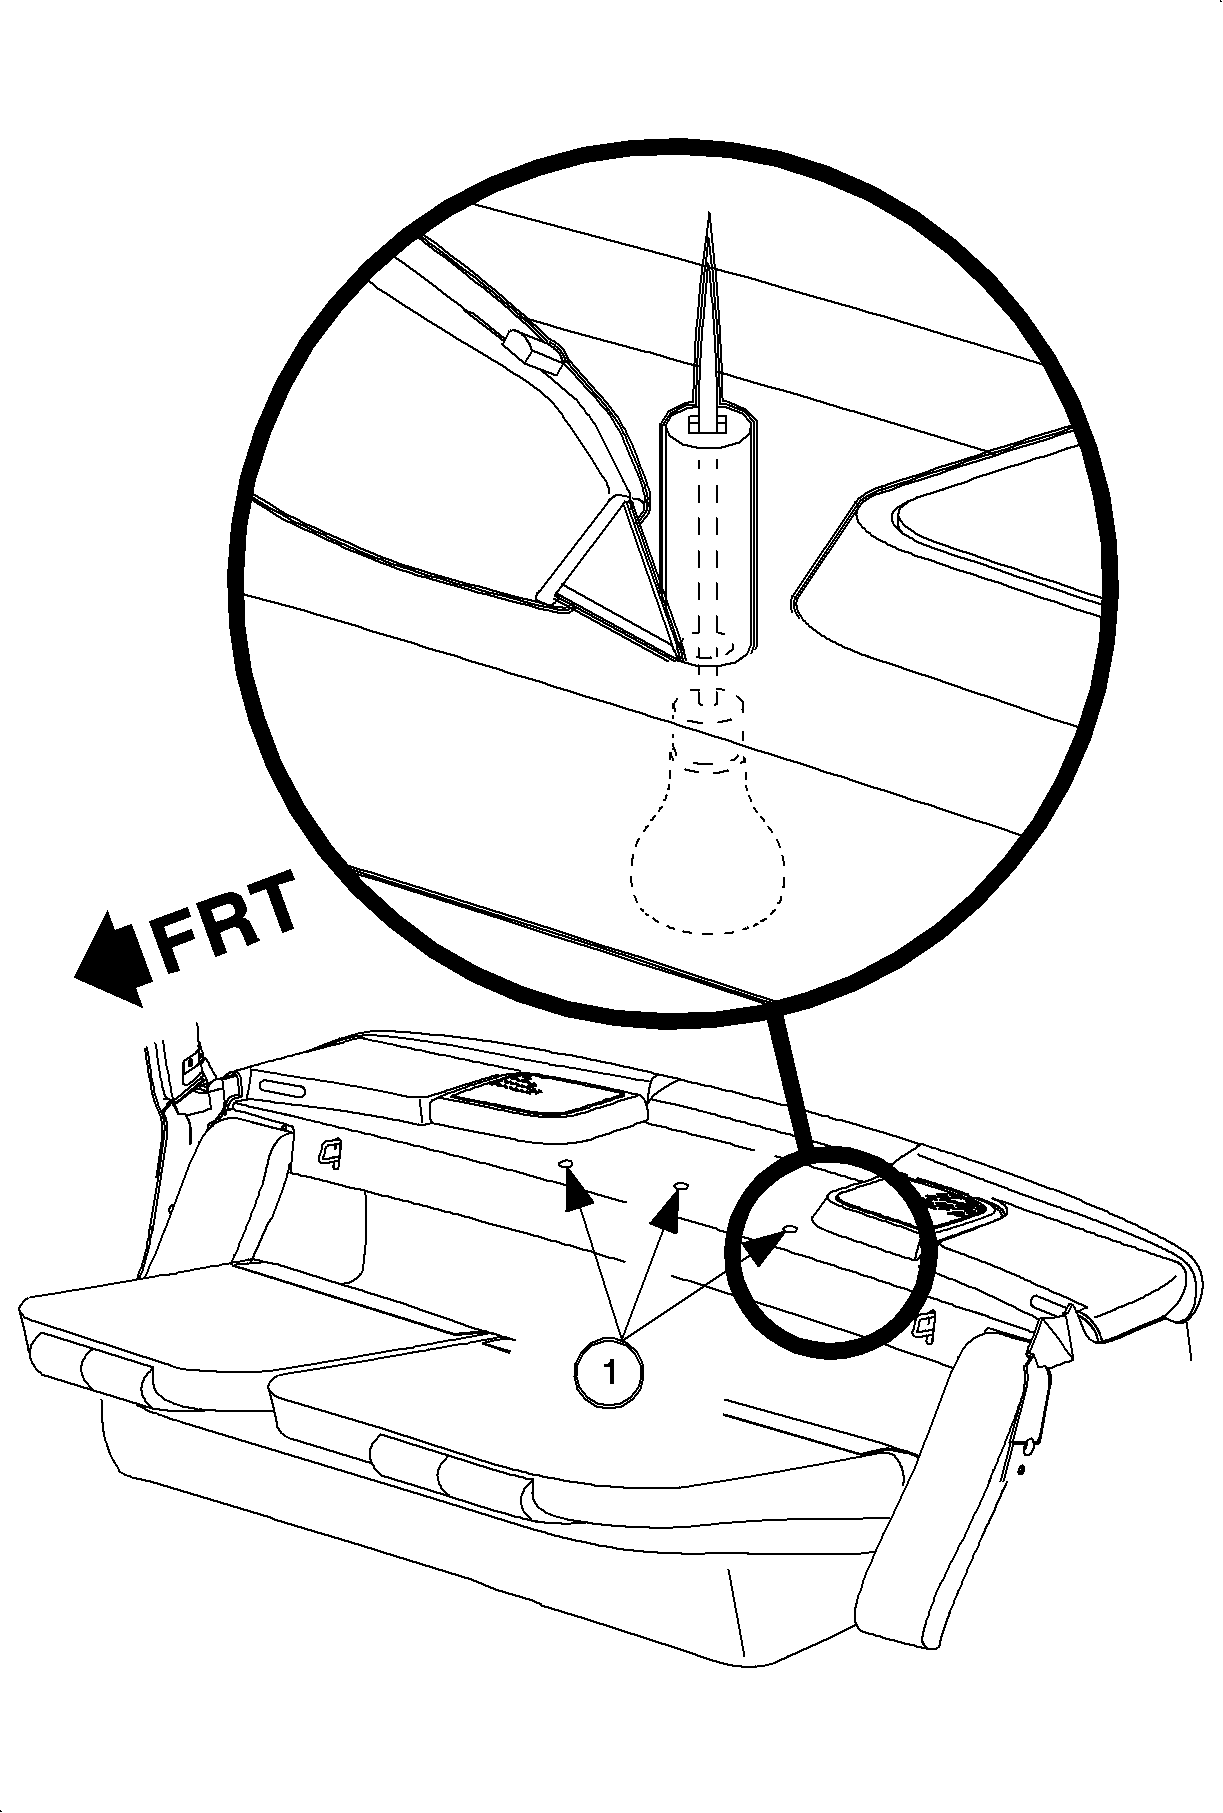

Important
Illustration shown is for 1991-1995
Sedans, 1996-1999 Sedans are similar.
- On 1991-1995 Sedans, for all three weld nut locations, and on 1996-1999
Sedans for the center weld nut location:
- Locate the desired weld nut from under the bottom of the rear window trim
finish panel and pierce a hole in the rear window trim finish panel with an awl.
- Leave the awl in the rear window trim finish panel and select a deep well
socket with the same outside diameter as the spacer included in the parts package.
- Center the deep well socket over the end of the awl and using a utility
knife, trim around the perimeter of the socket. Remove the socket and awl from the
rear window trim finish panel.
- Remove the cut-out section of rear window trim finish panel.
- On 1996-1999 Sedans, if the desired weld nut is an outer rear window
trim finish panel assembly fastener, remove the fastener to expose the desired weld
nut.
Three Weld Nut Locations (1)
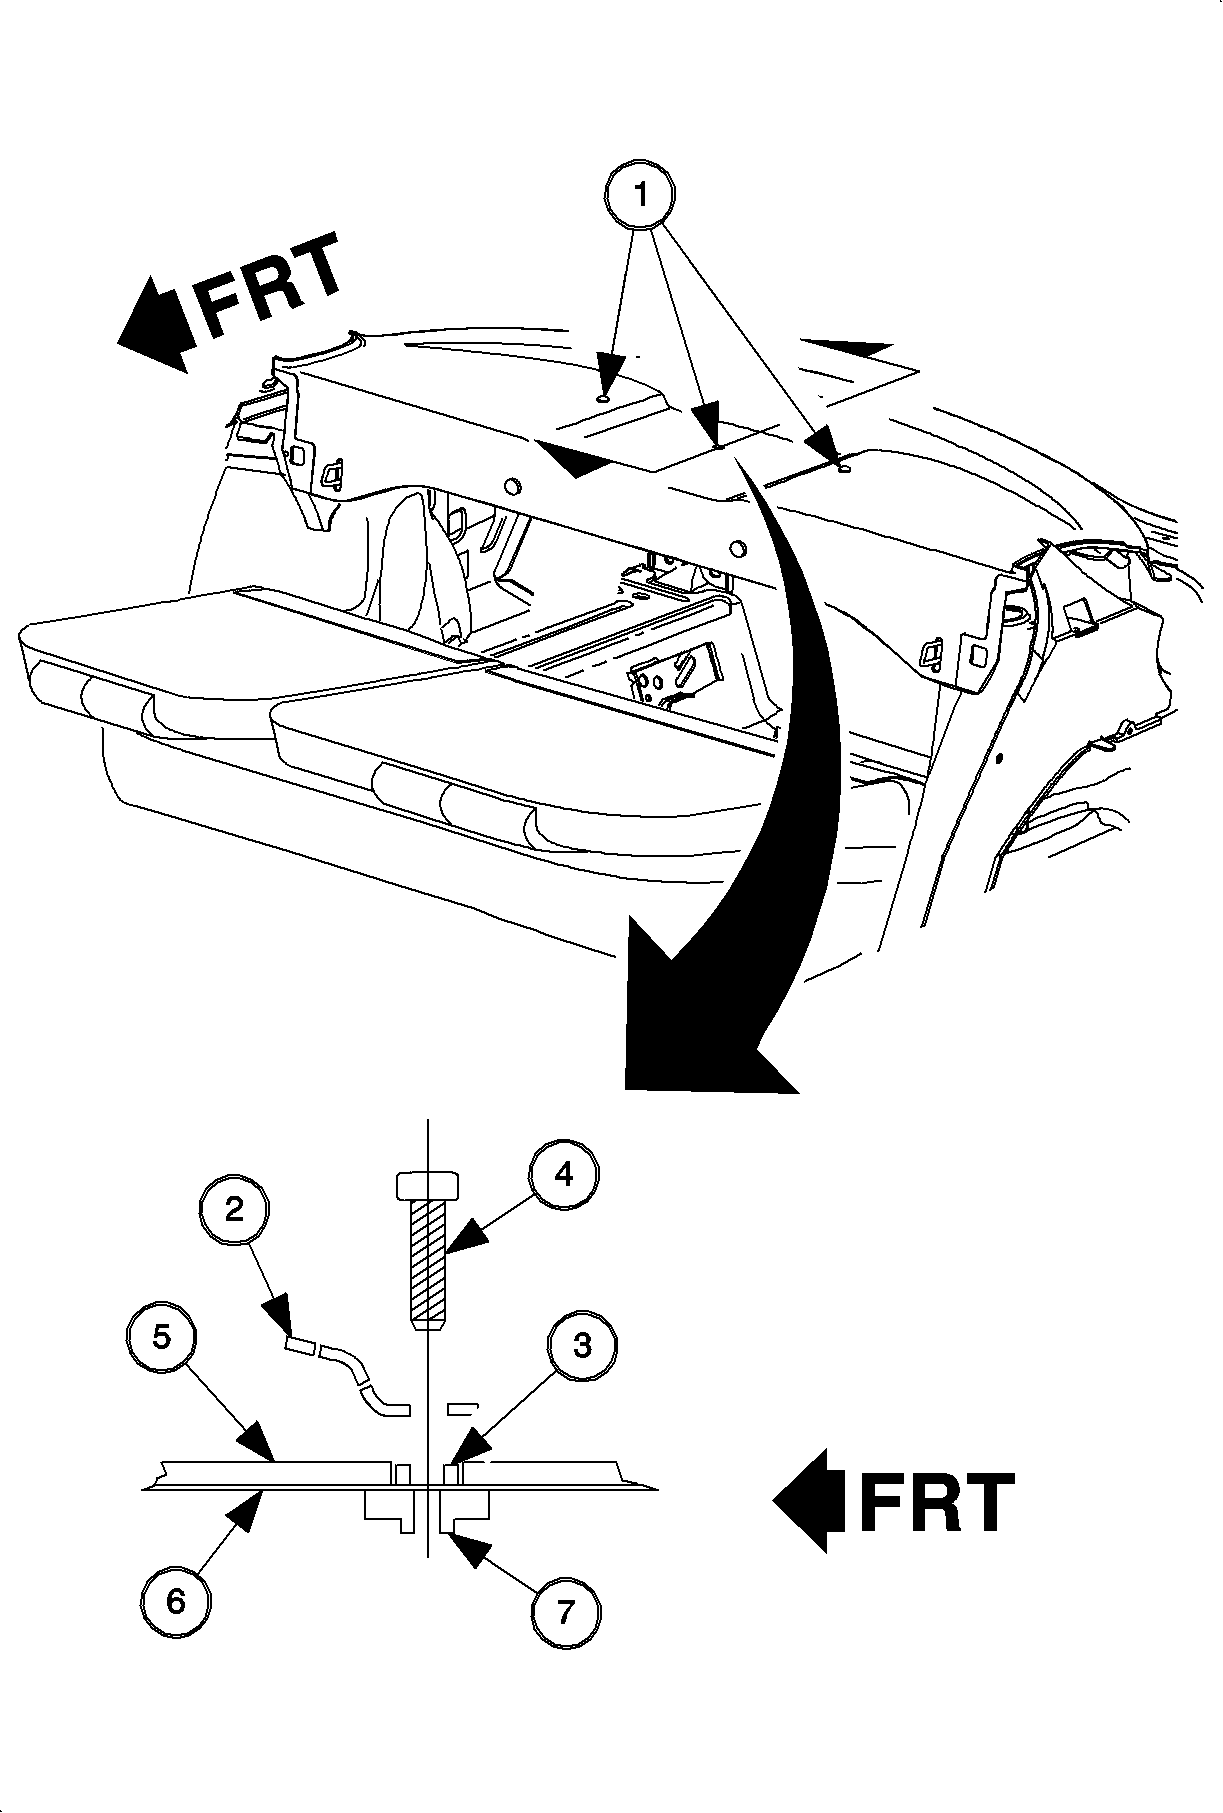

- Install the child tether anchor bracket, spacer and
fastener into the appropriate hole.
TightenTighten the fastener to 20-30 N·m
(15-22 lb ft).
- Raise the rear seat backs.
Illustration Key
- Two Weld Nut Locations (1)
- Anchor Bracket (2)
- Spacer (3)
- Bolt (4)
- Trim (5)
- Steel Panel Assembly (6)
- Weld Nut (7)
COUPE
Choose an anchor location shown in the figure that is most convenient for the
customer. Additional hardware is available if you require more than one child restraint.
- Lower the rear seat backs.
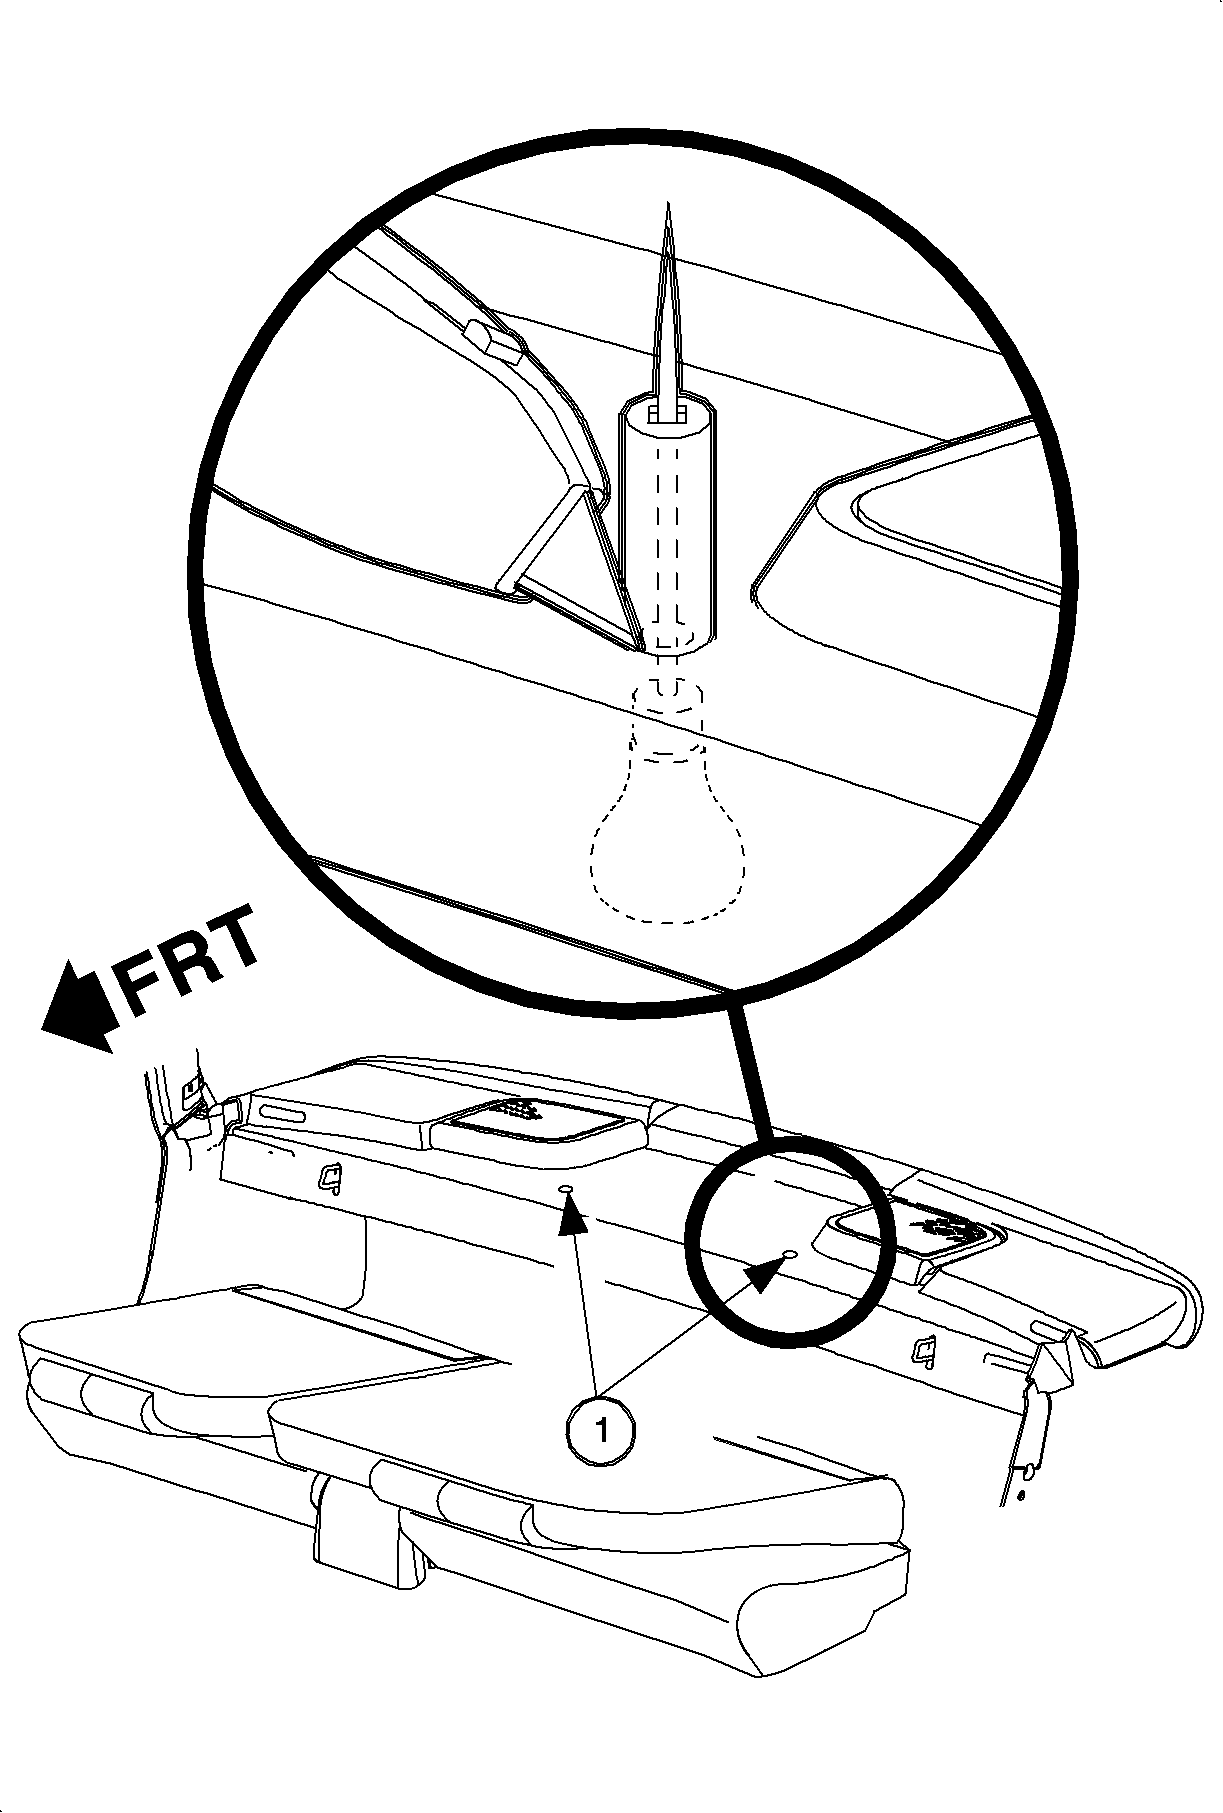

Important
Illustration shown is for 1991-1996
Coupes, 1997-1999 Sedans are similar.
- On 1991-1996 Coupes, for both weld nut locations:
- Locate the desired weld nut from under the bottom of the rear window trim
finish panel and pierce a hole in the rear window trim finish panel with an awl.
- Leave the awl in the rear window trim finish panel and select a deep well
socket with the same outside diameter as the spacer included in the parts package.
- Center the deep well socket over the end of the awl and using a utility
knife, trim around the perimeter of the socket. Remove the socket and awl from the
rear window trim finish panel.
- Remove the cut-out section of rear window trim finish panel.
- On 1997-1999 Coupes, select the desired weld nut and remove the
fastener to expose the weld nut.
Two Weld Nut Location (1)
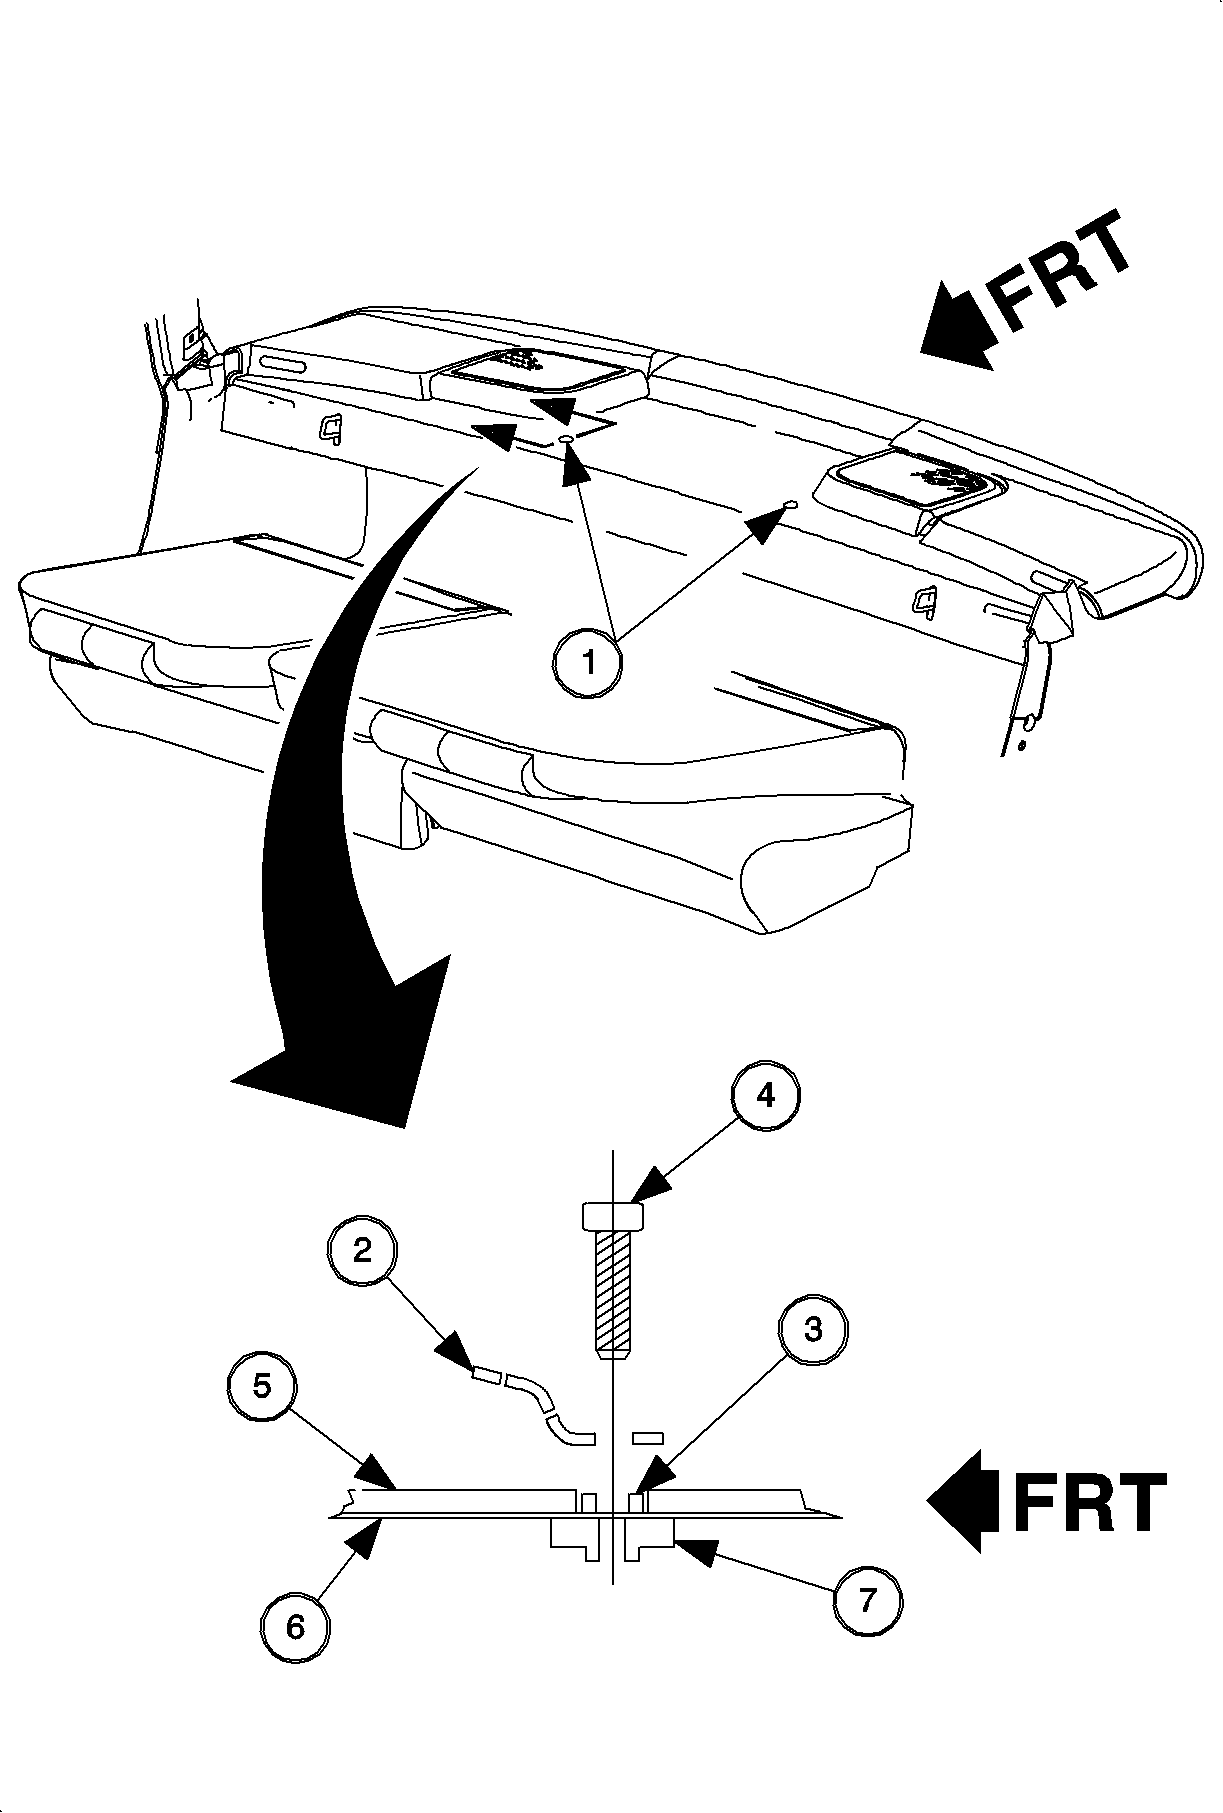

- Install child tether anchor bracket, spacer and fastener
into the appropriate hole.
TightenTighten the fastener to 20-30 N·m
(15-22 lb ft).
- Raise the rear seat backs.
Illustration Key
- Two Weld Nut Locations (1)
- Anchor Bracket (2)
- Spacer (3)
- Bolt (4)
- Trim (5)
- Steel Panel Assembly (6)
- Weld Nut (7)
WAGON
Choose an anchor location shown in the figure that is most convenient for the
customer. Additional hardware is available if you require more than one child restraint.
- Raise the rear liftgate.
- Remove the rear sill molding.
- Remove the cargo carpet.
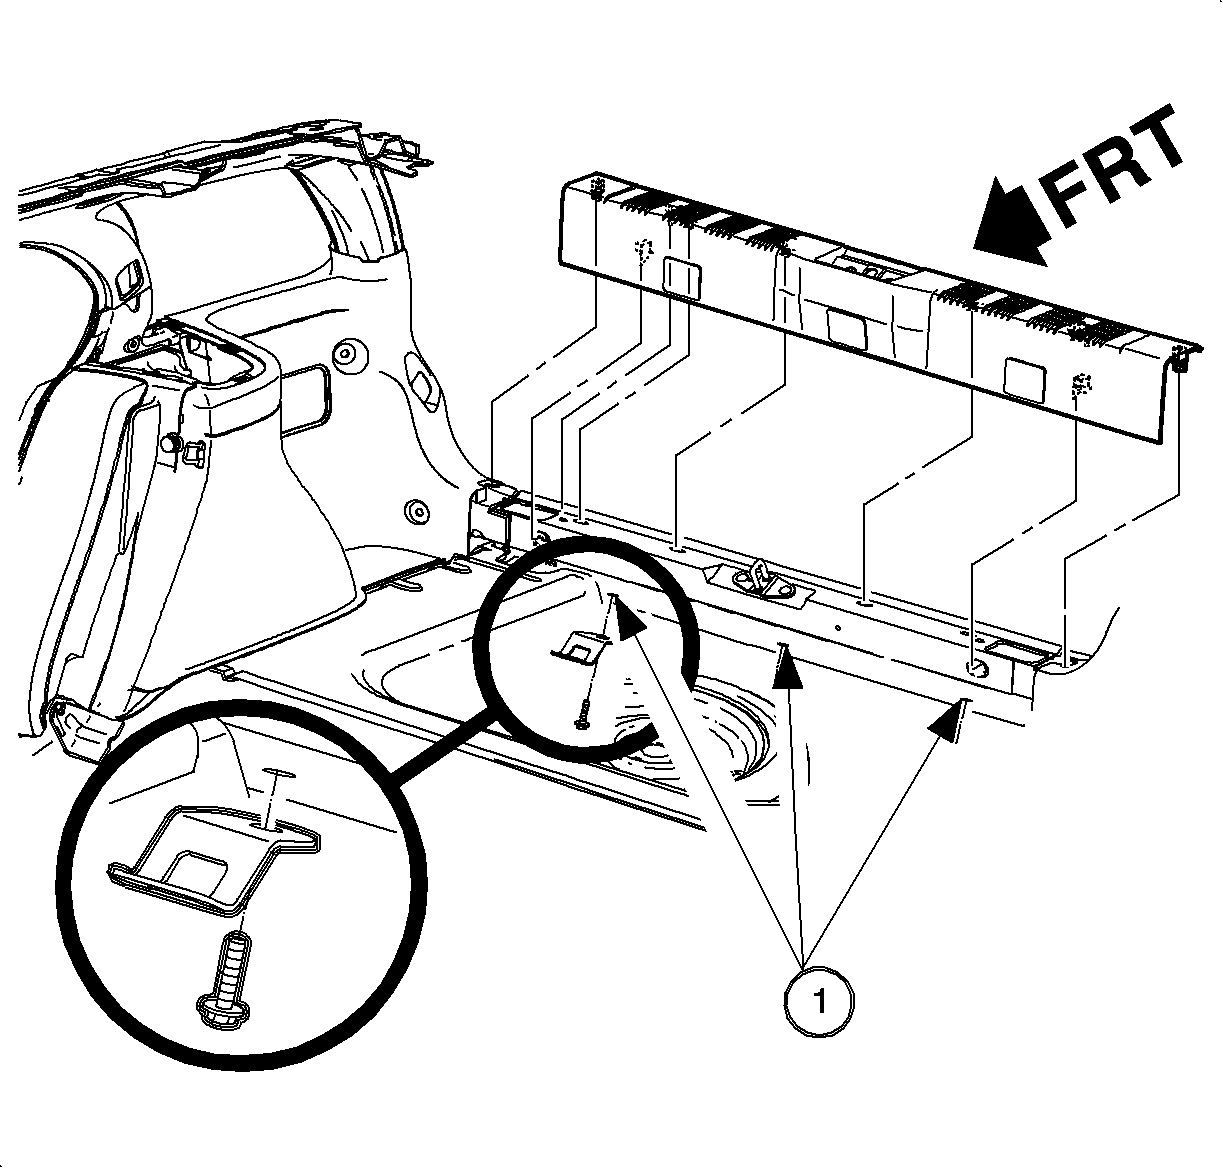

Notice
Improper installation
of the top tether anchor may cause damage to the wiring harness in the same area.
- Avoiding the wiring harness, position the bracket in the forward
direction and install the tether screw/bolt provided in the tether anchor package.
TightenTighten the fastener to 20-30 N·m
(15-22 lb ft).
- Three Anchor Locations (1)
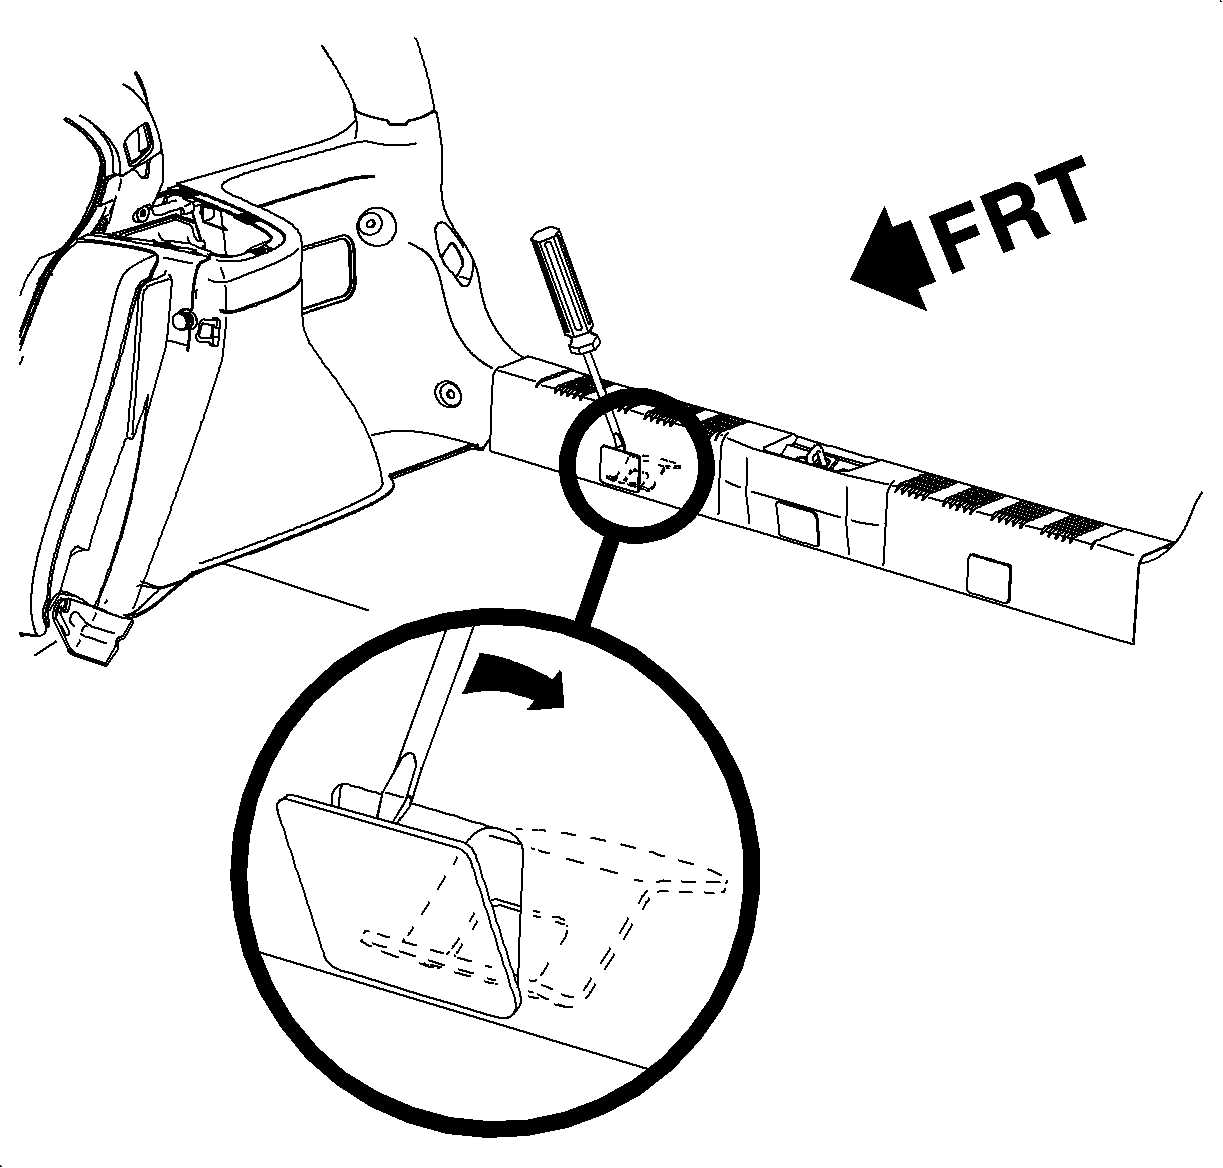

- Remove the rear sill molding tether access panel at
the location of the tether bracket installation.
- Install the rear sill molding by pushing on the molding at the clip locations
until the clips engage.
- Install the spare wheel cover and cargo carpet.
- Close the liftgate.
Parts Requirements:
Part Number
| Description
|
21048010
| Bracket Pkg -- Child Restraint System Belt (Sedan & Coupe) (One needed
per child restraint seat)
|
21048023
| Bracket Pkg -- Child Restraint System Belt (Wagon) (One needed per child
restraint seat)
|
Claim Information: The retailer will be reimbursed for the parts and labor,
through the submission of a claim using the applicable Case Type of VW or VP. Submit
the claim through the Saturn Dealer System using the appropriate Electronic Labor
Time Guide and Labor Operation Code C9175 (Install Child Restraint Anchor Plate).
All Claims submitted must be supported by a signed customer service order.
GM bulletins are intended for use by professional technicians,
NOT a "do-it-yourselfer". They are written to inform these
technicians of conditions that may occur on some vehicles, or to
provide information that could assist in the proper service of a
vehicle. Properly trained technicians have the equipment,
tools, safety instructions, and know-how to do a job properly and
safely. If a condition is described, DO NOT assume that the
bulletin applies to your vehicle, or that your vehicle will have
that condition. See your GM dealer for information on whether
your vehicle may benefit from the information.
|

|
WE SUPPORT VOLUNTARY TECHNICIAN CERTIFICATION
|
© Copyright General Motors Corporation.
All Rights Reserved.


