Repair Procedure for Stripped or Detached Front Seat to Floor Panel Attachments #99-T-21 - (Dec 18, 2002)
Repair Procedure for Stripped or Detached Front Seat to Floor Panel Attachments
(Use Repair Bolt or Replace Floor Panel Weld Nut)All 1991 -- 1999 Saturn S-Series vehicles
Condition
The weld nut(s) may strip or detach during removal or installation of front
seat to floor pan anchor bolts.
Cause
Stripped or detached front seat attachment weld nuts may be caused by improper
installation of front seat attachment bolts during removal and installation.
Correction
- If weld nut is stripped, replace with a self-tapping oversized bolt. (Refer
to "Striped Threads in Weld Nut" procedure in this bulletin.)
- If front seat attachment bolt is broken off in weld nut, remove broken
front seat attachment bolt. (Refer to "Broken Bolt Weld Nut" procedure in this bulletin.)
- If weld nut is detached, remove and replace weld nut. (Refer to "Detached
Weld Nut in Floor Pan" procedure in this bulletin.)
Procedure
STRIPPED THREADS IN WELD NUT
If front seat anchor bolt(s) will not accept a torque of 30 N·m
(22 lb ft) when installing front seat(s), use the following procedure.
- Measure thread diameter of original bolt in a non-stripped area of bolt.
- A 8 mm (0.31 in), thread diameter measurement indicates the original production
(P/N 21047085) was used.
- A 9 mm (0.35 in), thread diameter measurement indicates production repair
bolt was used.
- If bolt thread diameter measurement is 8 mm (0.31 in), obtain 9 mm (0.35
in) repair bolt (P/N 21035568) that will rethread weld nut. If bolt thread diameter
measurement is 9 mm (0.35 in), contact Saturn Technical Assistance.
BROKEN BOLT IN WELD NUT
If front seat to floor panel attachment bolt(s) have broke off in weld nut during
the process of removing or installing front seat(s), use the following procedure
- With front seats removed from vehicle, remove carpet. (Refer to "Carpet --
All" removal procedure in the appropriate model year Body/Repair service manual.)
Important
After broken front seat attachment bolt is
removed, threads in weld nut DO NOT
require re-threading.
Repair bolt will cut new threads.
- Use a center-punch to mark the center of broken front seat attachment bolts
and drill a 4 mm (5/32in) pilot hole in center of broken bolt.
- Use a #3 Easy-Out extractor or equivalent and remove remainder of broken
seat attachment bolt.
- Install carpet. Refer to "Carpet -- All" installation procedure in
the appropriate model year Body/Repair service manual.)
- Obtain 9 mm (0.35 in.) repair bolt (P/N 21035568) that will rethread weld
nut and install front seats
TightenTighten the nut to 30 N·m(22 lb ft).
- Function front seats to full forward and full rearward positions to ensure
proper operation.
DETACHED WELD NUT IN FLOOR PAN
If front seat to floor panel attachment weld nut(s) have detached from floor
panel, use one of the following three procedures according to which weld nut(s) have
detached.
Front - Inner and Outer Weld Nuts
- With front seats removed from vehicle, remove carpet. (Refer to "Carpet --
All" removal procedure in the appropriate model year Body/Repair service manual.)
- Remove fuel door and decklid/liftgate release able from floor pan #2 bar
assembly, if necessary.
- Use a magnetic retrieval tool to remove original weld nut from inside
the floor pan #2 bar assembly, if it is loose and laying in #2 bar assembly.
- Obtain replacement 31 mm (1.22 in.) weld nut (P/N 21122052) that is unthreaded
and can be used with standard front seat attachment bolt (P/N 21047085).
Important
Do not use a tap and die set to cut threads
in unthreaded replacement 31 mm (1.22 in.) weld nut. Front seat attachment bolt (P/N
21047085) will be used to cut threads.
- Place unthreaded replacement 31 mm (1.22 in.) weld nut (P/N 21122052) on a bench
vise.
- Use a standard front seat attachment bolt (P/N 21047085) to cut threads
in weld nut.
- Grind weld projection tips from weld nut.
- Grind ELPO coating from area surrounding weld nut on vehicle floor pan.

- Drill three 8 mm (5/16 in.) holes in the #2 bar assembly.
these three holes will surround the hole where the weld nut will be attached. Use
the illustration as a guide to drill holes.
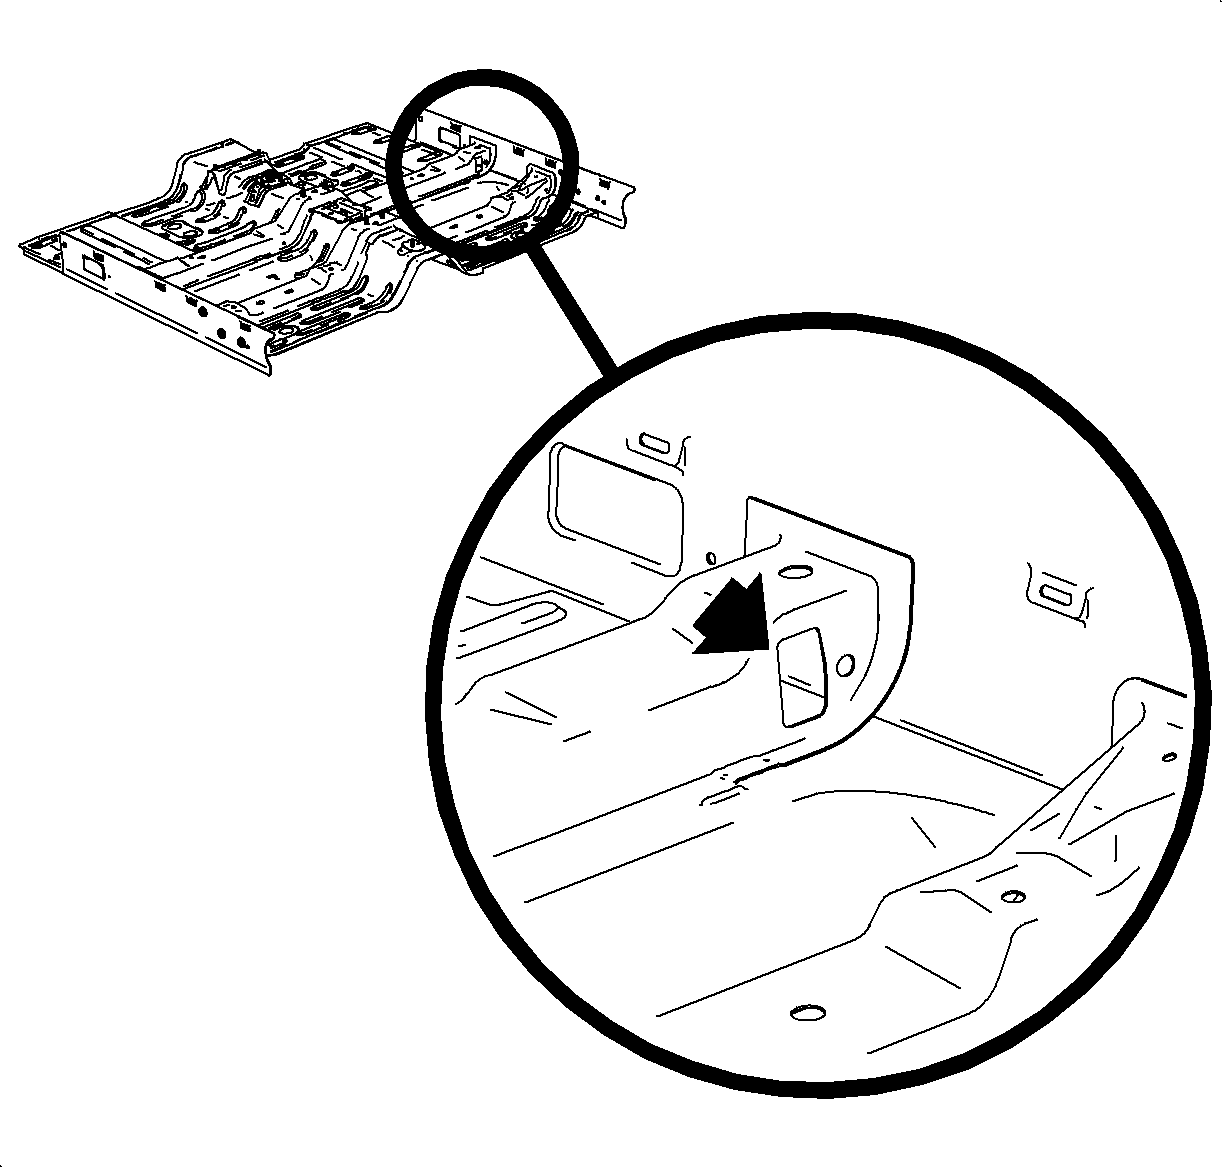

- Route a flexible wire into the center of hole where
replacement weld nut will be attached to #2 bar assembly. Route wire through #2 bar
assembly and out of access hole near rocker panel, (right side similar)
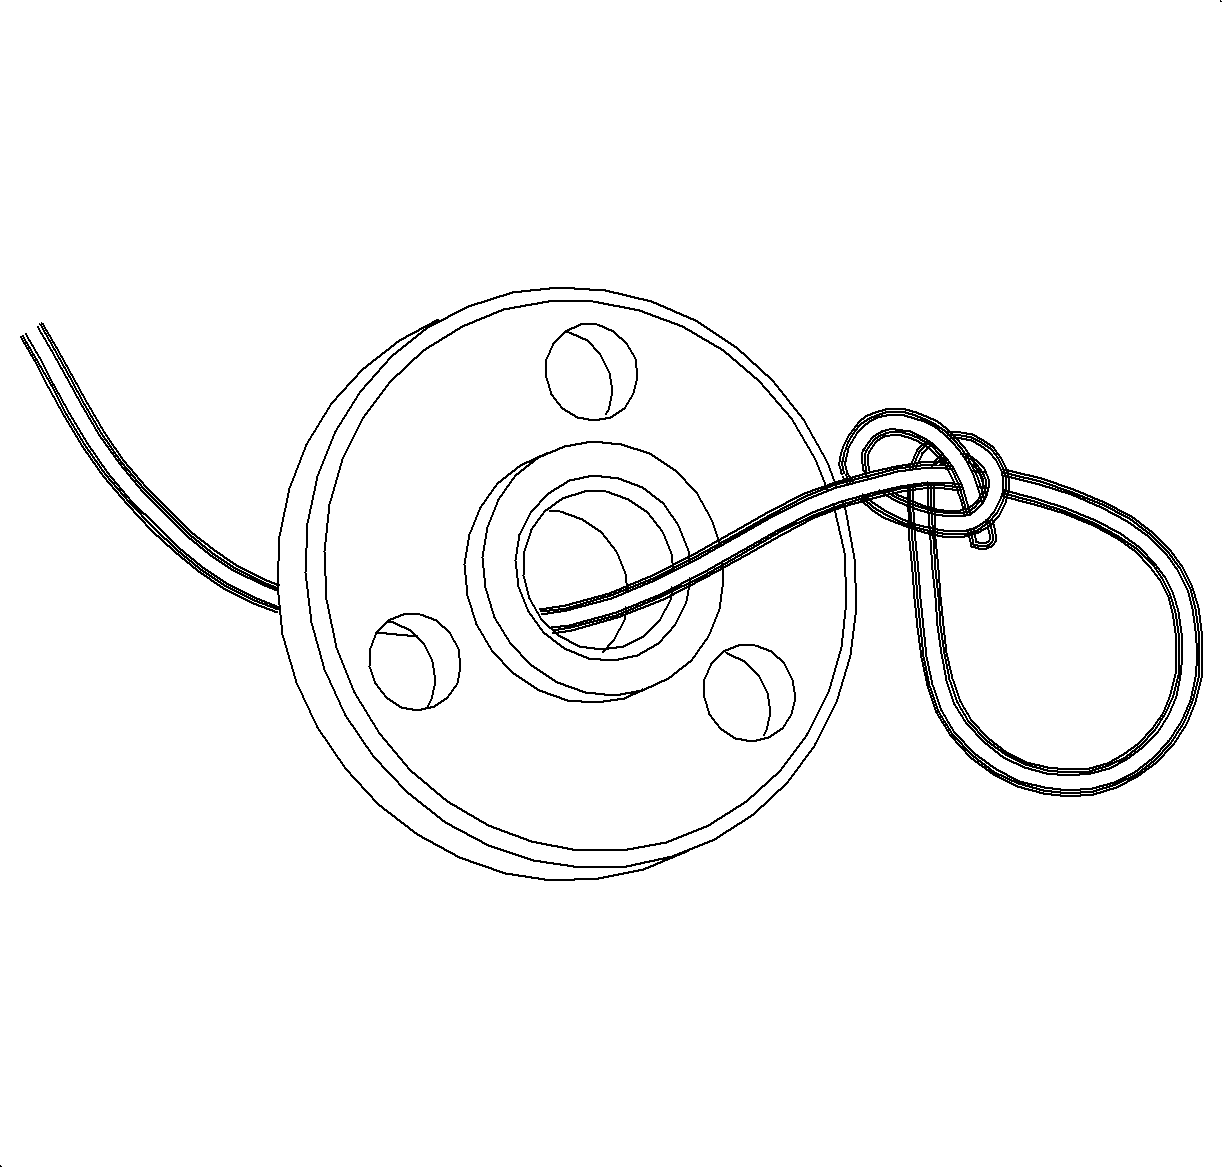

- Once wire is through access hole, place end of wire
through replacement 31 mm (1.22 in.) weld nut (P/N 21122052). Place several loops
in wire in order for the wire to hold the weld nut. Do not wrap the wire around the
weld nut.
- Pull weld nut back through access hole and line weld nut up with hole
where it will be attached.
- Using a MIG welder, plug weld replacement weld nut to the #2 bar assembly
in the three holes that were previously drilled.
- Remove wire from #2 bar assembly and weld nut.
- Grind welds flush.
- Prime and paint welded area. (Refer to " Body Paint" in the appropriate
model year Body/Collision service manual.)
- Install fuel door and decklid/liftgate release cable to floor pan #2 bar
assembly.
- Install carpet. (Refer to "Carpet -- All" installation procedure
in the appropriate model year Body/Repair service manual.)
- Apply Loctite 242® Threadlocker, or equivalent, to front seat attachment
bolts and install front seats.
TightenTighten the bolt to 30 N·m (22 lb ft).
- Function front seats to full forward and full rearwards positions to ensure
proper operation.
Rear - Inner Weld Nut
- With front seats removed from vehicle, remove carpet. (Refer to "Carpet --
All" removal procedure in the appropriate model year Body/Repair service manual.)
- Use a magnetic retrieval tool to remove original weld nut from inside
the floor pan #3 bar assembly, if it loose and laying inside #3 bar assembly.
- Obtain replacement 25 mm (0.98 in.) weld nut (P/N 20381222) that is threaded
and can be used with standard front seat attachment bolt (P/N 21047085).
- Grind weld projection tips from replacement 25 mm (0.98 in.) threaded
weld nut.
- Grind ELPO coating from area surrounding weld nut on vehicle floor pan.
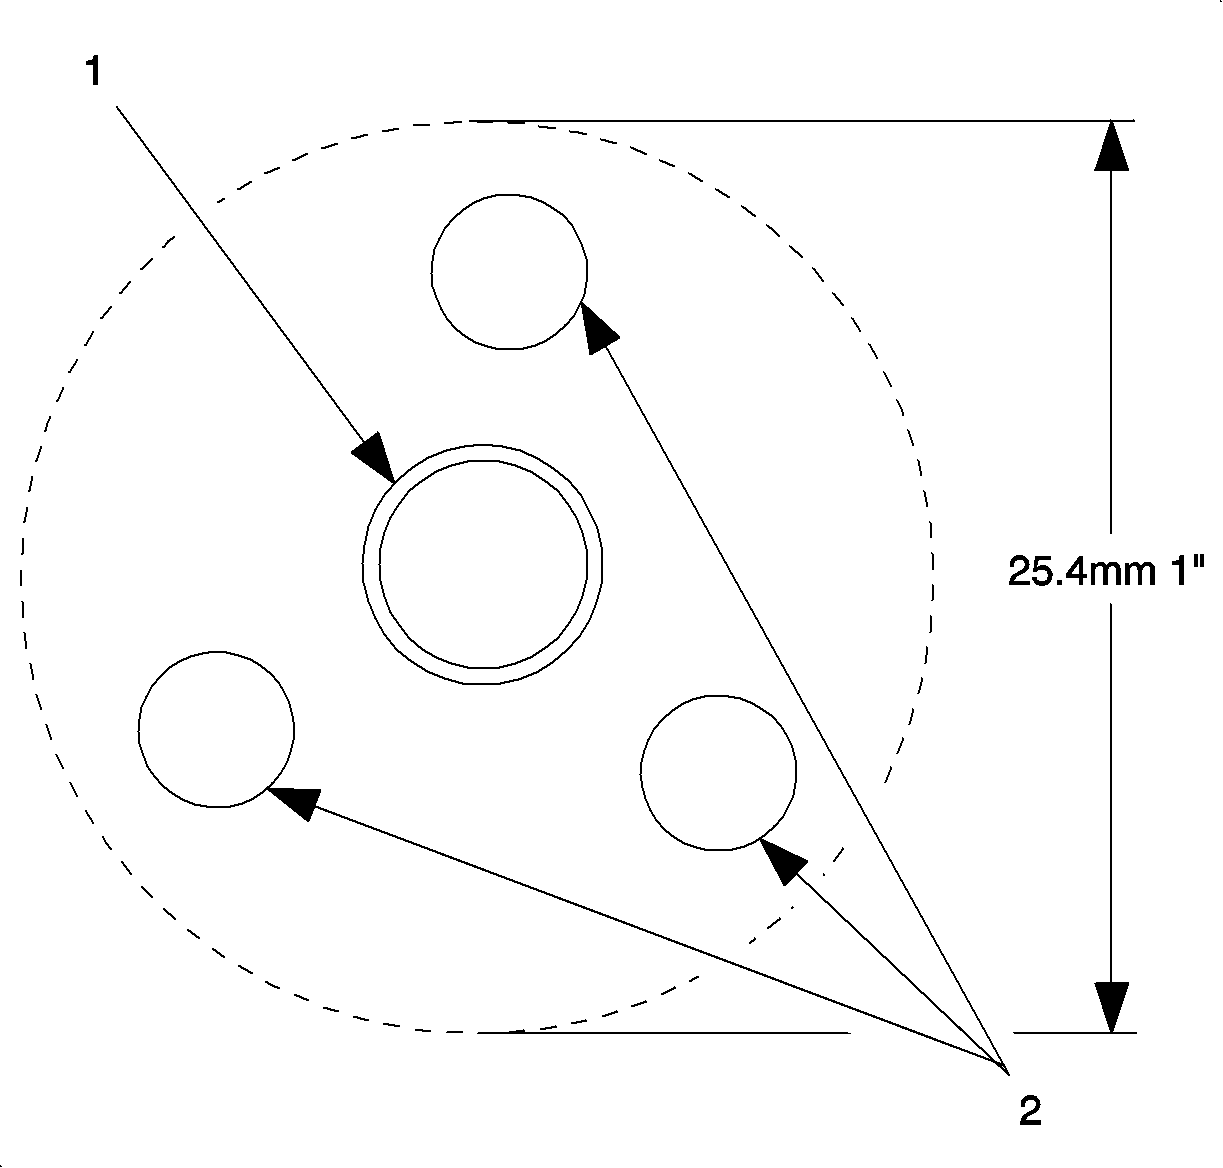

- Drill three 8 mm (5/16 in.) holes in the #3 bar assembly.
these three holes will surround the hole where the weld nut will be attached. Use
the illustration as a guide to drill holes.
- Hole in bar assembly that seat attachment bolts pass through
- Hole positions that need to be drilled for plug welds
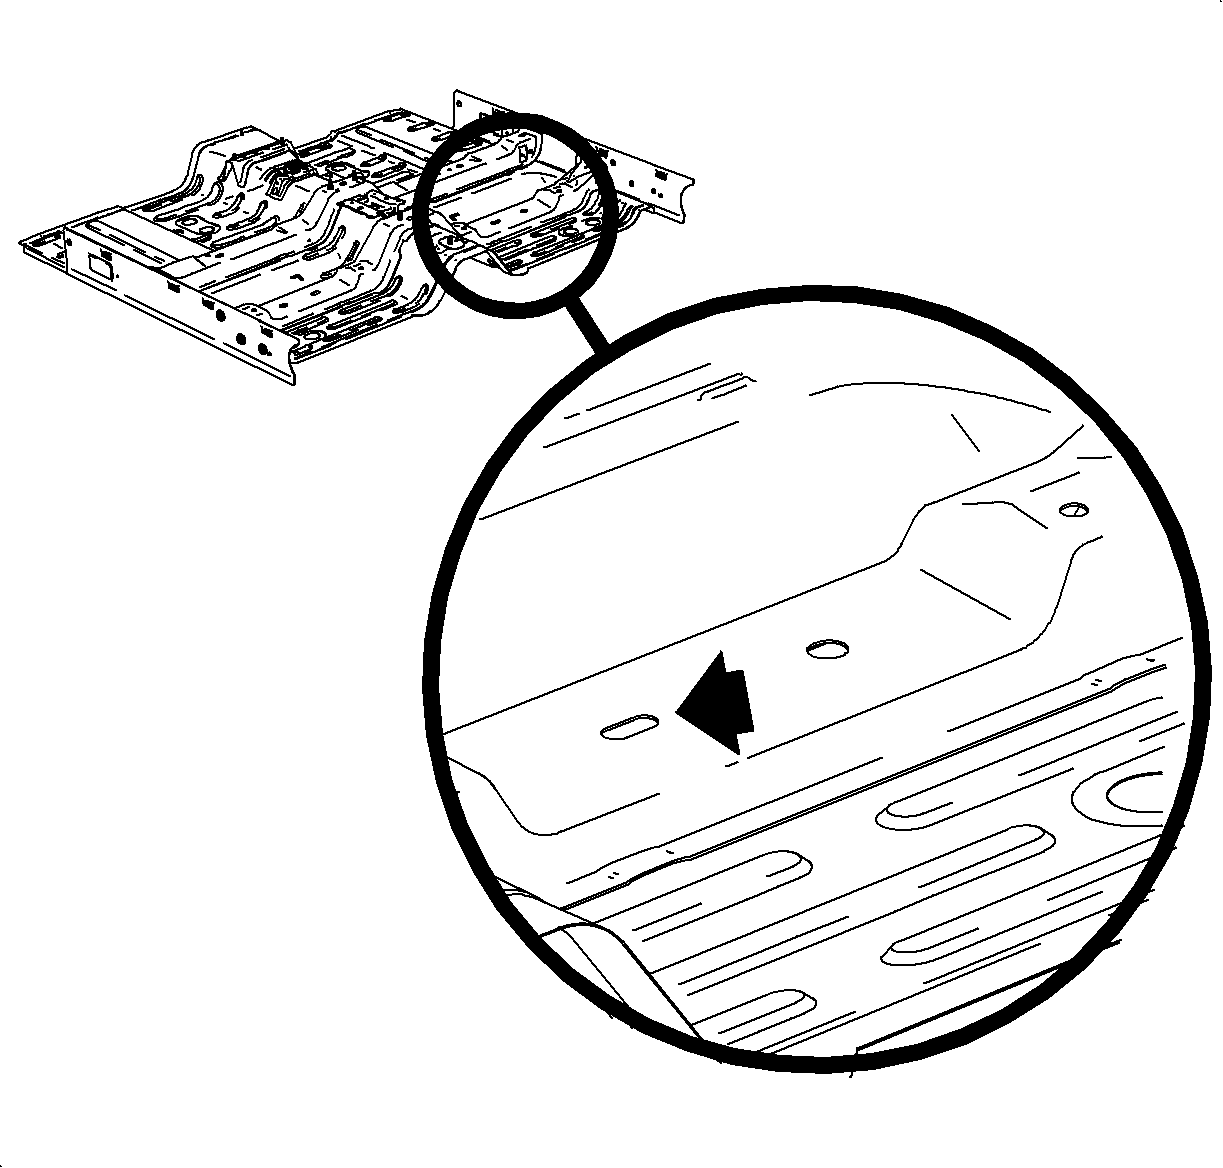

- Locate access hole in the #3 bar assembly as shown
in the illustration, (right side shown, left side similar). This hole will need to
be made slightly longer in order to pass the replacement weld nut through. This hole
enlargement will not need to be repaired, except for the ELPO primer.
- Route a flexible wire into the center of hole where replacement weld nut
will be attached to #3 bar assembly. Route wire through #3 bar assembly and out of
access hole.


- Once wire is through access hole, place end of wire
through access hole, place end of wire through 25 mm (0.98 in.) replacement weld nut.
Place several loops in wire in order for the wire to hold the weld nut. Do not wrap
the wire around the weld nut.
- Pull weld nut back through access hole and line weld nut up with hole
where it will be attached.
- Using a MIG welder, plug weld nut to the #3 bar assembly in the three
holes that were previously drilled.
- Remove wire from #3 bar assembly and weld nut
- Grind welds flush.
- Prime and paint welded area. (Refer to "Body Paint" in the appropriate
model year Body/Collision service manual.)
- Install carpet. (Refer to "Carpet -- All" installation procedure
in the appropriate model year Body/Repair service manual.)
- Apply Loctite 242® Threadlocker, or equivalent, to front seat attachment
bolts and install front seats.
TightenTighten bolts to 30 N·m (22 lb ft)
- Function front seats to full forward and full rearward position to ensure
proper operation.
Rear - Outer Weld Nut
- With front seats removed from vehicle, remove carpet. (Refer to "Carpet --
All" removal procedure in the appropriate mode year Body/Repair service manual.)
- Use a magnetic retrieval tool to remove original weld nut from inside
the floor pan #3 bar assembly if it is loose and laying inside #3 bar assembly.
- Obtain replacement 25 mm (0.98 in.) weld nut (P/N 20381222) that is threaded
and can be used with standard front seat attachment bolt (P/N 21047085).
- Grind weld projection tips form replacement 25 mm (0.98) threaded weld
nut.
- Grind ELPO coating from area surrounding weld nut on vehicle floor pan.


- Drill three 8 mm (5/16 in.) holes in the #3 bar assembly.
These three holes will surround the hole where the weld nut will be attached. Use
the illustration as a guide to drill holes.
- Hole in bar assembly that seat attachment bolts pass through
- Hole positions that need to be drilled for plug welds
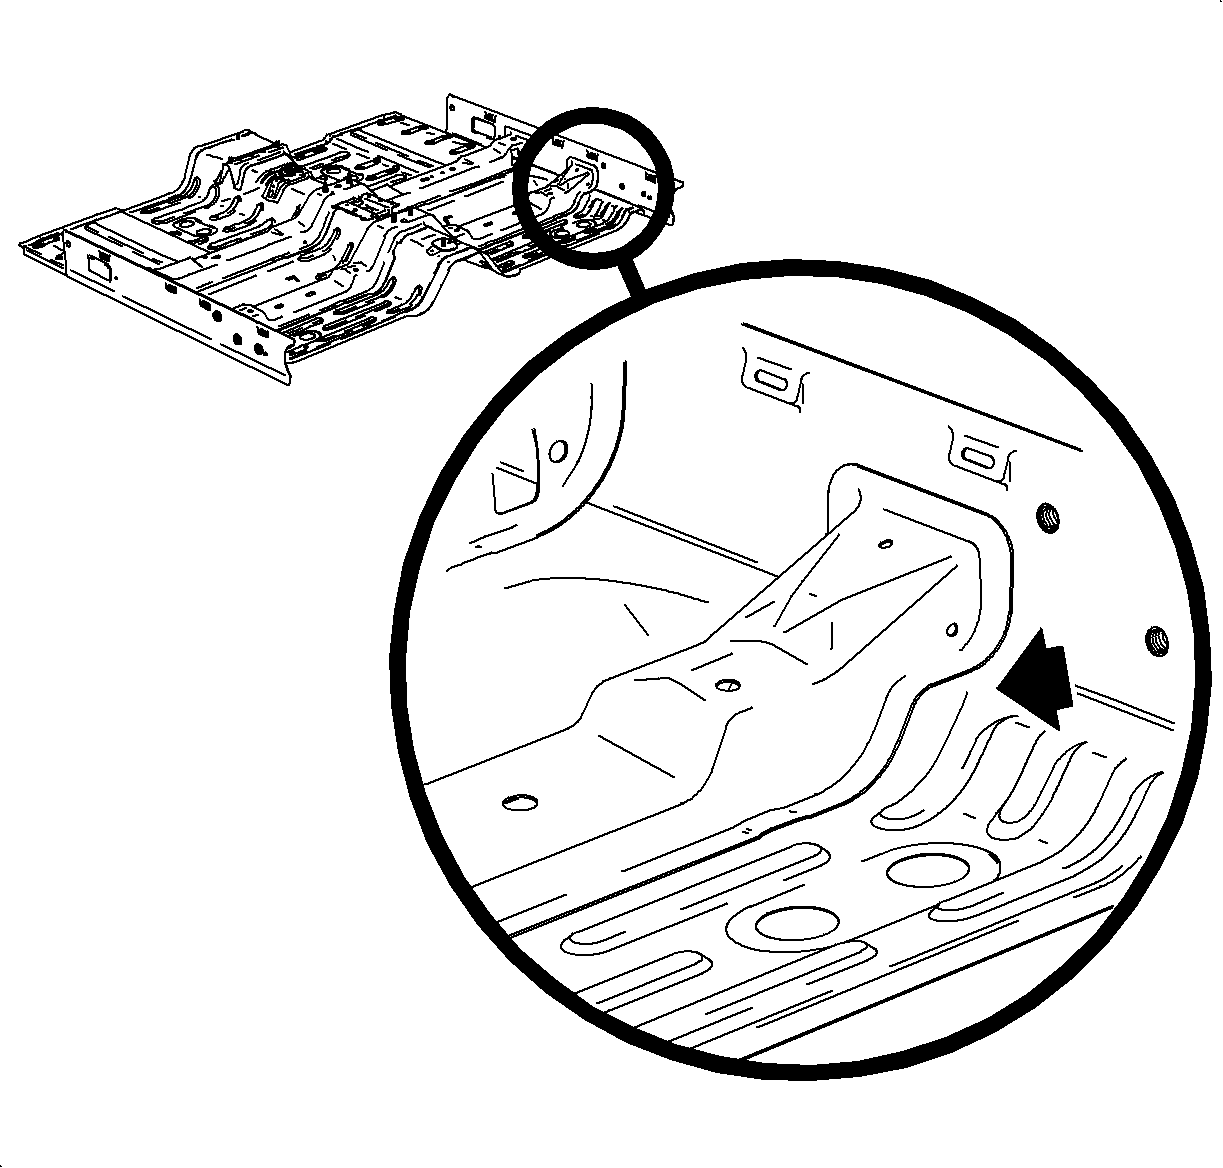

- Route a flexible wire into the center of hole where
replacement weld nut will be attached to #3 bar assembly. Route wire through #3 bar
assembly and out of gap between floor pan and rear out-board side of #3 bar assembly,
(right side shown, left side similar).


- Once wire is through access hole, place end of wire
through 25 mm (0.98 in) replacement weld nut. Place several loops in wire in order
for the wire to hold the weld nut. Do not wrap the wire around the weld nut.
- Pull weld nut back through gap and line weld nut up with hole where it
will be attached.
- Using a MIG welder, plug weld replacement weld nut to the #3 bar assembly
in the three holes that were previously drilled.
- Remove wire from #3 bar assembly.
- Grind welds flush.
- Prime and paint welded area. (Refer to "Body Paint" in the appropriate
model year Body /Collision service manual.)
- Install carpet. (Refer to "Carpet -- All" installation procedure
in the appropriate mode year Body/repair service manual.)
- Apply Loctite 242® Threadlocker, or equivalent, to front seat attachment
bolts and install front seats.
TightenTighten bolts to 30 N·m (22 lb ft).
- Function front seats to full forward and full rearward positions to ensure
proper operation.
Parts Requirements
21047085
| Standard Front Seat Attachment Bolt
|
21035568
| 9 mm (0.35 Repair Bolt
|
21122052
| 31 mm (1.22 in.) Unthreaded Weld Nut
|
20381222
| 25 mm (0.98 in.) Threaded Weld Nut
|
21485277
| Locktite 242® Threadlocker
|
Claim Information
To receive credit for this repair during the warranty coverage period, submit
a claim through the Saturn Dealer System as follows:
Case Type
| Description
| Labor Operation Code
| Time
|
VW
| Front Seat Weld Nut Replacement
| Z4025
| 1.0 hrs.
|
Add
| To replace each additional weld nut
| --
| 0.6 hrs
|
VW
| Broken Front Seat Attachment Bolt Removal
| Z4026
| 0.3 hrs
|
Important
Installation of front seats require the use
of Locktite 242® Threadlocker (P/N 21485277). Claims received in the amount of
Retailer cost plus 30% for this part will be accepted. It will be necessary to sell
this part to the CSO as and "OT" (other than) part. Claims exceeding the cost equivalent
of an 1/8 of a bottle will be returned with return reason 064 - Parts Amount
Excessive.
GM bulletins are intended for use by professional technicians,
NOT a "do-it-yourselfer". They are written to inform these
technicians of conditions that may occur on some vehicles, or to
provide information that could assist in the proper service of a
vehicle. Properly trained technicians have the equipment,
tools, safety instructions, and know-how to do a job properly and
safely. If a condition is described, DO NOT assume that the
bulletin applies to your vehicle, or that your vehicle will have
that condition. See your GM dealer for information on whether
your vehicle may benefit from the information.
|

|
WE SUPPORT VOLUNTARY TECHNICIAN CERTIFICATION
|
© Copyright General Motors Corporation.
All Rights Reserved.


