Window Regulator Makes a Popping/Clicking/Binding Noise When Cycling Up or Down #99-T-18A - (Dec 18, 2002)
Window Regulator Makes a Popping/Clicking/Binding Noise When Cycling Up or
Down (Replace Counter-Balance Spring) --This bulletin has been revised to include
1997 through 2001 model year coupes and new parts information. It supersedes bulletin
99-T-18, which should be discarded.1996-1999 Saturn S-Series and Wagons built before and including
VIN XZ351210
1997-2001 Saturn S-Series Coupes built before and including
VIN 1Z1140
Condition
Whenever window is cycled from full up to full down or full down to full up
position, window regulator may exhibit a popping, clicking, and/or binding noise that
is transmitted into passenger compartment.
Cause
The window regulator counter-balance spring coils stick or bind together. Whit
the force from movement of the window regulator is great enough to overcome this sticking/binding
condition, the counter-balance spring coils release and cause spring to vibrate. This
transmits a noise through the door structure into the passenger compartment.
Correction
Refer to the procedure in this bulletin for door where noise is heard.
Procedures
- Remove door outer panel on door where noise is heard.
- On 2000 and 2001 models, refer to "Front Door Outer Panel -- Coupe"
removal procedure in the Door/Windows/Mirror sections of the 2000/2001 S-Series Body/Electrical
(Volume) service manual.
- On 1996-1999 models, refer to "Front Door Outer Panel -- Sedans
and Wagon, " Front Door Outer Panel -- Coupe" or "Rear Door -- Outer Panel"
removal procedure in the Doors (BDDR) section of the appropriate model year Body/Repair
service manual.
Important
The front and rear door insulator is called
the door sound deadener in the 1996 and 1997 Body/Repair service manuals.
- Remove door insulator assembly.
- On 2000 and 2001 models, refer to "Front Door Insulator" removal procedure
in the Door/Windows/Mirrors section of 20002001 S-Series Body/Electrical (Volume I)
service manual.
- On 1998 and 1999 models, refer to "Door Insulator" removal procedure in
the Doors (BDDR) section of the 98-99 Body/Repair service manual.
- On 1996 and 1997 models, refer to "Door Sound Deadener Panel" removal
procedure in the Doors (BDDR) section of the appropriate model year Body/Repair service
manual.
- Remove door trim panel.
- On 2000 and 2001 models, refer to "Front Door Trim Panel" removal procedure
in the Door/Windows/Mirrors section of the 2000/2001 S-Series Body/Electrical (Volume
I) service manual.
- On 1997 -- 1999 models, refer to "Front Door Trim Panel or Rear Door
Trim Panel -- Sedan/Wagons" (BDDR) section of the appropriate model year Body/Repair
service manual.
- Carefully remove enough of door water deflector to gain access to the
window regulator mounting bolts.
- Remove window regulator assembly.
- On 2000 and 2001 models, refer to "Front Door Window Regulator Assembly"
removal procedure in the Doors/Windows/Mirrors section of the 2000/2001 S-Series Body/Electrical
(Volume I) service manual.
- On 1998 and 1999 models, refer to "Window Regulator Assy--Front Door"
or Rear Door Window Regulator/Motor -- Sedan/Wagon removal procedure in the Doors
(BDDR) section of the 98-99 Body/Repair service manual.
- On 1997 models, refer to "Front Door Window Regulator/Motor" "Rear Door
Window Regulator/Motor -- Sedan/Wagon" removal procedure in the Doors (BDDR)
section of the 1997 Body/Repair service manual.
- On 1996 model, refer to "Front Door Window Regulator/Motor -- Sedan/Wagon
or "Rear Door Window Regulator/Motor removal procedure in the Doors (BDDR) section
of the 96 Body/Repair service manual.
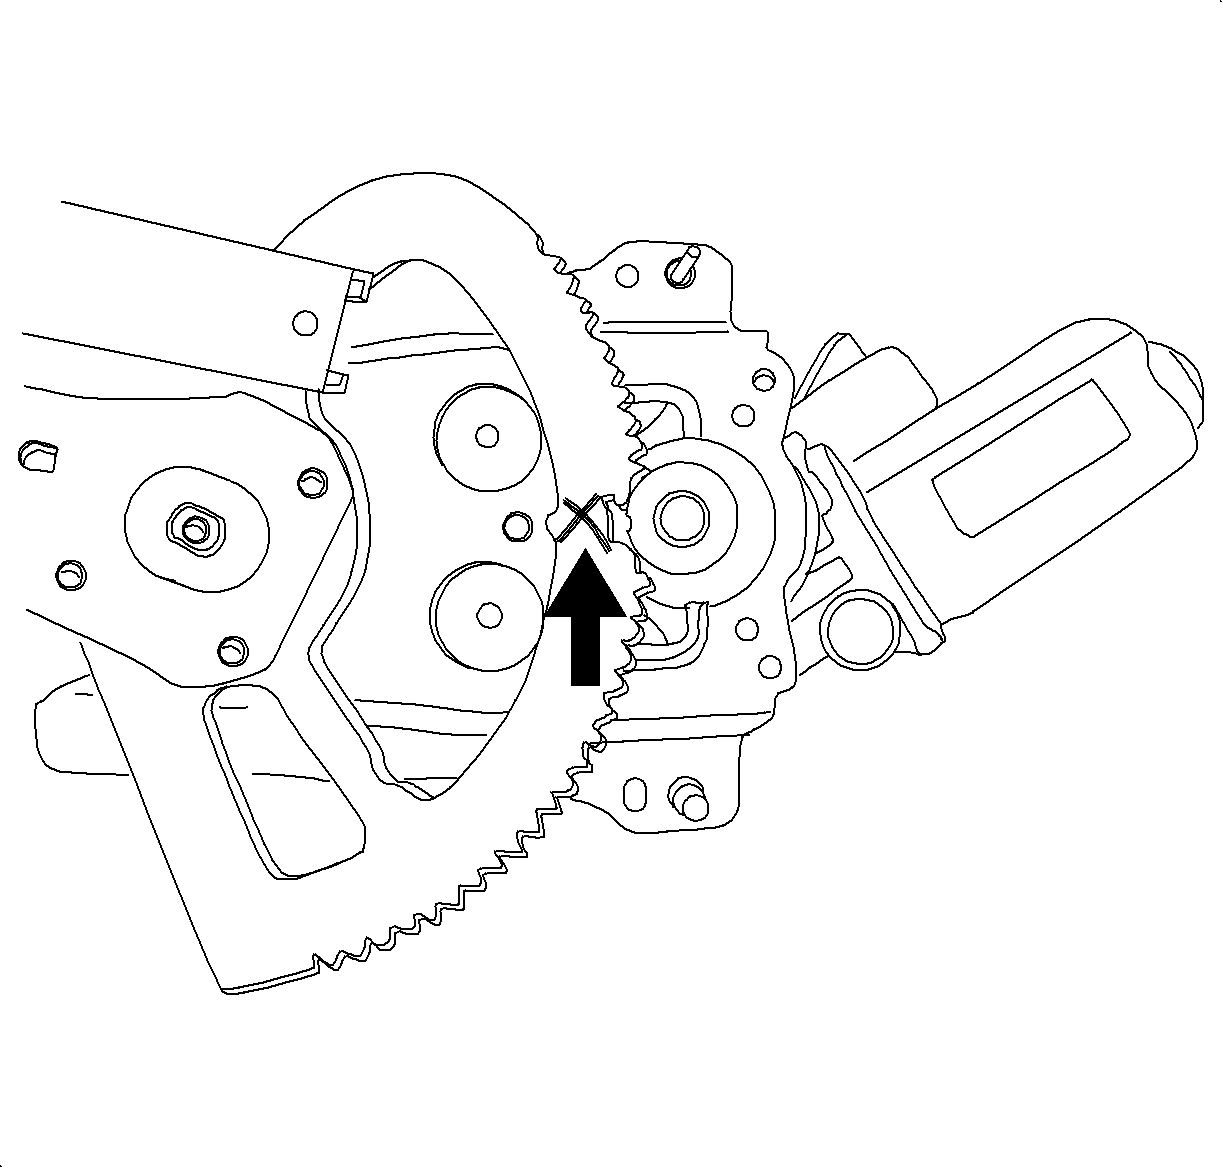

- Mark sector gear with a grease marker or awl at pinion
gear shaft to note location of sector gear on window regulator. The gear will be moved
and needs to be returned to this location prior to installation of regulator.
- For Manual Windows,
continue to step 11.
- For Power Windows,
carefully remove wiring harness
plastic retainer located just above and forward of window regulator motor.
- Carefully remove wiring harness plastic retainer closest to power door
lock switch (front doors) or power window switch (rear doors).
- To allow movement of wiring harnesses later on perform the following:
- On front doors, route window regulator motor end of wiring harness through
speaker opening in door to inside of door.
- On rear doors, route window regulator motor end of wiring harness motor
end of harness to outside of door.
Important
When cycling window regulator, make sure
window regulator is pointing in a direction away from anything that lift arm(s) and
sash bar may contact.
- Carefully cycle window regulator to full up position.
- On Manual Windows
- Install handle onto regulator.
- Hold regulator backing plate with one hand and crank window regulator
to full up position. Do not remove handle at this point.
- On Power Windows
- Make sure the ignition is in the RUN position
- If working on rear door, make sure rear door power window switch is connected
to wiring harness.
- While holding the window regulator motor with one hand, connect wiring
harness connector to motor and carefully cycle regulator to full up position and disconnect
wiring harness connector.
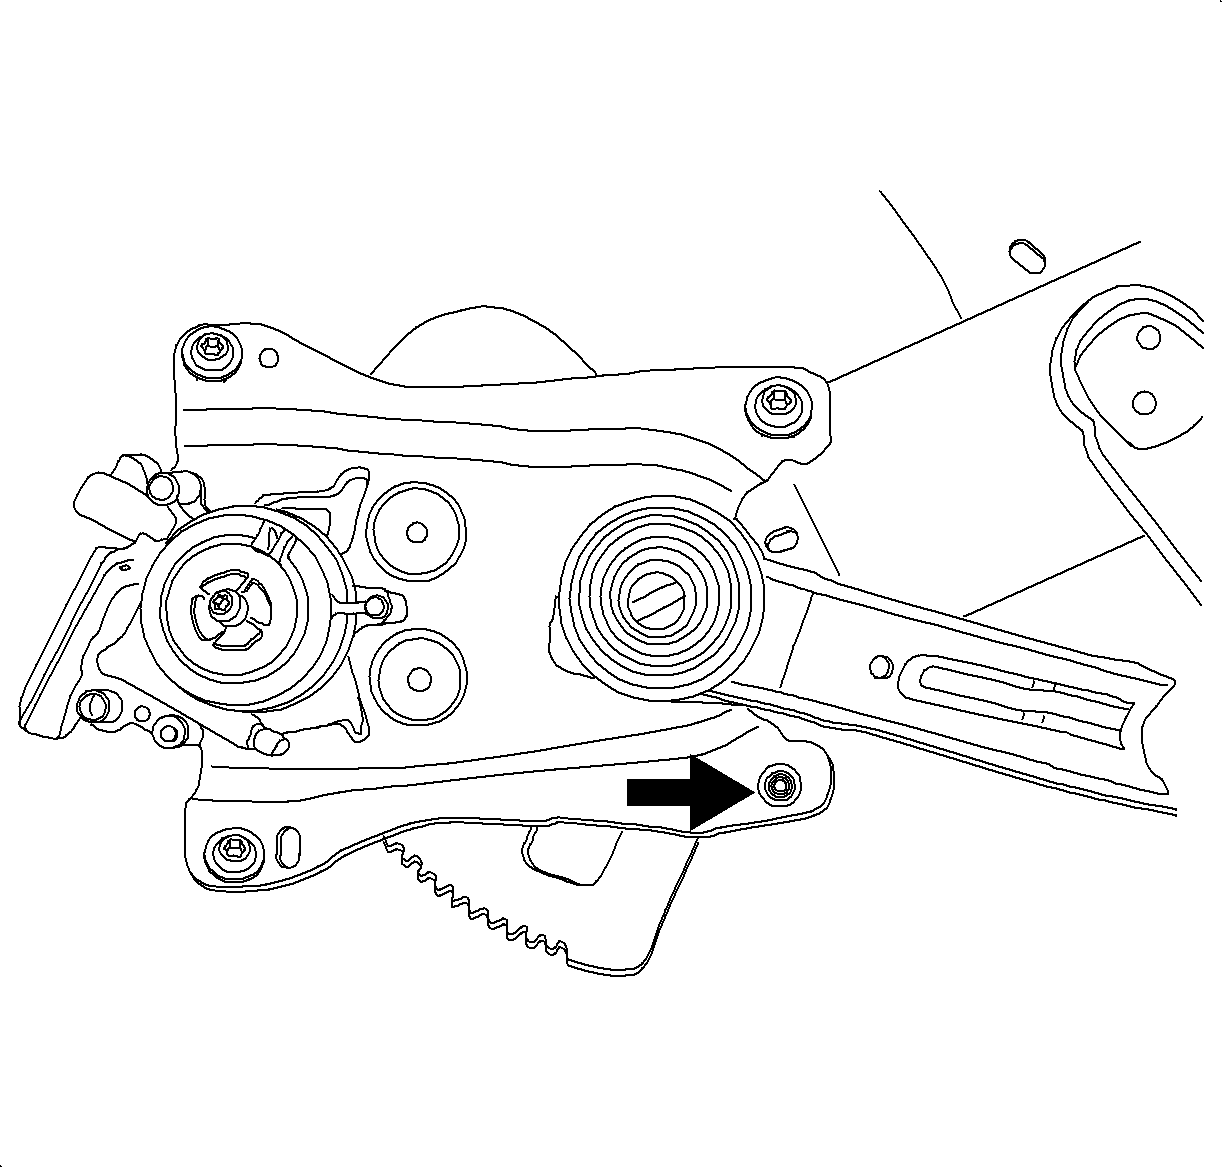
- Remove window regulator mounting bolt located closest
to counter-balance spring mounting tab wrapped around backing plate. This will allow
clearance for spring removal.
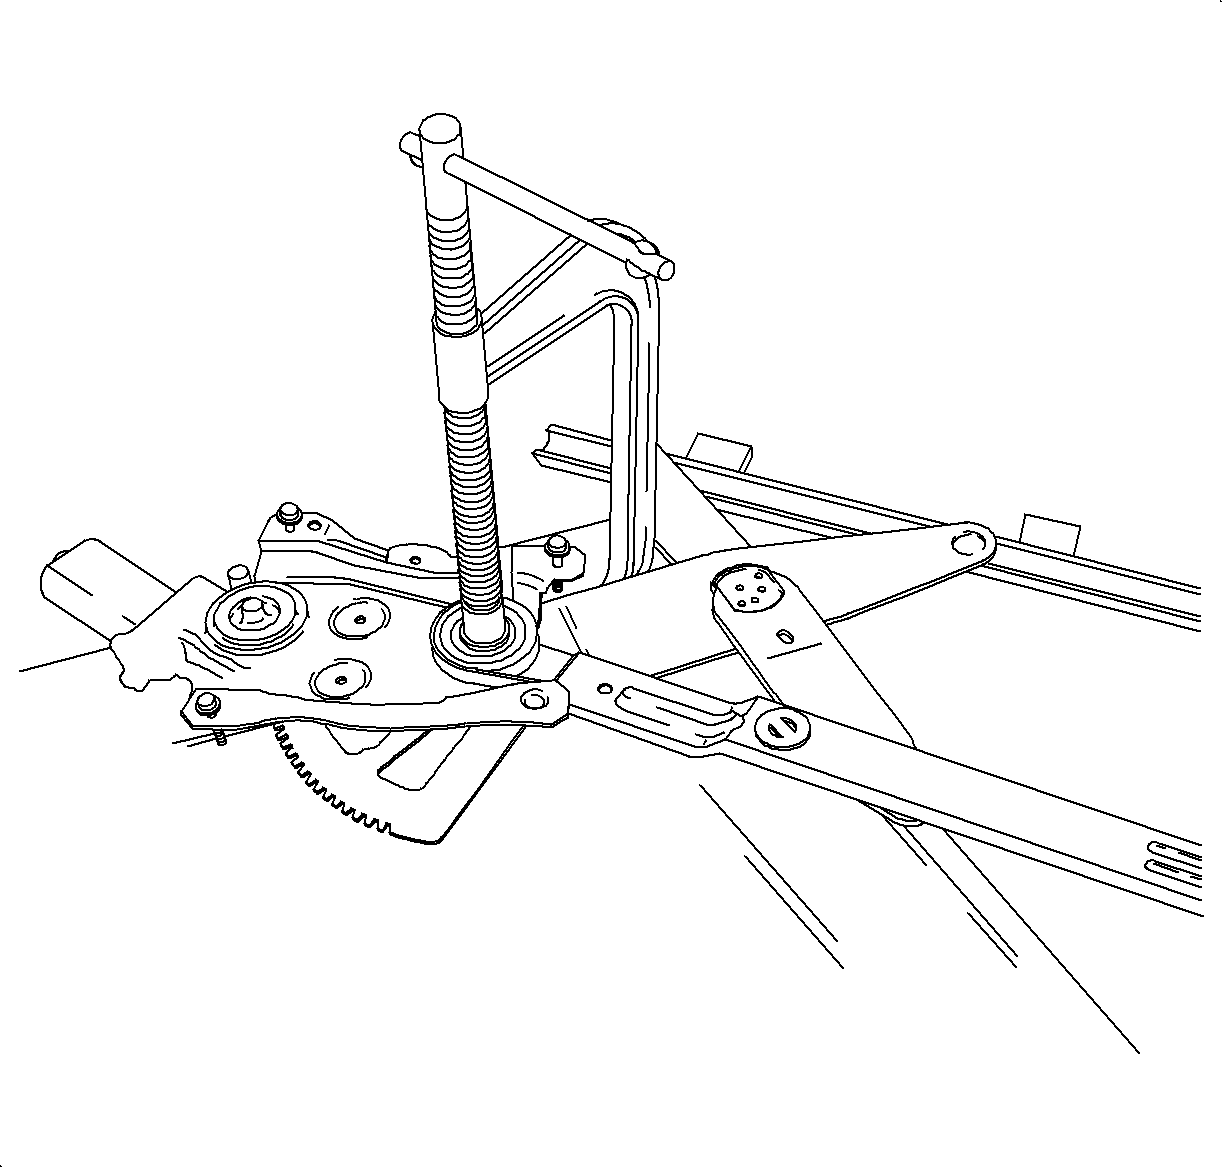
- With window regulator lying on bench, install a C-clamp
or C-clamp style locking pliers over regulator spring with flat spot of upper leg
located directly over center of spring. Make C-clamp snug enough to stay in place.
this will ensure spring does not come off regulator prematurely.
- Grab counter-balance spring mounting tab end with a
pair of locking pliers. Make sure the tension id tight. While holding the regulator
with one hand, carefully pry back the spring with locking pliers while raising spring
enough to allow tab to clear backing plate side of regulator. Once spring clears regulator
backing plate, slowly release tension on spring and allow it to relax.
- Remove C-clamp or C-clamp style locking pliers installed previously.
- Before removing spring from window regulator backing plate shaft, note
the orientation if spring for correct installation of new spring. Remove spring from
regulator backing plate shaft.
- Install new spring part (P/N 21171344 -- Sedan/Wagon Front, 21171345 --
Sedan/Wagon Rear or 21171493 -- Coupe) onto regulator backing plate shaft in
same orientation noted previously.
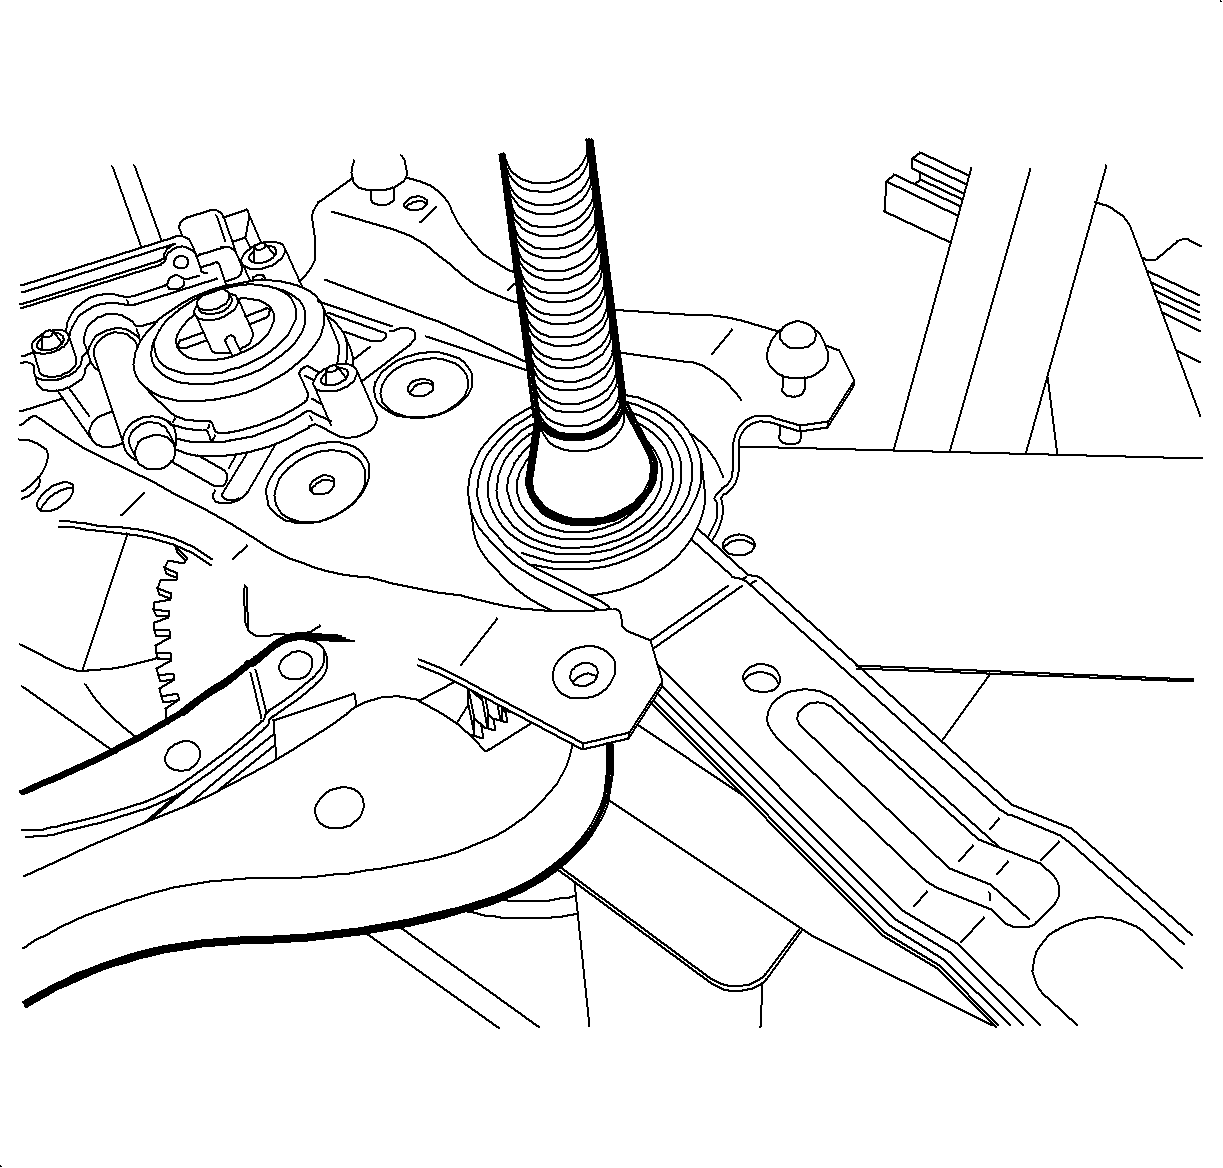
- Install C-clamp or C-clamp style locking pliers over
regulator spring with flat spot of upper leg located directly over center of spring.
Make C-clamp snug enough to stay in place. This will ensure the spring does not come
off regulator prematurely.
- Grab counter-balance spring mountain tab end with locking
pliers. Make sure the tension is tight. While holding regulator with one hand, carefully
pry back spring with locking pliers while raising spring enough to allow the tab to
clear backing plate side, carefully lower spring and gradually relax spring tension
to let spring tab rest on backing plate side.
- Remove C-clamp or C-clamp style locking pliers previously installed.
Important
When cycling window regulator, make sure
window regulator id pointing in a direction away from anything that lift arm(s) and
sash bar may contact.
- Carefully cycle window regulator back to position previously marked.
- On Manual Windows
- Hold regulator backing plate with one hand and crank window regulator
to position previously marked.
- Remove handle from regulator.
- On Power Windows
- Make sure the ignition is in the RUN position
- If working on rear door, make sure rear door power window switch is connected
to wiring harness.
- While hold the window regulator motor with one hand, connect wiring harness
connector to motor and carefully cycle regulator to position previously marked and
disconnect wiring harness connector.
- Install the window regulator mounting bolt located
closest to counter-balance spring mounting tab wrapped around backing plate. Only install bolt far enough to remain in backing plate allowing enough
clearance for door structure to fit between bolt head and backing plate.
- For Manual Windows,
continue to step 25.
- For Power Windows,
route power window wiring
harness back into door and secure wiring harness retainer into door structure. Make
sure wiring harness routing is correct so it does not interfere with window regulator
movement.
- Install window regulator assembly.
- On 2000 and 2001 models, refer to "Front Door Window Regulator Assembly"
installation procedure in Doors/Windows/Mirrors section of 2000/2001 S-Series Body/Electrical
(Volume I) service manual.
- On 1998 and 1999 models, refer to "Window Regulator Assy -- Front
Door" or "Rear Door Window Regulator/Motor -- Sedan/Wagon" installation procedure
in the Doors (BDDR) section of the 98-99 Body/Repair service manual.
- On 1997 models, refer to "Front Door Window Regulator/Motor" or "Rear
Door Window Regulator/Motor -- Sedan/Wagon" installation procedure in the Doors
(BDDR) section of the 1997 Body/Repair service manual.
- On 1996 models, refer to "Front Do Window Regulator/Motor -- Sedan/Wagon"
or "Rear Door Window Regulator/Motor" installation procedure in the Doors (BDDR) section
of the 96 Body/Repair service manual.
Important
When servicing a newer style regulator that
has the nuts attached to the backing plate, installation of the washers and nuts is
not necessary.
- From outside of door structure, install two washers (P/N 15650962)
and nut (P/N 11508277) to each window regulator bolt and tighten.
TightenTighten the window regulator fasteners to 22 N·m
(16 lb ft).
Important
Replace water deflector if damaged.
- Carefully install the water deflector. Make sure there are no creases left around
the door structure mounting surface. If creases are present, water leaks and/or dust
intrusion can result.
- Install door trim panel.
- On 2000 and 2001 models, refer to "Front Door Trim Panel" installation
procedure in the Door/Windows/Mirrors section of the 2000/2001 S-Series Body/Electrical
(Volume I) service manual.
- On 1997-1999 models, refer to "Front Door Trim Panel" or "Rear Door
Trim Panel -- Sedan/Wagon" installation procedure in the Doors (BDDR) section
of the appropriate made year Body/Repair service manual.
- On 1996 models, refer to "Front Door Trim Panel -- Sedan/Wagon" or
Rear Door Trim Panel -- Sedan/Wagon " installation procedure in the Doors (BDDR)
section of the 96 Body/Repair service manual.
- Install door insulator assembly.
- On 2000 and 2001 models, refer to "Front Door Insulator" installation
procedure in the Doors/Windows/Mirrors section of the 2000/2001 S-Series Body Repair
service manual.
- On 1998 and 1999 models, refer to "Door Insulator" installation procedure
in the Doors (BDDR) section of the 98-99 Body/Repair service manual.
- On 1996 and 1997 models, refer to "Door Sound Deadener Panel" installation
procedure in the Door (BDDR) section of the appropriate model year Body/Repair service
manual.
- Install door outer panel.
- On 2000 and 2001 models, refer to "Front Door Outer Panel -- Coupe"
installation procedure in the Doors/Windows/Mirrors section of the 2000/2001 S-Series
Body/Electrical (Volume I) service manual.
- On 1996-1999 models, refer to "Front Door Outer Panel -- Sedan
and Wagon," Front Door Outer Panel -- Coupe" or "Rear Door -- Outer Panel"
installation procedure in the Doors (BDDR) section of the appropriate model year Body/Repair
service manual.
- Function window to full up and full down positions to ensure proper operation.
Part Requirement
21171344
| Spring - Frt S/D Wdo Reg C/Bal (Sedan/Wagon)
|
21171345
| Spring - Rr S/D Wdo Reg C/Bal (Sedan/Wagon)
|
21171493
| Spring - Frt S/D Wdo Reg C/Bal (Coupe)
|
15650962
| Washer - Metric Flat
|
11508277
| Nut
|
Claim Information
To receive credit for this repair during the warranty coverage period, submit
a claim through the Saturn Dealer as follows:
Case Type
| Description
| Labor Operation code
| Time
|
VW
| Replace Right Front Door Window Regulator Counter-Balance Spring
| Z4027
| 1.3 hrs.
|
VW
| Replace Left Front Door Window Regulator Counter-Balance Spring
| Z4028
| 1.3 hrs.
|
VW
| Replace Right Rear Door Window Regulator Counter-Balance Spring
| Z4029
| 1.3 hrs.
|
VW
| Replace Left Rear Door Window Regulator Counter-Balance Spring
| Z4030
| 1.3 hrs.
|
ADD
| For Power Windows
| | 0.1
|
GM bulletins are intended for use by professional technicians,
NOT a "do-it-yourselfer". They are written to inform these
technicians of conditions that may occur on some vehicles, or to
provide information that could assist in the proper service of a
vehicle. Properly trained technicians have the equipment,
tools, safety instructions, and know-how to do a job properly and
safely. If a condition is described, DO NOT assume that the
bulletin applies to your vehicle, or that your vehicle will have
that condition. See your GM dealer for information on whether
your vehicle may benefit from the information.
|

|
WE SUPPORT VOLUNTARY TECHNICIAN CERTIFICATION
|
© Copyright General Motors Corporation.
All Rights Reserved.